Environment
Retain Server for Linux (for Windows, see "Upgrade to Retain 3 latest Version (Retain Server on Windows)")
NOTE: If your Retain server is on Linux but you plan on running the Migrator tool from a Windows machine, you'll want to follow the instructions for running the Migrator on Windows and then refer back to this article to complete the upgrade on your Linux server (see the "UPGRADE (LINUX") section that follows "MIGRATION (LINUX)".
Situation
Upgrade: Retain 2.x to Retain 3.x (Linux)
Resolution
This guide will help you to upgrade from Retain 2.6.2 to Retain 3.5.1, and go through the migration process of the data. There are a few things to understand prior to installing Retain 3.5.1:
- If running Retain 1.x, then you must update to Retain 2.6.2 first before going to 3.x.
- If running an earlier version of Retain 2.6.2, you first need to upgrade to Retain 2.6.2 first before starting the migration due to some minor database schema updates it provides, which are vital to the succes of the migrator tool.
- This guide does not go through the process of upgrading from another version of Retain 3. For those situations, see Upgrade: Retain 3.x to Retain 3.x (Linux).
- The upgrade process involves two major phases (data migration and software upgrade/schema change). If the RetainInstall.sh is executed, it will unzip the migrate3 folder and launch the BeginMigration.sh (starts up the migration tool). Once the migration tool has completed (hours, days, or weeks in some cases) and gets exited, the installer screen remains open and the upgrade process begins. Because the migration tool is a separate process, it can actually be launched as a standalone application. It does not have to be run on the Retain server, but it does need access to Retain database. If the database resides on a different server from Retain, a customer may choose to run the migration tool on the database server for performance reasons since it will not have to process over the network.
- Access to data and messages from Retain 2.6 will be FULLY available during the migration process. Users will be able to view their messages and archive jobs can still run at the same time (although we strongly advise against running archive jobs during the migration in order to minimize potential issues).
- License: A new license is required for Retain 3. Go to http://licenses.gwava.com and enter in the validation key for Retain 3. This new license will need to be uploaded at the end of the upgrade after logging in to the upgraded Retain system. For further questions on licensing please contact the sales representative in the area, or call 801-437-5678 for assistance.
- Avoid using PuTTY for Retain for Linux installations, if possible, for launching the migrator. PuTTY is subject to disconnections; and, when that happens, the migrator gets terminated. Run the migration from the local box. The exception to this if you are comfortable using the Linux "screen" command.
If you wish to have a Retain expert perform the migration and upgrade for you, GWAVA offers professional services. See your GWAVA territory executive or our inside sales team for more information.
Pre-migration Preparation
1. Ensure that the Retain installer has access to the ASConfig.cfg file.
The ASConfig.cfg contains the Retain configuration information (configuration and message store database location and credentials, mailer configuration, etc). It is located off the retain program directory:
/opt/beginfinite/retain/RetainServer/WEB-INF/cfg
If the installer is run on the same machine and drive as where the ASConfig.cfg is stored, it should find it. If running the installer from a different drive or server from Retain (which is possible for the migration phase of the upgrade), then copy the ASConfig.cfg to the local drive from which you are running the installer and remember that path - the installer will prompt for it.
2. Prepare the machine from which you are performing the migration by ensuring access to necessary resources:
a. Retain database.
b. SMTP gateway (for email status messages). If it cannot send an email to your messaging system, the migrator will fail to proceed and will return an error.
c. Internet (Retain installs the necessary version of Java on Linux or opens a web page on Windows for the install)
The migrator requires at least 1G, but we've watched it use much more. We recommend providing it with a minimum of 4G if possible - 8G would be optimal for larger systems. If you decide to allow Retain to continue running during the migration so that users can access their mailboxes, then tomcat's memory usage has to factor in as well. In such cases, you may want to tone down tomcat's memory usage to 2G during the migration and then bump it back up afterwards. Click here for Linux instructions. For Windows, simply run Apache's Configure Tomcat program and click on the Java tab. Restart tomcat after making changes.
Thus, this requires some planning. If running on the Retain server, the Retain server will need its normal RAM already being allocated to tomcat. Now the Migrator needs RAM. All these things need to be kept in mind, as we have seen a few customers' migration halt because of insufficient Java memory for the Migrator.
Memory allocation for the migrator can be configured in a configuration file within its install directory. More about that during the installation steps. For now, just be sure that the machine it runs on has enough for its normal processing plus an additional 1 - 8 GB for the migrator (again, we recommend 8 GB if you can pull it off).
If your database system is running on the Retain server and you are running the migrator on the server, factor in RAM for the database. See "Prepare your database server".
What you want to avoid is Java or your database using swap space (Linux) or Page File (Windows) access, which is where the OS swaps memory to disk to make room for other processes. When the migrator needs access to information in memory that has been swapped to disk, now you've slowed it down. On Linux, run the top command and look at how much swap is used. On Windows, you want to watch for "hard faults" (or "page faults"). Hard faults occur every time the OS or an application needs to access a block of memory from the page file on disk (slow) rather than from the physical memory (fast).
3. Prepare your database server.
a. Ensure the database server has sufficient disk space.
We have seen some databases grow by up to 100 - 200% after the upgrade. Rather than cut it close, be sure to have double or triple the disk space of your current database size as available disk space. For example, if your database is 100G, have at least 100G free space, preferably 200G free. This does not include the space needed for Retain storage (for those running the database on the Retain server).
For MySQL, add a tmpdir setting to the /etc/my.cnf that points to a volume where the database resides or where there is available disk space that is at least the size of the Retain database. The setting should read: tmpdir = /[path]. You'll also have to make sure that MySQL is the owner of this temp directory and that it has 774 permissions to it. This helps prevent errors when the migrator creates indexes.
Same goes for MS SQL and Oracle. Be sure to notify your DBA of your plans to migrate the Retain database and let him/her know that it will need the disk space. In Oracle, this is called tablespace and it is critical that it be doubled or tripled.
b. Ensure the database server has sufficient RAM.
Databases can load tables into RAM, which is faster access that disk. If you can provide 18 GB for the database, that will really help. The bigger the table sizes on disk, the more RAM you might want to give it if you can. The migration can proceed just fine without this... it will just take longer... perhaps as much as twice as long or more.
MySQL Memory Tuning
MySQL has to be instructed on how much memory it can use as its "innodb_buffer_pool". Again, 18 GB would be optimal (should not need more than that unless you have huge tables that are larger than that). If you my.cnf does not include the innodb_file_per_table setting, then you will not know how large each table is on disk because all of the table data will be in the ibdata1 file. If you do have that set, change into the "retain" (or whatever your Retain database name is) directory and look at the .ibd files). For more discussion on the innodb_buffer_pool or innodb_file_per_table settings, see "MySQL Database Maintenance for Best Performance".
MS SQL Memory Tuning
By default, MS SQL will use all available RAM on the server. If MS SQL is on the Retain server, then you should tame its memory usage. See, "How to: Set a Fixed Amount of Memory (SQL Server Management Studio)" for SQL Server 2008. There are similar articles for other versions. If it is not on the Retain server, then you probably don't need to worry about it's memory. Your DBA should know how to optimally configure MS SQL.
Oracle
Without fail, any customer using the powerful Oracle database has a DBA that administers it. Be sure to let your DBA know that you are performing this migration and show him/her this article so they can properly prepare the database.
c. For Oracle systems: Increase the cursors to at least 1,000.
d. For MySQL, it must be at version 5.5.x to be able to run Retain 3.x.
Note: SQL databases and data storage systems are not supported or administered by GWAVA Inc., and are the responsibility of the local system administrator and the customer.
To upgrade MySQL, refer to this KB article, "Upgrading MySQL".
e. Check your Retain database for the existence of an index on the recip_id column in the t_recp_properties table.
On some systems, this index does not exist and this dramatically slows down the migration when it gets to the "Recipients" phase.
Be sure that you have plenty of disk space before creating the index. You will also need a tmpdir setting in your my.cnf to a volume (like your database volume) with plenty of available space (the size of your database). Reference substep #a under this Preparation section.
Here is how to check for the index on MySQL and MS SQL. Oracle is purposely left out because DBAs know how to do this.
MySQL
Logon to MySQL and run this query: show indexes from [database name].t_recp_properties \G
EXAMPLE: show indexes from retain.t_recp_properties \G
If missing, create it with this query: CREATE INDEX idx_recip_id ON t_recp_properties (recip_id);
MS SQL
In SQL Server Management Studio, expand "Databases", expand your Retain database, expand dbo.t_recp_properties, and then expand "Indexes".
If missing, create it with this query:
GO
CREATE NONCLUSTERED INDEX [idx_recp_value]
ON t_recp_properties ([recip_id])
INCLUDE ([value])
f. OPTIONAL (but recommended): Check for database index fragmentation and rebuild tables or indexes if necessary.
If you are not performing the migration for several days, then this can improve the performance of the database migration. If you are doing the migration immediately, the time it takes to perform these tasks may not be worth the benefit unless you have a very large database and a high fragmentation percentage.
For the migration, there are only a few tables you need to be concerned with:
- attachment
- Document
- t_msg_properties
- t_recipients
- t_recp_properties
MySQL Instructions
See KB article, "MySQL Database Maintenance for Best Performance", for steps on how to rebuild the indexes. If you had to upgrade MySQL for this migration, then this step is unnecessary altogether. The MySQL upgrade process resolves any fragmentation by the very fact that you are importing a dump of your old database into the new database. The indexes get created anew while the data gets imported.
MS SQL Instructions
For those using MS SQL, you can run the following query to check for table fragmentation within your retain database:
SELECT
OBJECT_NAME(object_id),
index_id,
avg_fragmentation_in_percent,
fragment_count,
avg_fragment_size_in_pages
FROM sys.dm_db_index_physical_stats(DB_ID('retain'), NULL, NULL, NULL , 'LIMITED')
order by avg_fragmentation_in_percent desc;
Or, you could expand the table object in SQL Server Management Studio, expand the indexes folder, and double click on each index. It will give you the fragmentation percentage. If you need to rebuild any indexes, you simply would right-click on the index and choose the option to rebuild.
Oracle
Your Oracle DBA will know what to do.
g. OPTIONAL: Disable transaction logging.
Database transaction logs are a backup of every database transaction committed to the database. If your database were to become corrupted or the disk on which it resides were to fail, you could restore your latest backup and then add all of the transactions that transpired since the last backup.
Since you already have a backup of the database and/or the VM, then transaction logging would not be needed during the database migration. If something were to go wrong, the migration can be easily reversed. These transactions logs can consume a lot of disk space and have caused some customers to run out of disk space. Just remember to re-enable transaction logging when the migration has completed!
For MySQL users, we have seen a lot of customers with dozens of transaction logs. Each of those logs can be up to 1G in size, so they easily consume GIGABYTES of valuable space. If you are backing up the disk where your database data is stored on a regular basis (for most at least weekly), then we recommend expiring those transaction logs after that period of time. So if I were doing weekly backups of the database disk, I would set the expiration of the transaction logs to 7 days. To do that, you simply add a line to your /etc/my.cnf that reads:
expire_logs_days = X (where X is the number of days)
MySQL 5.5
Edit the /etc/my.cnf. Comment out the line that reads "log-bin=mysql-bin" so that it reads "#log-bin=mysql-bin". Just be sure to restore this after the migration is complete.
MS SQL
Go into the properties of the retain database and change its recovery model to "Simple". See "View or Change the Recovery Model of a Database (SQL Server)". Just be sure to restore this after the migration is complete.
Oracle
Yes, you guessed it... your DBA will know what to do.
4. Download the the latest Retain 3.5.1 package.
a. Go to: http://download.gwava.com/download.php?product=Retain&version=current
b. Copy the downloaded zip file:
a) To the Retain server.
b) To every mail server (if any) running a RetainWorker.
c) To the machine from which you are running the migration (if different from the Retain server).
c. Unzip the Retain zip file that was downloaded.
d. Make all of the installation scripts executable by typing: chmod +x *.sh
5. Make sure to have a backup of the database and of the Retain system. See KB article, "Backing Up Retain".
6. OPTIONAL: Guestimate the migration time.
There are several factors that play key roles in how long the migration will take, so it is impossible to estimate to the day. Disk I/O, RAM, database configuration, the number of records stored, and the nature of the data in those records. So, we will give you ROUGH idea. This is a rough idea based on two key tables: t_msg_properties and t_recipients. When you run the migration, t_msg_properties will likely take the longest. For example, on a system with approximately 188 million records in t_msg_properties and 195 million in t_recipients, it took over 4 days on Message Properties alone and only one day on Recipients. Why? Because there is a lot of data normalization being performed on the records - it is not just a straight copy from the old table to the new one.
|
Number of Records |
Estimated Days |
|
0 - 100 million |
1 - 3 |
|
100M - 600M |
3 - 10 |
|
600M - 999M |
7 - 14 |
Here is how you get the record count:
MySQL
You can run a query that will give you the sizes of all your tables. What gets returned will be a general record count as it depends upon MySQL updating its record counts in its information_schema.tables. In an in-house test system, it was off by 25%:
"MySQL Query for Table Record Count (All Tables)".
If you want to be assured of the most up-to-date record count, you could focus on a couple of key tables as mentioned previously by running the following queries (where "retain" is the database name - modify this if yours is named differently):
SELECT COUNT(id) FROM retain.t_msg_properties;
SELECT COUNT(recipient_id) FROM retain.t_recipients;
MS SQL
Run the following queries in SQL Studio (where "retain" is the database name - modify this if yours is named differently):
SELECT COUNT(id) FROM retain.dbo.t_msg_properties;
SELECT COUNT(recipient_id) FROM retain.dbo.t_recipients;
MIGRATION (LINUX)
1. Launch the migration tool: ./InstallRetain3Migrator.sh
It installs Java 6 if not installed (but requires Internet access).
It creates a subdirectory off the main Retain 3 installation directory called "migrate3", which will contain the migrator tool and its configuration files, etc.
Shuts down tomcat5 if it is running.
Leaves Retain 2.x completely unchanged.
Creates a file named "MigrateConfig" in the migrate3 directory. This file configures the memory space for Java.
It displays the aforementioned information as well as the contents of MigrateConfig, which sets up the variables JAVA_HOME and JAVA_OPTS.
2. At this point, it prompts with, "Run Migration Program?" Respond with "N" for "no".
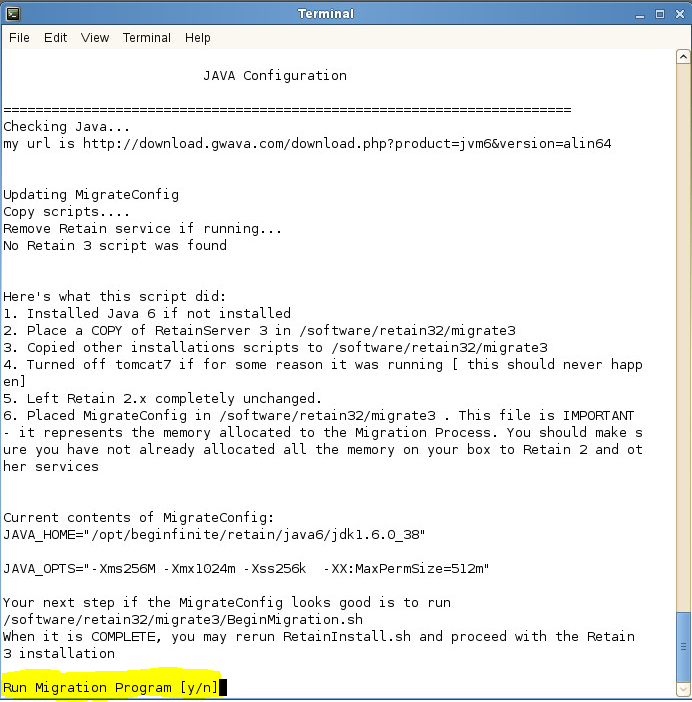
At this point, you need to increase the Java memory pool if you have it available (see the memory discussion under the Preparation section). Step #1 unzips and creates the staging directory (migrate3 directory), which now allows you to change its configuration.
a. Change directories: [Retain 3.x installation directory]/migrate3
b. Edit MigrateConfig (it is an executable file, so be sure to EDIT and not OPEN).
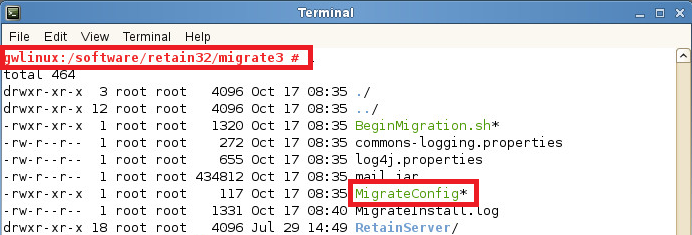
c. On the second line beginning with, "JAVA_OPTS=", change the values for "Xms256M" and "Xmx1024m" to read respectively:
"Xms4096M" and "Xmx4096m". This assumes you have sufficient memory leftover for the Retain server, database server, or other machine from which you are running the migrator.
If you can give it up to 8 GB, then do that. You don't have to use the "m" (megabyte) designator. You can specify this value in gigabytes (e.g., 8G).
BEFORE:
This sets the minimum and maximum Java memory heap value to 4G each. This will not work if you do not have 4G free memory on the machine (and you'll want to reserve at least 2 GB free memory for the OS), so be sure to check that before proceeding.
If you are running the Migrator on the Retain server and you do not have 4G free, see how much is allocated to Tomcat and consider lowering it TEMPORARILY to free up space for the migrator. See "How to Adjust the Tomcat Memory Settings on Linux"; however, the ideal solution would be to add memory to the server itself.
d. Save your changes.
3. From the migrate3 directory, launch BeginMigration.sh: ./BeginMigration.sh
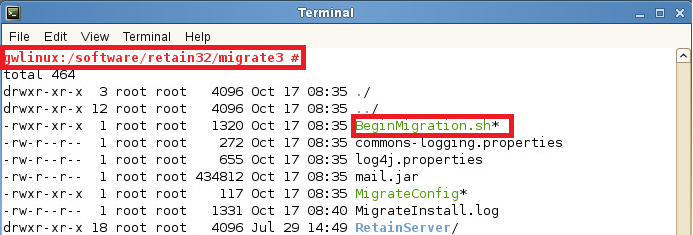
4. Type "y" to run the migration tool.
It displays some information, including the name of the log file to which it will write.
It then displays a few paragraphs of important information about the migration tool. Read this closely.
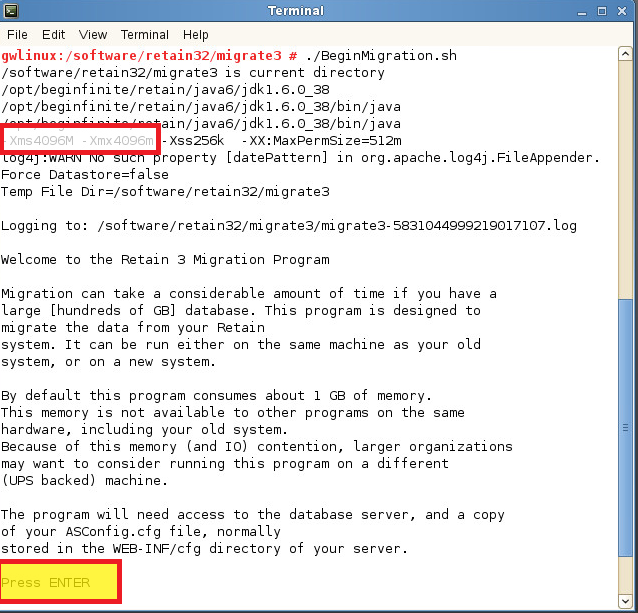
5. Press the ENTER key as prompted after reading over the welcome message.
It will pause for a few seconds and display some information to read.
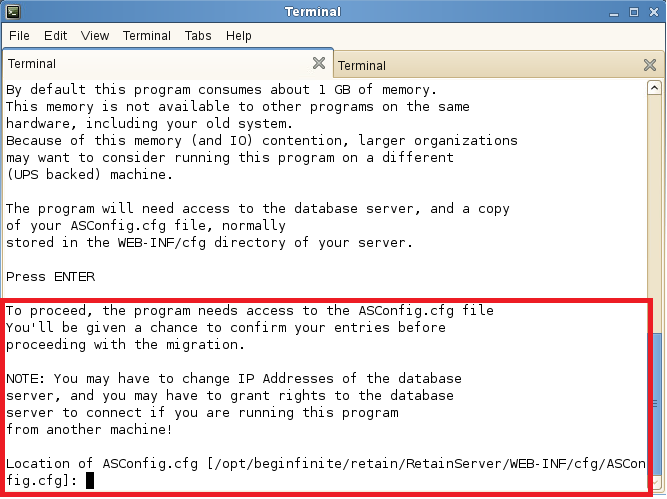
It searches for the asconfig.cfg in the /opt/beginfinite/retain/RetainServer/WEB-INF/cfg directory. It if cannot find it, it will prompt you to enter the path of where it is located. If you are running this on the Retain server, you should not get this prompt, but this is what it would look like.
If that is correct, press ENTER; otherwise, type in the path to where you copied the ASConfig.cfg.
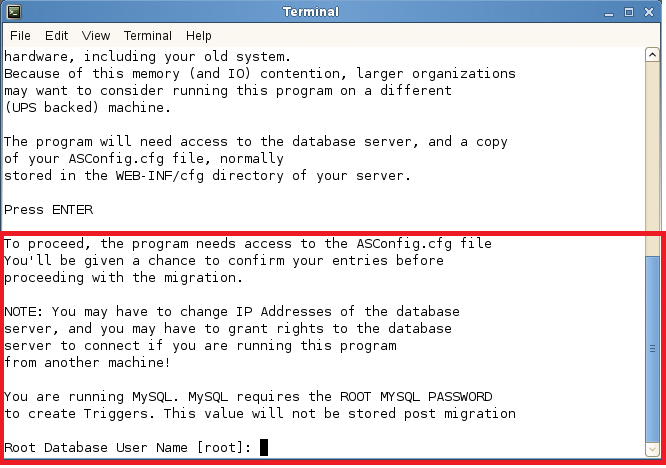
6. It prompts for the root database user name. If "root" (default), press ENTER; otherwise, enter the appropriate value.
7. It prompts for the root password.
Type in the correct value and press ENTER to continue.
8. It prompts whether you want to run the GUI.
If wanting the GUI interface and if running under a GUI session of Linux (runlevel 6, X-Windows, or VNC), type "y" and hit ENTER; otherwise, press ENTER to continue in a console session.
9. The next prompt is the Refresh Stats Interval. Enter desired value and press ENTER.
This determines how often (in seconds) the screen refreshes with updated migration statistics (5 minimum, 600 maximum). It defaults to 15 seconds.
10. Press ENTER to except the default value ("n") for "Exit automatically when migrated item count hits zero".
It then displays pertinent information from the ASConfig.cfg that it found. In most situations, you will not need to change this; however, look over the settings and ensure they are accurate. If not, this is your chance to change them by selecting the setting from the menu.
Do check to make sure the Mailer information is configured. The migration will not continue until the "Server", "From" and "To" fields have data. While it is recommend that this information be valid (so that you can receive email status notifications), it does not require that the data be valid in order to proceed.
If you do need to change a setting, type the menu selection number for that setting and press ENTER. It will prompt you with each setting one-by-one. If a particular line item does not need to be changed, simply press ENTER on it to keep it at the default value; otherwise, type in the new setting and press ENTER.
11. Type "5" and press ENTER, which activates the menu item, "5. Proceed with Migration" when ready.
It will test the connectivity, upgrade the schema, check the database version, disable deletion jobs, and check mail parameters.
12. Press ENTER.
13. The migration now begins.
If the GUI option was chosen, a Java app opens and shows the progress. It contains three tabs: Logs, Statistics, and Errors. The errors tab will be blank unless there are errors.
If the GUI was not chosen, it will display the stats in the terminal window.
During the migration, statistics will show on how many messages are being archived. It will also include each table that is being migrated. The time it takes to make changes to each of the tables will also display. Please do not close out of this process as it will stop the migration.
The migration can take a long time, depending on the size of the database. It can take hours, days, or weeks. We've seen database sizes of 190G take 3 days, but there are too many environment factors involved to predict.
Users will be able to use Retain fully during this migration process. In fact, archive jobs can even be run during the migration process; however, we recommend disabling archive jobs during the migration. We've had several instances where running archive jobs during the migration caused database racing conditions and the migration tool stopped. It can easily be restarted, but it is best to avoid potential issues, so we recommend disabling the jobs.
If the migrator crashes or freezes for some reason, you should be able to just run it again and it will pick up from where it left off. It keys off the migration3Resume.xml in the Migrate3 directory. If that file is missing, the migration program will not allow the process to be run again.
During the migration, if any errors occur, fix the errors. The migration log in the Migrate3 directory will indicate the issues. Fix the errors and run the job again by running BeginMigration.sh. Again, the migration will pick up from where it left off.
If you run out of space on the system, it is best to revert the database back to 2.x, correct the space problem and run the migration again. Lack of disk space may cause issues where data or tables are missing and the migration piece may not run efficiently after that. Restoring the database from a backup is required at this point. For further assistance with this please contact GWAVA support.
If you must revert back and start all over, check the ASConfig.cfg in the ../RetainServer/WEB-INF/cfg directory. The "<storageEngine>" parameter must be set back to "standard" before proceeding as the migration changes it to "database_process".
14. First pass completes.
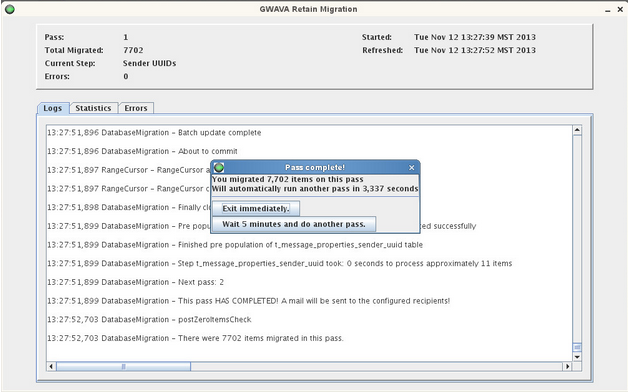
Once the migration is finished it will show a total number of messages migrated in the pass (per the screenshot above from a small test system, it reads, âThere were 7,702 items migrated in this passâ).
The GUI also presents two buttons: "Exit immediately" and "Wait 5 minutes and do another pass".
The terminal screen will read:
There were [number] items migrated in this pass.
1. Exit immediately.
2. Wait 5 minutes, then do another pass.
You have 1 hour to respond, or option 2 will be selected for you. Please make a choice [1-2]:
After the first pass has completed, you'll want to either leave it alone (thus automatically making another pass within an hour), choose the "Wait 5 minutes..." option, or choose "Exit immediately".
If archive jobs were not running during the migration or if Tomcat was shut down during this entire time, then exit immediately; otherwise, shut down tomcat or disable your jobs and make another pass.
Exiting the program will cause it to delete the migration3Resume.xml file, which it uses to keep track of what data has been migrated. If this file gets deleted, all the migrated tables will have to be dropped from the database an the migration will need to be run all over again IF archive jobs have run since the migration began. If the Migration process is finished before messages are migrated, they will not be visible within the new database14. If not already done before starting the migration, disable all archive jobs and user access to Retain.
Make sure a job is not running or is finished before exiting and finishing the migration process. Any data that is not migrated will not be visible to the new system.
15. Click on the "Exit immediately" button when you are sure all data has been migrated (that no new data was added by an archive job while the migration was running).
The same buttons appear after the second pass has completed as when the first pass finished. Once you click on "Exit immediately", the program will ask if you are sure. Respond by clicking on "Yes".
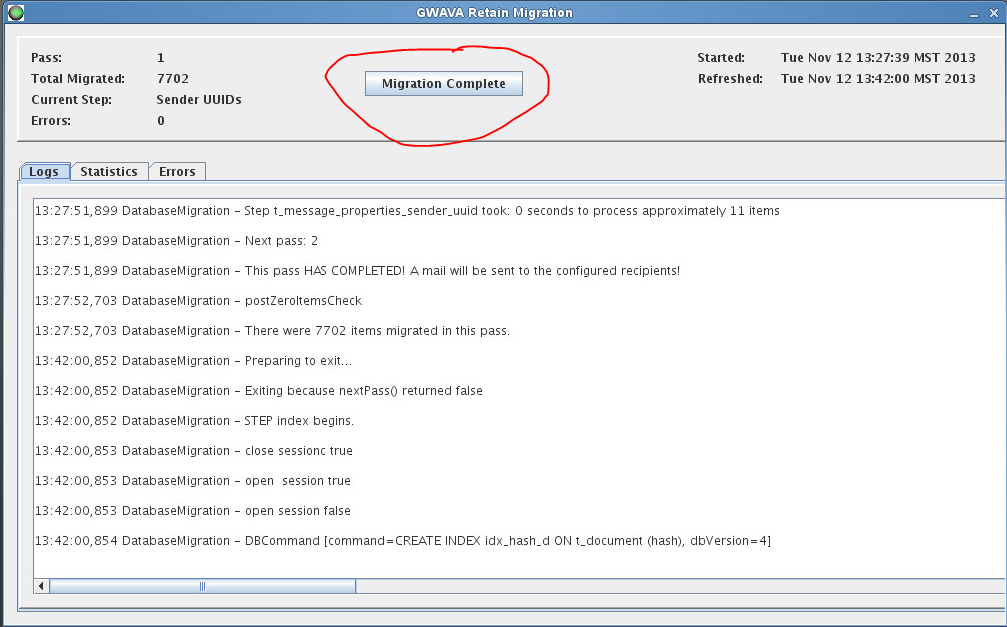
At this point, the Migrator is not yet done, but close. It now issues some commands to the database to create several indices. Depending on the size of your system, this can take a few hours. Here's an example of the commands, which will appear in the migration log. Note that this was done on a small test system, so its timing will not reflect the reality of a larger live system:
11:35:51,783 DatabaseMigration - DBCommand [command=CREATE INDEX idx_hash_d ON t_document (hash), dbVersion=4]
11:35:52,053 DatabaseMigration - DBCommand [command=CREATE INDEX idx_tag_d ON t_document (tagID), dbVersion=4]
11:35:52,123 DatabaseMigration - DBCommand [command=CREATE INDEX idx_refcount_d ON t_document (f_referenceCount), dbVersion=4]
11:35:52,172 DatabaseMigration - DBCommand [command=CREATE INDEX idx_message_natural_id_m ON t_message (message_natural_id), dbVersion=4]
11:35:52,233 DatabaseMigration - DBCommand [command=CREATE INDEX idx_thread_m ON t_message (f_thread), dbVersion=4]
11:35:52,285 DatabaseMigration - DBCommand [command=CREATE INDEX idx_uuid_relevant_m ON t_message (uuid_mapping_id, f_relevantDate), dbVersion=4]
11:35:52,341 DatabaseMigration - DBCommand [command=CREATE INDEX idx_fid_uuid_rel_m ON t_message (folder_id,uuid_mapping_id, f_relevantDate), dbVersion=4]
11:35:52,394 DatabaseMigration - DBCommand [command=CREATE INDEX idx_indexed_m ON t_message (f_indexed), dbVersion=4]
11:35:52,444 DatabaseMigration - DBCommand [command=CREATE INDEX idx_stored_m ON t_message (f_stored), dbVersion=4]
11:35:52,497 DatabaseMigration - DBCommand [command=CREATE INDEX idx_uuid_parent_f ON t_folder (uuid_mapping_id, parent_id), dbVersion=4]
11:35:52,544 DatabaseMigration - DBCommand [command=CREATE INDEX idx_refcount_r ON t_recipient (f_referenceCount), dbVersion=4]
11:35:52,593 DatabaseMigration - DBCommand [command=CREATE INDEX idx_refcount_v ON t_value (f_referenceCount), dbVersion=4]
11:35:52,649 DatabaseMigration - DBCommand [command=CREATE INDEX idx_natkey_td on t_tagdefs (f_natural), dbVersion=5]
11:35:52,685 DatabaseMigration - DBCommand [command=CREATE INDEX idx_crea_scope_td on t_tagdefs (uuid_mapping_id,f_scope), dbVersion=5]
11:35:52,717 DatabaseMigration - DBCommand [command=CREATE INDEX idx_scope_td on t_tagdefs (f_scope), dbVersion=5]
11:35:52,753 DatabaseMigration - Step index took: 0 seconds to process approximately 16 items
Here's an example of a customer's index creation phase of the migration who was using an Oracle 10 database using the migration utility from Retain 3.2.1.2:
2014-07-09 11:03:22,632 DatabaseMigration - DBCommand [command=CREATE INDEX fk_message_id_mp ON t_message_properties (message_id), dbVersion=4]
2014-07-09 12:14:16,762 DatabaseMigration - DBCommand [command=CREATE INDEX fk_name_id_mp ON t_message_properties (name_id), dbVersion=4]
2014-07-09 13:44:00,613 DatabaseMigration - DBCommand [command=CREATE INDEX fk_value_id_mp ON t_message_properties (value_id), dbVersion=4]
-BREAK-
2014-07-10 14:40:12,261 DatabaseMigration - DBCommand [command=CREATE INDEX fk_message_id_mr ON t_message_recipients (message_id), dbVersion=4]
2014-07-10 14:57:28,539 DatabaseMigration - DBCommand [command=CREATE INDEX fk_recipient_id_mr ON t_message_recipients (recipient_id), dbVersion=4]
2014-07-10 15:21:34,647 DatabaseMigration - DBCommand [command=CREATE INDEX fk_folder_id_m ON t_message (folder_id), dbVersion=4]
2014-07-10 15:23:28,889 DatabaseMigration - DBCommand [command=CREATE INDEX fk_parent_id_m ON t_message (parent_id), dbVersion=4]
2014-07-10 15:24:26,722 DatabaseMigration - DBCommand [command=CREATE INDEX fk_message_id_ma ON t_message_attachments (message_id), dbVersion=4]
2014-07-10 15:27:50,581 DatabaseMigration - DBCommand [command=CREATE INDEX fk_document_id_ma ON t_message_attachments (document_id), dbVersion=4]
2014-07-10 15:31:18,070 DatabaseMigration - DBCommand [command=CREATE INDEX fk_ds_container_id_dsr ON t_dsref (entity_id), dbVersion=4]
2014-07-10 15:32:48,070 DatabaseMigration - DBCommand [command=CREATE INDEX fk_uuid_mapping_id_r ON t_recipient (uuid_mapping_id), dbVersion=4]
2014-07-10 15:32:58,070 DatabaseMigration - DBCommand [command=CREATE INDEX fk_parent_id_f ON t_folder (parent_id), dbVersion=4]
2014-07-10 15:32:59,070 DatabaseMigration - DBCommand [command=CREATE INDEX fk_uuid_mapping_id_t ON t_tagdefs (uuid_mapping_id), dbVersion=4]
2014-07-10 15:32:59,215 DatabaseMigration - DBCommand [command=CREATE INDEX fk_tag_id_mt ON t_message_tags (tagdef_id), dbVersion=5]
2014-07-10 15:32:59,220 DatabaseMigration - DBCommand [command=CREATE INDEX fk_message_id_mt ON t_message_tags (message_id), dbVersion=5]
2014-07-10 15:32:59,225 DatabaseMigration - DBCommand [command=CREATE INDEX fk_uuid_mapping_id_tt ON t_message_tags (uuid_mapping_id), dbVersion=4]
2014-07-10 15:32:59,230 DatabaseMigration - DBCommand [command=CREATE INDEX idx_hash_d ON t_document (hash), dbVersion=4]
2014-07-10 15:36:24,417 DatabaseMigration - DBCommand [command=CREATE INDEX idx_tag_d ON t_document (tagID), dbVersion=4]
2014-07-10 15:37:34,232 DatabaseMigration - DBCommand [command=CREATE INDEX idx_refcount_d ON t_document (f_referenceCount), dbVersion=4]
2014-07-10 15:39:01,398 DatabaseMigration - DBCommand [command=CREATE INDEX idx_message_natural_id_m ON t_message (message_natural_id), dbVersion=4]
2014-07-10 15:41:52,536 DatabaseMigration - DBCommand [command=CREATE INDEX idx_thread_m ON t_message (f_thread), dbVersion=4]
2014-07-10 15:42:35,849 DatabaseMigration - DBCommand [command=CREATE INDEX idx_uuid_relevant_m ON t_message (uuid_mapping_id, f_relevantDate), dbVersion=4]
2014-07-10 15:44:15,763 DatabaseMigration - DBCommand [command=CREATE INDEX idx_fid_uuid_rel_m ON t_message (folder_id,uuid_mapping_id, f_relevantDate), dbVersion=4]
2014-07-10 15:46:17,468 DatabaseMigration - DBCommand [command=CREATE INDEX idx_indexed_m ON t_message (f_indexed), dbVersion=4]
2014-07-10 15:48:01,336 DatabaseMigration - DBCommand [command=CREATE INDEX idx_stored_m ON t_message (f_stored), dbVersion=4]
2014-07-10 15:49:19,242 DatabaseMigration - DBCommand [command=CREATE INDEX idx_uuid_parent_f ON t_folder (uuid_mapping_id, parent_id), dbVersion=4]
2014-07-10 15:49:19,379 DatabaseMigration - DBCommand [command=CREATE INDEX idx_refcount_r ON t_recipient (f_referenceCount), dbVersion=4]
2014-07-10 15:49:24,509 DatabaseMigration - DBCommand [command=CREATE INDEX idx_refcount_v ON t_value (f_referenceCount), dbVersion=4]
2014-07-10 15:51:50,522 DatabaseMigration - DBCommand [command=CREATE INDEX idx_natkey_td ON t_tagdefs (f_natural), dbVersion=5]
2014-07-10 15:51:50,528 DatabaseMigration - DBCommand [command=CREATE INDEX idx_crea_scope_td ON t_tagdefs (uuid_mapping_id,f_scope), dbVersion=5]
2014-07-10 15:51:50,534 DatabaseMigration - DBCommand [command=CREATE INDEX idx_scope_td ON t_tagdefs (f_scope), dbVersion=5]
2014-07-10 15:51:50,540 DatabaseMigration - Migration successful at: Thu Jul 10 15:51:50 EDT 2014
2014-07-10 15:51:50,540 DatabaseMigration - Moved resume file to: /tmp/Retain_3.2.1.1/migrate3/rtn9146309515331908914.log
2014-07-10 15:51:50,540 DatabaseMigration - Finally migrateDatebase()
As you can see, it took over 6 hours for his system.
16. When it is done, it will present you with a "Migration Complete" button. If you did not use the GUI, then there is no other option presented - it just drops you at the command prompt.
17. (GUI only) Click on the "Migration Complete" button.
You are now done with the longest/hardest part of the upgrade to Retain 3 - the migration phase. You are now ready to upgrade the Retain software.
UPGRADE (LINUX)
1. Once the migration is complete, the next step is to finish the Retain 3.x upgrade.
Change to the main Retain 3.x installation directory on the Retain server.
2. Upgrade the Retain software.
a. Execute RetainInstall.sh: ./RetainInstall.sh.
b. It brings up the license agreement. Please feel free to read through it thoroughly. For those that do not wish to, you can hit Q to quit out of the license verbiage and take you directly to the point where you can accept, reject, or re-read the license agreement.
c. At the next screen, you are then presented with four upgrade options. Choose option 3 - Yes, I'm upgrading from Retain 3.x and have completed data migration.
d. It will prompt and ask if you are certain. Since you have completed the migration, select option 1 to continue.
e. It then prompts for the modules you want to install. Here are our recommended responses:
- Retain Server - Y
- Retain Stubbing Server - N
- Retain Reporting & Monitoring Server - N
- Retain Worker - Y
- Retain Message Router - N
f. After a bit of installation routine, it will prompt you whether to upgrade while preserving the configuration or not. Go with the recommended option, #1.
g. It will complete the installation and leave you back at the command prompt. You are now done with the software upgrade. Now just a few more minor steps and you will have completed the entire project!
3. Open your web browser and go to the RetainServer site.
Log in to the Retain server web administration console. There are minor additional schema updates that take place at this pint. After a minute, or two, the window will change to prompt to restart Tomcat to complete the update.
4. Restart Tomcat.
5. Run the Retain installer on every mail server running a RetainWorker (if any) in order to upgrade the worker. If the Workers are local to the Retain Server, then this step is not necessary. They were upgraded during the normal upgrade process.
6. If you disabled database transaction logging before beginning the migration, you may want to re-enable it. Again, we recommend limiting the time period of those transaction logs to only cover the timeframe between backups.
7. If you disabled archive jobs (recommended) before beginning the migration, re-enable them.
8. After ensuring a successful migration by logging into Retain and making sure everything looks intact, you can dump your Retain 2 tables that were migrated. See How to Delete Retain 2 Tables from Retain 3 Database.
Congratulations! The migration and upgrade is complete!


