Environment
Situation
Reflection X 14.x enables you to create and run concurrent X server instances whose registry-based settings can be exported and shared with other users. You do this by creating a Windows shortcut that references a server instance (*.rxs) and a client connection (*.rxc) file. When double-clicked at a second machine, the shortcut updates the registry and starts the server instance and client under the X Manager.
This technical note describes how to create and export the X server setting, associate it with a client connection, and create the shortcut to start the two in the X Manager. The Windows shortcut you create can then be distributed for use by end users in any fashion available to you, including using Reflection Customization Manager.
For details on getting started with multiple X server instances, see KB 7021778.
Resolution
Important Notes:
- All machines using the shortcut should have identically mapped drives or Universal Naming Convention (UNC) mapping. This ensures that a Windows shortcut created on one machine can be shared with another without manually editing the shortcut's Target path for each machine.
- Attachmate continues to refine the X server instance functionality. This technical note will be updated as more information becomes available.
How to Share X Server Instances with other Machines
The example in this technical note follows three steps to share multiple X server instances with other users.
Step One â Create and Export the X Server Instance
In this section, you will create and optionally customize an X server instance, and then export the settings to an *.rxs file.
There are two ways to create a new X server instance. You can use one of the X server templates provided with Reflection X, or you can create and customize a new instance without using a template. Choose your preferred method and follow the corresponding steps to create and export the instance.
To create an instance using an X server template:
- In the Reflection X Manager, select an X Server Template in the lower left pane.
- Right-click the template and click Start. If Start appears dimmed, the server is already active, and you can simply proceed to the next step.
- In the Reflection X Manager, click File > New X Instance Settings. Enter a unique name for the new server instance. Click OK.
The new server instance inherits the settings of the active server and appears in the Reflection X Manager's list of X Server Instances.
- Start the new server instance and click Settings under X server management. To change any of the inherited settings, such as fonts or display, click the appropriate options on the Settings menu.
- Click File > Export X Instance Settings. In the Save to RXS File dialog box, type a unique name and save the file to a local folder (the default path is C:\Documents and Settings\<user>\My Documents\Reflection).
When prompted to complete the conversion, click Yes; then click OK in the confirmation box.
Or, to create a custom X server instance without using a template:
- In the Reflection X Manager, click File > New X Instance Settings.
- In the Create Settings dialog box, type a unique name and then click OK. This name is used to identify this instance of the X server.
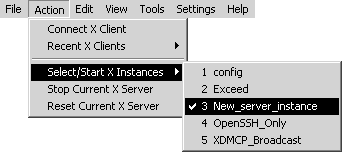
- Click Action > Select/Start X Server Instances and select the server instance you just created.
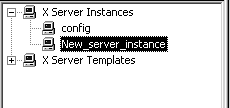
- In the lower left pane of the X Manager, expand X Server Instances and highlight the server instance you created in step 2.
- Click Settings under X server management. To customize any of the settings, such as fonts or display, click the appropriate options on the Settings menu.
- Click File > Export X Instance Settings. In the Save to RXS File dialog box, type a unique name and save the file to a local folder (the default path is C:\Documents and Settings\<user>\My Documents\Reflection).
When prompted to complete the conversion, click Yes; then click OK in the confirmation box.
Step Two â Create the Client Connection and Windows Shortcut
Follow these steps to associate a client connection with the currently-running server instance (from the steps above). Then, save this association in a Windows shortcut.
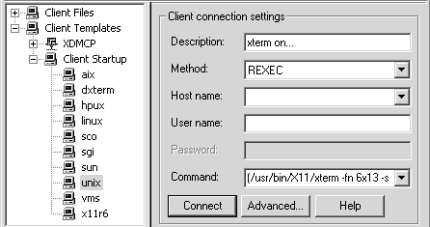
- In the upper-left pane of the Reflection X Manager, expand Client Templates and then Client Startup.
- Click a template, such as "unix", and configure options under Client connection settings (top-right pane) as needed.
- Click File > Save. In the Save As dialog box type a name for the client file. Click Save to exit this dialog box.
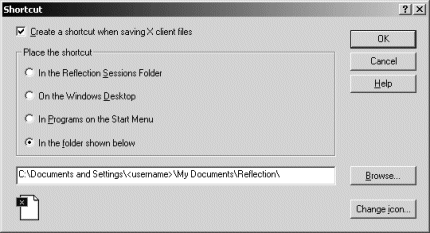
- Click File > Create Shortcut.
- In the Shortcut dialog box first select Create a shortcut when saving X client files, then select In the folder shown below. Save the shortcut to the same folder to which you saved the server instance (the default path is C:\Documents and Settings\<user>\My Documents\Reflection). Click OK to return to the Save As dialog box.
The shortcut you have created above references both the client connection and the server instance files. This means that this combination of server and client will start when the shortcut is double-clicked and the X Manager starts. However, you will need to remove machine-specific references in order to share this shortcut with other users. Follow the steps below to do this.
Step Three â Prepare the X Server Instance for End Users
You now need to edit the X Server instance to remove machine-specific information so that the shortcut can be shared with other users.
- Navigate to the folder containing the <serverinstance.rxs> file and open this file in any text editor such as Notepad. Then, remove the line containing the machine-specific IP address from the file (the following is an example of what this line looks like):
DetectedLocalAddress=150.123.45.67- Save and close this file.
- In the same folder right-click the Windows shortcut you created in step two and click Properties > Shortcut tab.
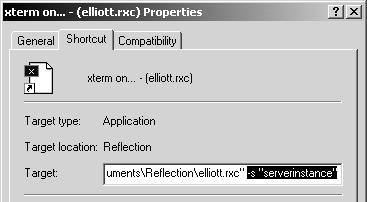
- The server instance reference is displayed as a registry value and does not include the required path or file extension:
To add the path and file extension, change this reference (-s "serverinstance") to include the full path to the file:
-s "C:\Documents and Settings\<user>\My Documents\Reflection\serverinstance.rxs"- Click OK to save this change and exit the dialog box.
Making the Server Instance Available to Other Users
The Windows shortcut can now be distributed using whatever deployment mechanisms are available. This might be as simple as email or more complex, involving for example Active Directory or SMS.
Note: When deploying shortcuts, the associated RXS and RXC files must be located on a shared server or distributed with the shortcut.
The shortcut can also be made available to an end user through Reflection Customization Manager. This is done using Customization Manager's Edit Product Shortcuts feature that enables you to add a shortcut to your customized installation of Reflection X (in this case, the shortcut is the one created above). When this shortcut is double-clicked on the end user's machine, the server settings are imported into the user's registry, Reflection X Manager starts, and the server instance and client connection is executed.
For more information, see the Reflection Deployment Guide, available at https://www.attachmate.com/docs/reflection/14.1/deploy.pdf.
Updating the Server Instance
Whenever the Windows shortcut you have created starts the X Manager the information in the server instance (*.rxs) and client connection (*.rxc) files is re-read and any changes applied to the machine's registry. This means that an administrator can update the server instance and client connection files and have these updates appear when the shortcut is double-clicked at the end user's machine.
To do this, edit the shortcut's Target field to reflect an identical shared network folder for both of these files. Be sure that each user's machine shares identically mapped drives or Universal Naming Convention (UNC) mapping as noted above.
