Environment
GWAVA Any Version
Running on Linux
Situation
Resolution
To move all of your data over from one Linux server to another do the following:
1) Install GWAVA on Linux or the appliance if planning on using the appliance. (Appliance install guide)
NOTE: If you want to have the new server keep the same IP as the original then give it a new one at this point.
2) Shut GWAVA down on both servers by running: rcgwavaman stop
3) Move the following directories from the original server to the new GWAVA server:
- /opt/beginfinite/gwava/config
- /opt/beginfinite/gwava/license
- /opt/beginfinite/gwava/services/smtp_mailer
- /opt/beginfinite/gwava/services/stats/data
- /opt/beginfinite/gwava/services/qms/data
- /opt/beginfinite/gwava/services/spam_queue (only required if Spam reporting is enabled)
- /opt/beginfinite/gwava/services/logs (optional)
A quick and easy way to move the data from the original GWAVA server to the new one is to go to the directory that has the data you want moved and use a scp command to move it to the new server.
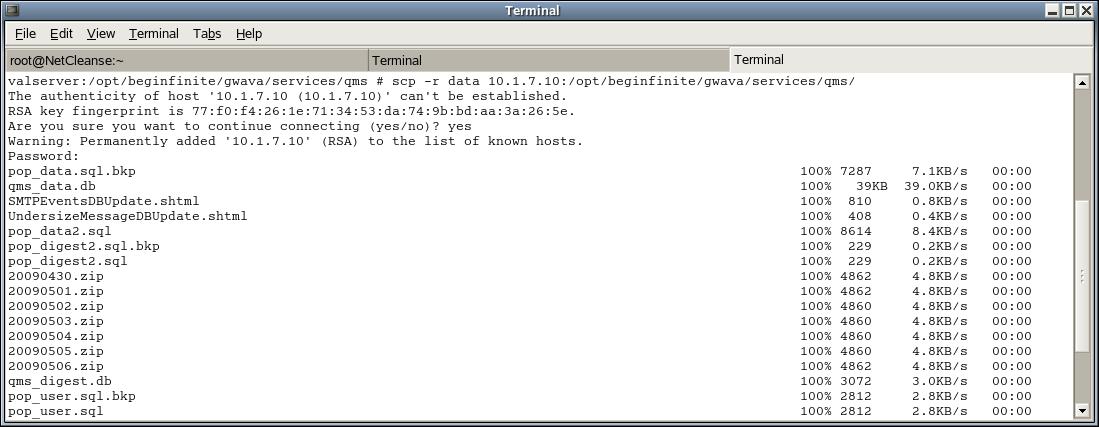
For example to move the ...services/qms/data directory:
a) Change to the services directory on your original server:
GWAVASMTP:~ # cd /opt/beginfinite/gwava/services/qms
b) Use the scp command to transfer the data:
GWAVASMTP: /opt/beginfinite/gwava/services/qms # scp âr data IP:/opt/beginfinite/gwava/services/qms
"IP" is the IP address of the server you are transferring the mail to, in this case, the IP address of the GWAVA SMTP Appliance. You will be prompted for the Applianceâs password before the transfer starts. The results of each file transfer will be printed to the screen. This can be a lengthy process depending on how much data was in the old QMS and how fast the connection is between the two servers. Thus, you should avoid performing this transfer during peak hours.

c) Repeat the above steps for each directory listed in step 3.
Note: If you have multiple directories to move, for example if you want to move all the QMS files over but not the db's, then you would want to use this scp command instead: scp /opt/beginfinite/gwava/services/qms/data/storage/*/*/*/*/* IP/opt/beginfinite/gwava/services/qms/inqueue This will copy everything from all those directories.
4) These steps are only necessary if GWAVA is running with a Postgre database:
a) Create a dump of the GWAVAMAN tables in the Postgre database on the original server.
Switch to the PostgreSQL /bin dirctory. With a GWAVA Appliance since build 25 this directory is at /opt/PostgreSQL/9.1/bin. If you installed Postgre manually this might be located somewhere else.
cd /opt/PostgreSQL/9.1/bin
Run the pg_dump file to create a dump file.
./pg_dump -U gwava GWAVA -c > /root/gwavamandump.sql
If you are asked for a password type in gwava.
This command will create a dump of all tables from the database GWAVA in the /root directory.
The dump file can also be saved in another directory.
You can check the root directory if the file was created by typing cd and l.
b) Copy the dump file to the new server(s).
You can use SCP to copy the dump file. The command to copy the file with SCP to the server could look like this:
scp gwavamandump.sql root@192.168.194.220:/root
In your case you would need to use the IP of your new server(s). Type in the password if prompted.
c) Restore the dump file on the new server.
Go to the directory on the new server where you copied the dump file and check if it was copied successfully.
Switch to the PostgreSQL /bin dirctory on the new server.
cd /opt/PostgreSQL/9.1/bin/
To restore the dump file run following command
./psql -U gwava GWAVA < /root/gwavamandump.sql
You should see that some actions are performed on the database.
5) Once the transfers have completed you can shut down the old server.
NOTE: If you are keeping the same IP on the new server, then shut down the old server and change the IP address to the original IP on the new server now, by following step 3) in this TID:
How To Change The IP Address Of The GWAVA Appliance.
6) Reboot the new GWAVA server. Use this command: shutdown -r 0
The data should all be transferred over to the new GWAVA server.