Environment
Reflection for Secure IT UNIX Server version 7.0 or higher
Reflection for Secure IT Windows Server version 7.0 or higher
Situation
Resolution
Public Key Authentication Overview
Public key authentication is one way a server can authenticate a user. It requires a private and public key pair; the private key is located on the client, and the public key must be uploaded to the Reflection SSH server.
In addition to the keys, specific files must exist in the user's directory on both the SSH client and server. If the files don’t exist, you must create them. By default, these files are stored in the .ssh2 directory.
The process of generating keys and creating files is outlined below. Troubleshooting tips are also included.
Using the Key Generation Utility
Use the Reflection Key Generation utility to generate a keypair.
- Open a terminal window on the UNIX system with the Reflection SSH UNIX client.
- Use the following command to create a key pair:
ssh-keygenNote: To get a list of available switches, use the command ssh-keygen -h, or check the man pages for more details.
The key generation utility will run for a few moments. Once the utility has generated the key pair, you are prompted to enter a passphrase and then confirm it. If you want to create a passphrase-less key, press the Enter key twice without entering a passphrase.
After entering a passphrase, the location and names of the private and public keys are displayed. For example:
Private key saved to /home/username/.ssh2/id_rsa_2048_aPublic key saved to /home/username/.ssh2/id_rsa_2048_a.pubCreating the Identification File on the Client
Follow these steps to create the identification file on the client:
- Change directories to the .ssh2 directory in your home directory.
- Use the following command to create a file named identification with the IdKey information as its contents:
echo IdKey <keyname> >> identificationReplace <keyname> with the name of the private key you generated using the key generation utility, for example
echo IdKey id_rsa_2048_a >> identification- Configure this file for user-only write access:
chmod 600 identificationUploading the Public Key to the Server
- Use the following command to connect to the Reflection SSH server using password authentication:
sftp user@host- If you are connecting to the Reflection SSH UNIX server:
- Change the directory to /$HOME/.ssh2:
cd /home/joe/.ssh2If you are connecting to the Reflection SSH Windows server:
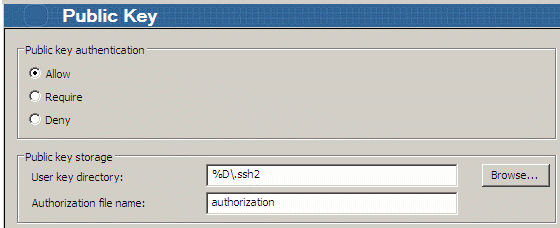
- Change to the User key directory defined in Configuration > Authentication > Public Key in the Reflection for Secure IT Server console. The default is %D/.ssh2, where %D string points to the user profile folder:
On Windows Server 2008: \Users\<username>
On Windows Server 2003: \Documents and Settings\<username>
Enter the command:
cd C:\Users\joe\.ssh2Note: If the .ssh2 directory does not exist in the /$HOME directory on UNIX, or in the user profile folder on Windows, you must create it:
mkdir .ssh2- Transfer the public key file you just created from the SSH UNIX client to the SSH server by using this command:
put <keyname>.pubReplace <keyname>.pub with the name of the public key you created, for example, put id_rsa_2048_a.pub.
- Use the quit command to close the sftp connection.
Creating the Authorization File on the Server
- Use the following command to establish a terminal session using password authentication to connect to the Reflection SSH server.
ssh user@host- In the SSH terminal window, change to the .ssh2 directory where you have uploaded the public key.
- Enter the following command to create (or append to) the authorization file:
echo Key [keyname.pub]>>authorizationReplace [keyname.pub] with the name of the public key you created using the key generation utility above, for example, echo Key id_rsa_2048_a.pub>>authorization
- Confirm that the authorization file is correct.
On a Windows server, enter the command: type authorization
On a UNIX/Linux server, enter the command: cat authorization
- Disconnect your SSH connection.
You should now be able to connect with SSH, SFTP, or SCP from the UNIX system running the client to the system running the Reflection SSH server without being prompted for a password.
Troubleshooting
If you have trouble connecting, check the troubleshooting suggestions listed below.
Check File and Directory Permissions on UNIX
On the UNIX client, verify that the private key is readable (600) and the identification file has write-access only to the user (600 or 644)
On the UNIX server, verify that /$HOME/.ssh2 directory is set to (700 or 755) and the authorization file is set to (600 or 644).
Note: The StrictModes setting affects the level of protection required for files and directories used for public key authentication. To ensure maximum security, this setting is now enabled by default. Some file permissions are enforced even when this setting is disabled.
For details, see File and Directory Permissions for Public Key Authentication in the Reflection for Secure IT documentation, https://support.microfocus.com/manuals/sshdocs.html.
For understanding UNIX permissions, see KB 7021756.
Verify that Public Key Authentication Is Enabled
Public key authentication must be enabled on both the client and the server.
On the Reflection SSH UNIX client:
Check the .ssh2 directory in the user's home directory for an ssh2_config file. If it exists, verify that the following entry is in the Authentication section:
AllowedAuthentications=publickey If it does not exist, check the /etc/ssh2 directory for the ssh2_config file. Verify that the following entry is in the Authentication section:
AllowedAuthentications=publickeyOn the Reflection SSH UNIX server:
The server configuration file, sshd2_config, generally located in /etc/ssh2/, should include the following entries:
AllowedAuthentications=publickey On the Reflection SSH Windows server:
Follow these steps to verify that public key authentication is enabled on the server:
- Click Start > Programs > Attachmate Reflection > Reflection SSH Server Configuration.
- Click Configuration tab, and go to Authentication > Public Key in the left pane.
- Verify that "Public key authentication" is set to Allow. Allow is the default.
If you have created Subconfiguration, check the Public Key pane within the subconfiguration window from the server console.
Verify that the Public Key Was Uploaded Properly and the Authorization File Exists
By default, the public key should be uploaded to the server in either of these locations:
Windows: <userid>\.ssh2
Note: Based on site requirements, server administrators can change the location of the User key directory. An account with administrator rights can verify the folder’s location:
Windows: Under Public key > Public key storage > User key directory.
Verify that you transferred the public key <keyname>.pub to the server, and the authorization file exists in this directory and contains a Key entry pointing to the public key file. The file name must match exactly. For example:
Key id_rsa_2048_a.pubWorking with Multiple Hosts and Key Pairs—An Example
If you are working with multiple hosts and key pairs, each key requires a separate entry line in the appropriate file, identification or authorization. The following example shows the required entries for Host A to connect to Hosts C or D, or for Host B to connect to Host C:
| Host A identification file (client) |
Host B identification file (client) |
| IdKey id_dsa_1024_a |
IdKey id_dsa_2048_a |
| IdKey id_dsa_1024_b |
|
| Host C authorization file (server) |
Host D authorization file (server) |
| Key id_dsa_1024_a.pub |
Key id_dsa_1024_b.pub |
| Key id_dsa_2048_a.pub |