Environment
Reflection for UNIX and OpenVMS 2014
Reflection for UNIX and OpenVMS 2011
Reflection for UNIX and OpenVMS version 14.x
Reflection Standard Suite 2011
Reflection for HP version 14.x
Reflection for ReGIS Graphics version 14.x
Reflection for Secure IT Windows Client version 7.0 or higher
Situation
This technical note describes how to set up public key authentication for use with the Secure Shell connection type. Once configured, the user is authenticated with the host using a locally stored private key and the corresponding public key on the host. This configuration eliminates the need to enter a username and password, thus providing "single sign-on" type functionality.
Resolution
Reflection Secure Shell Client Overview
You can configure Reflection to use Secure Shell when you need secure, encrypted communications between a trusted host and your PC over an unsecured network. When you use Secure Shell, all connections between your PC and the remote host(s) are encrypted. Passwords are never sent over the network in a clear text format as they are when you use Telnet, FTP, rlogin, or rsh.
Secure Shell Authentication
Reflection Secure Shell connections support the following methods of authentication: password, user key (also called public key), keyboard interactive, and Kerberos key exchange. This technical note focuses on user key authentication.
Public Key Authentication
Public key authentication requires a public/private key pair. The private key is located on the client, and the user (public) key must be uploaded to the host. You can use Reflection to generate a public/private key pair for the PC. Once generated, the user key must be added to the host's list of authorized keys.
Follow the steps below to configure Reflection to use Secure Shell and then to configure public key authentication.
Configuring Reflection 2014, Reflection 2011, or Reflection 14.x to Use Secure Shell
Secure Shell is the only option available in Reflection for Secure IT.
Configuring Reflection 2014 or 2011
Follow these steps to configure Secure Shell in Reflection 2014 or 2011:
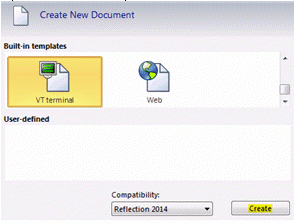
- Open the Reflection Workspace.
- Select the built-in template, VT terminal, and click the Create button.
- Under Connection, select the Secure Shell option and enter a Host name/IP address, User name, and SSH configuration scheme. You can enter a name of your choice in the SSH configuration scheme field, or if you leave it blank, it will default to the Host name value.
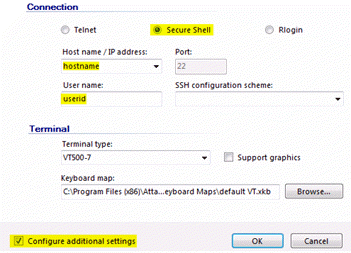
- In the bottom left corner, select the “Configure additional settings” check box and click OK.
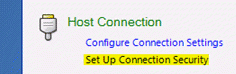
- For Host Connection select “Set Up Connection Security,” which opens the Reflection Secure Shell Settings dialog box, Use the dialog box to configure additional settings.
Configuring Reflection 14.x
Follow these steps to configure the Secure Shell in Reflection for HP, UNIX and OpenVMS, or ReGIS Graphics:
- Start Reflection 14.x.
- On the Connection menu, click Connection Setup.
- Under Connect using, select Network (the default), and then select SECURE SHELL from the list of network options.
- Under Connection options, enter values for Host name, SSH config scheme, and User name. You can enter a name of your choice in the SSH config scheme field, or if you leave it blank, it will default to the Host name value,
- Click the Security button, which opens the Reflection Secure Shell Settings dialog box, to configure additional settings.
Configuring Public Key Authentication
Public key authentication relies on a public/private key pair that is used for authentication purposes. Before you can make Secure Shell connections to hosts, both your PC and the host must be correctly configured.
Configuring the PC
Use this procedure to configure your PC:
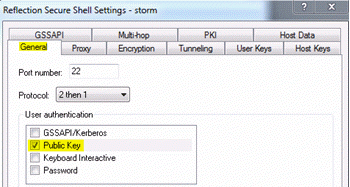
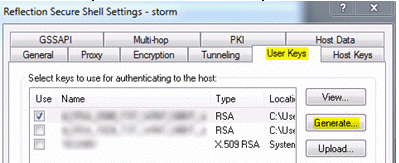
- Open the Reflection Secure Shell Settings dialog box (by following steps 1-5 in the previous section). On the General tab:
- Confirm that the Public Key check box is selected (one of the default settings).
- Clear the Keyboard Interactive and Password check boxes.
- On the User Keys tab, click the Generate… button.
- In the User Key Generation dialog box, select the Key Type you want to generate. Use either RSA (the default) or DSA for ssh2 hosts; use RSA1 for ssh1 hosts.
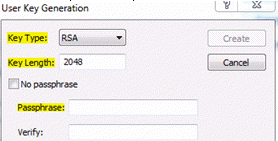
- Specify a value for Key Length. The default is 2048 for RSA and 1024 for DSA and RSA1.
Increasing this value increases the time it takes to generate the key and also improves the security of the key you generate. The length of this key does not affect the speed of data encryption or decryption once the connection has been established.
The remaining steps depend on the product version:
For Reflection 2014, Reflection 2011, Reflection 14.1, Reflection for Secure IT 7.2:
- Enter a case-sensitive passphrase that will be required to authenticate with this key, or select the No passphrase check box for automated processes.
Note: The public key is transferred using the SFTP protocol and will, by default, use password authentication when public key authentication has not yet been configured. You do not have to have the client configured for password authentication for this step. The host must be configured to use password authentication in order to upload the public key to the host.
If the passphrase is lost or forgotten, a new key must be generated and the corresponding public key must be copied to all of the hosts you plan to use.
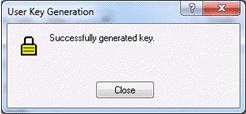
- Click Create. You are prompted to save the key. The default key name is id_<key type>_<key length>_<client hostname>_<a, b, etc.>. For example:
id_RSA_2048_clienthostname_aid_RSA_2048_clienthostname_bThere is a pause while your key is generated. The length of the wait depends on the key type and key length you have specified. When the key is created you will receive a Reflection Secure Shell message “Successfully generated key.”
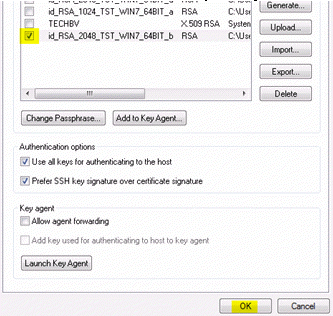
- Click OK. You are returned to the User Keys tab, and the key you generated is highlighted and checked for Use.
Keep the Reflection Secure Shell Settings dialog box open.
For Reflection 14.x, Reflection for Secure IT 7.0 – 7.1:
- The default key name is key. To change the name of the key, click the Browse button. In the File name field, at the end of the path, change key to the name of your choice. Click OK.
- You have the option to enter a case-sensitive passphrase that will be required to authenticate with this key.
Note: The public key is transferred using the SFTP protocol and will, by default, use password authentication when public key authentication has not yet been configured. You do not have to have the client configured for password authentication for this step. The host must be configured to use password authentication in order to upload the public key to the host.
If the passphrase is lost or forgotten, a new key must be generated and the corresponding public key must be copied to all of the hosts you plan to use.
- Click Create. There is a pause while your key is generated. The length of the wait depends on the key type and key length you have specified. When the key is created, you are returned to the User Keys tab, and the key you generated is highlighted and checked for Use.
Keep the Reflection Secure Shell Settings dialog box open.
Configuring the Host
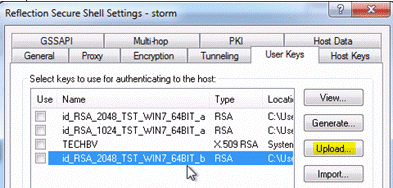
Use the Upload button on the User Keys tab to upload a public key to the currently specified host.
To upload a key:
- On the User Keys tab of the Secure Shell Settings dialog box, click a key (the Use column check box does not need to be selected for that specific key), and click Upload.
Note: If no key is selected, the Upload button is not available. If you select a certificate to be uploaded, only the public key of the certificate will be uploaded. The certificate will not be uploaded.
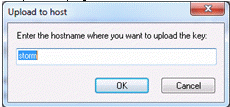
- Enter the name of the host where you want to upload the key. By default, the value in this field is the Host name or IP address that you entered to access the Secure Shell Properties page. Click OK.
- Enter the name of the user who will authenticate to the host using the key. Click OK.

- Enter the password or passphrase for the specified user. Click OK.
Note: If this is the initial connection to the host, then the user is prompted to accept the identity of the host. The user is presented with the Host Key Authenticity dialog box. Select Always to accept the host identity if this is the host to which you will be connecting.
- The user will be prompted to enter the public key destination. The destination folder defaults to .ssh2 which is located under the user’s profile or home directory and the authorization file defaults to authorization. Click OK.
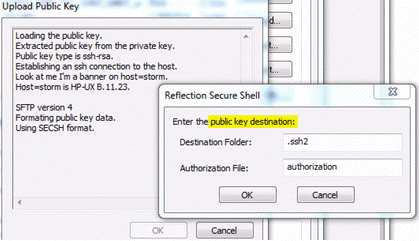
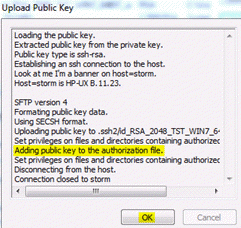
- The Upload Public Key dialog box displays information about the transfer. Click OK to close this dialog box.
Note: During the key upload process, the upload utility exports the key in the correct format, sets the privileges on the files and directories containing the authorized public key data, and adds the public key to the authorization file. The server administrator must ensure that the server is enabled for public key authentication.
- Click OK. On the User Keys tab. make sure that the key you want to use for authentication is selected for use, by clicking the check box in the Use column. Click OK.
- In Reflection 2014 or 2011, you are returned to the Settings for VT dialog box. When you click OK, a connection attempt to the host is automatically started.
- In Reflection 14.x, you are returned to the Connection Setup dialog box. Click the Connect button to connect.
Notes about Host Configuration
- Keys uploaded to hosts running F-Secure and SSH Communications (SSH Tectia) servers are exported to SECSH format and are installed to the user's .ssh2 directory. An appropriate key entry is made in the authorization file. This file is created if it did not previously exist.
- Keys uploaded to hosts running OpenSSH servers are exported using OPENSSH format and are added to the authorized_keys file located in the user's .ssh2 directory. This file is created if it did not previously exist.