Archived Content: This information is no longer maintained and is provided "as is" for your convenience.
Reference
Steps for Deploying ice
Return to ICE Development Resources
ice Configuration and Deployment Guide
Editor Note: This document is a hand-conversion from the original PDF documentation. No doubt there exists a need for further formatting corrections and, possibly, spelling corrections. :) Hopefully this guide will serve as a useful tool to those deploying, or thinking about deploying, TRIM Context ice!
This document details the deployment and configuration that is required to successfully deploy a TRIM Context ice Server in an organization. It is designed to be read by system administrators, IT managers, enterprise architects, and anybody else who needs to understand how the underlying TRIM Context ice Server is deployed, configured and managed.
Overview
The TRIM Context ice Server is a companion Server to the TRIM Context platform Server family. As such, this guide should be read in conjunction with the TRIM Context Installation & Setup Guide (TRIMInstall.pdf).
The primary function that the TRIM Context ice Server provides is to act as an HTTP interface to TRIM Context. In order to fulfill this function several components are required. Figure 1.0 details the internal architecture of the TRIM Context ice Server:

Figure 1.0 TRIM Context ice Server Architecture
The separate components of the ice architecture are as follows
ice Web Server - The ice Web Server is an HTTP compliant Web Server that has been specially designed by TOWER Software to fulfill operating requirements. It uses a proprietary design for two reasons: greater security â itâs a unique product that has not been widely available and isnât susceptible to any known security vulnerabilities in established products, such as IIS or Apache; simpler installation and setup â weâve minimized the dependencies - so thereâs no additional Web Server configuration to do in order to get this thing to work. The Web Server contains three conceptual âlayersâ that perform the rendering of client information. They are:
Static Content - This layer is essentially a basic Web Server- it listens to a particular port for HTTP requests, and responds with HTTP responses based on unique files that exist on the Server.
ice Template Engine - This layer handles requests for content, and breaks down the configured ice templates into script files, adds TRIM Content, and responds to the web browser.
The WebDAV Layer - The WebDAV layer is responsible for receiving, parsing and responding to WebDav requests. This also includes HTTP Mail requests from Outlook 2003.
Draft Storage Management - This area of the Server is responsible for managing requests for users to check in documents, check documents out and save TRIM metadata not yet committed to TRIM to their draft storage. Each user of the system is granted exclusive access to an area of disk where these objects can be serialized. Note that access to these areas is managed by the ice Server itself - users donât actually need NTFS permissions to that area in order to save documents in it. The location of this directory can be configured using the sever.config. For more information see: Server Configuration.
! Note: The Draft Storage area needs to be managed with the same level of backup and failover as is typically attributed to network shares.
ice Executive Service Layer - This layer co-ordinates all conversations with TRIM, and performs pre-processing, and validation for logins and date prior to passing them through to the TRIM Context Workgroup Server.
! Note: All business rules still reside in TRIM Context.
Planning
This section discusses how to plan a TRIM Context ice Server as part of your TRIM rollout.
Initial Considerations
TRIM Context is designed to fulfill many and varied applications - all the objects and features available in the platform are unlikely to be used by any single site. Chances are that you have a defined feature set that you want to take advantage of, and deploy to your users. Before deploying TRIM Context ice as the interface in these instances, you will need to plan out exactly what features you will be expecting your users to interact with, and in what way.
ice includes a comprehensive template generator, which can potentially create millions of different interfaces into the TRIM Context platform. As with all planning tasks, the better you plan upfront, the more trouble it will save you later on.
While itâs easy to make and deploy changes to the ice interface, there will be less change management required if you can present a complete and standardized interface to users from the outset, as opposed to changing it dramatically as you go.
When you install ice , it will generate a template for each object, based on defaults, and the Administrator will run the Formgen executable to create record entry forms for each record type youâve defined in TRIM. (For information on building record entry forms and record types, see the Record Types chapter in the TRIM Context Help file.) These forms are generated to make the main fields on all TRIM objects accessible through ice, however it is recommended that you use the Template Generator tool to review the templates ice generates, and to customize them further to your needs. In the event that you need further customization than the Template Generator allows, you can edit the template files (HTML) generated. Refer the TRIM Context ICE Customization Guide.pdf for further details on how to do this.
Metadata Concerns
Recommended practice is to map out each screen that you expect the user to use, and detail all the metadata that you want the user to see. Additionally, youâll need to define what information will be editable on each page, when the page is flipped into edit mode.
For example, if youâre planning on using the Project Teams feature to enable collaboration with people outside of your organization, you will need to think about what information they will see on each screen. Do you want the comments section to be available?
Do you want people to be able to append comments?
Edit existing comments?
Do you want to list records that are owned by the project team?
Or ones that are currently assigned to the project team?
Do you want to display a particular project folder, regardless of its whereabouts or status?
Do you need to limit the records displayed based on record type?
All of these questions need to be addressed, and in most cases can be adequately fulfilled using the ice template generator.
For each object that can be displayed in ice , there is a corresponding template. Depending on the template itself, there is a collection of relevant metadata that can be displayed or edited.
Security Concerns
Since potentially any user can access the URL that ice listens to, it is of paramount importance that ice be set up securely:
It is recommended that a special network account be set up for the ice service that has full control access to the content directory (and subdirectories), but no access to any other directory, thereby ensuring that if the web server is compromised, it cannot be used to access other parts of the system or network.
Only give users that will be accessing ice access to the content\store and content\cache directories. Do not give these users access to any of the other ice directories
Use SSL if ice will serve pages to the World Wide Web. The default HTTP protocol is insecure by design, and unauthorized users can easily subvert both the Basic and NTLM authentication methods which ice uses if the server is not using SSL.
Designing Templates for Usability
When designing the templates, it is important that web usability principles are considered for each screen. For example, ensure that most commonly viewed items are higher up on the screen, and the less valuable, more specific data is displayed below.
Users often wonât use a scroll bar when itâs presented to them, so any data that falls outside of screen resolution should not be critical.
Deployment Considerations
If you have multiple distributed Workgroup Servers, larger organizations may wish to deploy multiple ice Servers in order to distribute the load.
! Note: In this configuration (figure 1.2) each configuration will require a different URL to access the system. This may be a preferred model for organizations that have discreet regional offices connected by a WAN. |
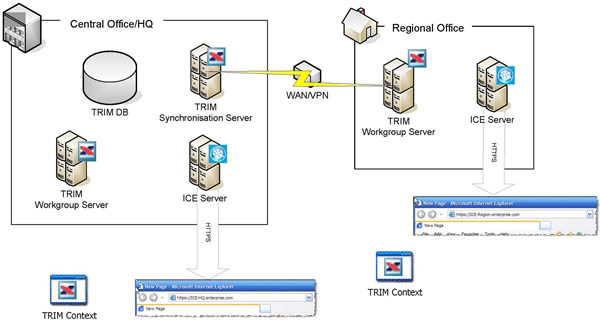
Figure 1.2 - a typical network topography for an ice deployment
In this scenario, when a user travels from their regional office to interstate, they can still connect to their preferred URL, itâs just that performance may be slower, due to higher latency.
Because every object in TRIM has a unique record Identifier (URI), and all the information is ultimately stored in the same TRIM Data store, a user traveling from HQ to a regional office could access their documents using the regional URL. URLâs will differ only in the name of the Server - for example, given the network topography illustrated above:
If a user is working on a document in Headquarters with the URL: https://ICE-HQ.enterprse.com/record/305
The same document could also be accessed at: https://ICE-Region.enterprse.com/record/305
! Note: You will generally get better performance using a Server that is geographically closer to you. |
The current version of ice features improved compatibility with load balancing hardware. By configuring each ice server to point to the same draft storage location, the need to use different URLs can be avoided. Bear in mind though, that if youâre working with large documents, transfer from a central repository could be slow.
ice Deployment
This section discusses how to deploy a TRIM Context ice Server as part of your TRIM rollout.
Installation Process
The ice client does not include records management administrative functionality. Consequentially, TRIM administrators will require TRIM Context to provide administrative support, and manage users, projects and EDRMS functionality.
Follow the Installation instructions contained in the TRIM Context 6 Installation Guide (TRIMInstall.pdf).
In conjunction with your Workgroup Servers, you will also need to deploy ice Servers across your organization.
The installation package for TRIM Context ice is a Microsoft Windows Installer (MSI) package. The aim of the installation package is to get ice installed as a windows service and configure all the possible options that can be configured via the command line. You will also be prompted to set up the installation directories for both the Server and the Web content to be served.
ice Deployment Step-By-Step
1. Install TRIM Context 6 successfully into the domain (with ice included in the license)
2. Determine the number of ice Servers your organization will require
3. Install ice (using the MSI installer) onto your chosen Workgroup Servers
4. Plan your information infrastructure
5. Implement your Record Types
6. Generate and export your Templates to the content directory in ice (see Template Generator)
7. Start your ice Server.
See also: Appendix 1: Common Problems and Resolutions - Troubleshooting.
Client Requirements
As ice is zero-footprint, it will work with any client that has the following browsers:
Microsoft Internet Explorer 5.5 + SP2
Microsoft Internet Explorer 6
Mozilla Firefox 1.1 or later on Windows and Apple Macintosh.
Safari 2.0 or later on Apple Macintosh
TRIM Context ice is designed to be as compliant as possible with web standards (given the large diversity in acceptance between browsers).
Additionally, other browsers may function properly with the ice Server, most notably versions of IE later than 5.0 on windows, and the Firefox browser running under other operating systems. Itâs important to note that while these browsers may function correctly, they havenât been extensively tested, and so TOWER Software are unable to provide user support for users on these platforms.
Minimum Security Settings
The minimum security settings needed in IE are to have the following turned on (based on the defaults of High Security):
Run ActiveX Controls and Plug-Ins
Script ActiveX Controls Marked Safe for Scripting
Active Scripting
Server Requirements
The Server supports multiple processor Server solutions, and is designed to run with the following requirements as a minimum:
Intel Pentium III class processor (800MHz) â (or equivalent) 512 MB of RAM
50 MB of Hard Drive Space (Executables and working space)
Draft Storage space required is dependent on the number of users, and expected volume.
Microsoft Windows 2003 Server or Windows 2003 Server SP1
Microsoft .NET Runtime, version 2.0 - ice requires the .NET runtime files to be present on the Server that is to host the ice service. Note that while the ice service will run on other Windows operating systems, Windows Server 2003 is the preferred OS.
Current version of TRIM Context 6 SP2, or greater - ice requires that your organization is running the same version of TRIM Context 6 as the version release of ice. ice will not function properly across versions of TRIM. (When upgrading TRIM, you must also upgrade ice.)
! Note (1): Your organization needs to be running a Windows authenticated network. ice will not work with Novell eDirectory, or other network authentication methods. (2): Windows XP may also run ice however this is not recommended as XP is not optimized to run server software. (3): ice does not require any version of Internet Information Services (IIS) or Apache. It uses its own internal web Server. |
Security
The TRIM Context ice Server supports SSL with 128 bit encryption to secure conversations across a network. Like TRIM Context, ice requires that every user have a valid domain login before access to the Server is granted. This combination of encryption and NTLM authentication ensures that using the TRIM Context ice client is equally as secure when working internally or externally.
Authorization roles access control and security levels are handled directly from the TRIM Context interface. For more information, see the TRIM Context Help file.
Running the Server under SSL
The ice Server supports encryption using SSL (supported protocols are SSL 3.0 and TLS). This is recommended for installations that have a requirement to access outside of an internal network. For installations without this requirement, not running the Server using SSL will be marginally faster.
To enable SSL for a production Server, you need to have a valid certificate. The certificate serves to verify the Serverâs identity.
To run ice under SSL, you need to supply two additional parameters to the service configuration file (or the command line). The first is the path to the certificate file, and the second is the password for the certificate (all certificates are expected to include passwords).
If the ice Server finds a valid certificate at the specified path, it will negotiate a secure conversation with the client.
! Note: The port that the Server is running is also an issue here. If you want your users to be able to type âhttps://yourservernameâ into their browser, you must run the Server on port 443. |
Avoiding the Log In Screen - using NTLM
! Note (1): Before using NTLM with ice, it is recommended that the website administrator researches how to set it up securely. NTLM is a relatively new way of authenticating across the internet, and as such, several proxies, and older browsers do not support it. (2): If ice is to be run outside of your organization, it is recommended that NTLM be used over SSL terminated on the ice webserver. NTLM is a connection-oriented authentication mechanism, and using it over HTTP will not be secure because HTTP does not guarantee that a single connection will be used by a single entity. SSL provides a secure connection between a client and a server, guaranteeing that only they can understand the messages in the connection. |
The server will attempt to authenticate users via NTLM challenge/response for supported web browsers.
Browsers that support NTLM headers for ice are:
Internet Explorer 6
Mozilla Firefox 1.1
This means that if you are making a call from a supported browser, it will include some authentication information in each request, that the server will use to validate the clients credentials against the domain controller.
If those credentials can be successfully validated, the user will be allowed to bypass the login screen, and taken straight to the page they requested.
If these credentials arenât present, or they canât be successfully validated by the domain, the browser will redirect the user to a page informing them of the failure to authenticate.
Using the Log In Screen - using Basic Authentication
! Note: If ice is to be run outside of your organization, it is recommended that Basic Authentication be used over SSL. If the connection is not secure, it is relatively easy to listen in to the connection, and decode the password, compromising the connecting user. |
Basic Authentication authenticates the user by sending their credentials in the Request header to the server in base 64 encoding. It is the only authentication method available for ice draft storage and mail integration. If Basic Authentication is on, users will be presented with an ice login page when they browse to the ice URL. They are then required to login using their NTLM user name and password that they would use to connect to TRIM.
! Note: Mozilla Firefox Login - In the about:config settings (type "about:config" in as a URL), there is a key named network.automatic-ntlm-auth.trusted-uris If you include the URL of the ICE server, the NTLM authentication will happen automatically. |
Enabling External Access to ice
If your organization is exposing TRIM Context ice outside of the organization, the following procedure is recommended:
1. Set up TRIM Context ice to run with SSL encryption
2. Obtain a certificate from a certifying authority, and place it in a directory
3. Edit the ice configuration file to point to the certificate
4. Set up a port forwarding arrangement from a computer in the DMZ to the TRIM Server inside the network. (Figure 1.1) Make sure that the port forwarded is the same as the one specified in the ice configuration file.
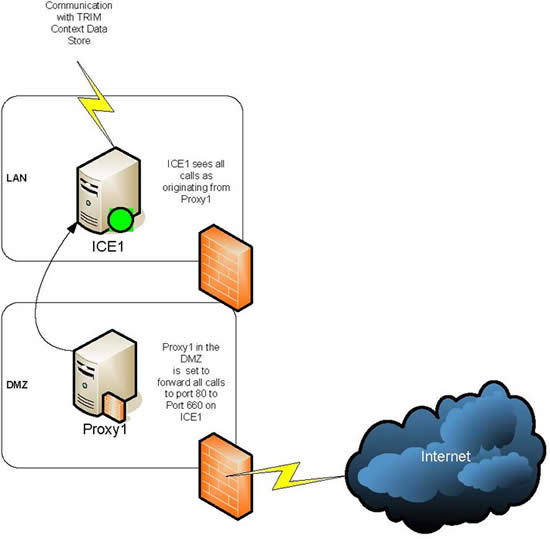
Figure 1.1 Port Forwarding for a Typical ice installation connected to the internet
Firewalls
Because TRIM Context uses DCOM to traverse the internal network, itâs advisable to design a network topography that avoids any firewall solution between the ice Server and other TRIM Servers â DCOM can require extensive modifications to firewalls in order to operate properly.
Drafts Storage
Each user that uses the ice Server will need to have an allocated region of disk space to hold draft documents, new documents and edited records. Depending on the usage pattern, and the types of files created and stored in TRIM, the amount of allocated disk space can vary considerably. As a guide, the current level of network disk available on the corporate file share to each user should be used as a benchmark setting.
! Note: The draft location can be specified in the configuration file. If the chosen location is represented as a UNC path, drafts can be shared across a domain. For more information, see Server Configuration. |
Each user also has a configuration file, which stores settings unique to that user - this is also stored in the userâs drafts folder, with the name UserConfig.xml.
Web Server Overview
The ice Web Server functions like any other static content Web Server. Any content that is hosted in the yourcontentdirectory\static directory is available through the Web at http://yourdomain:specifiedoperatingport/static For instance, the static document info.htm at the ice demonstration site would be accessed using the form: http://ice.towersoft.com.au/static/info.htm.
Folder structures under static are also supported.
WebDAV Server Overview
The WebDAV Server is used to edit documents on the Server. Wherever possible, users are encouraged to use this method of editing documents. By retaining all edited documents on the Server, your organization will be able to back up and maintain users work - which means that no documents will be lost through theft, or hardware failure (at least on the usersâ side).
To access the WebDAV Server, a user needs to send an HTTP request from a WebDAV capable client to the Serverâs /drafts directory. For instance: http://ice.towersoft.com.au/drafts
Ideally, a user will need to have a Network Place for this part of the Server configured on their computer in order to easily access this feature - this makes it easier to use: 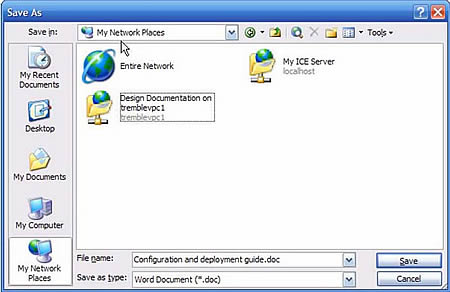
Figure 2.0 â Making ice Drafts more accessible through a shortcut in My Network Places.
Licensing Requirements
ice is independently licensed as a module on your TRIM license sheet. If you do not have a valid license for ice , the ice Server will refuse to accept any logins until the license is updated.
As well as being reported on the login screen, this error is reported in the server logs, or can be seen by running the Server in interactive mode.
Installing ice
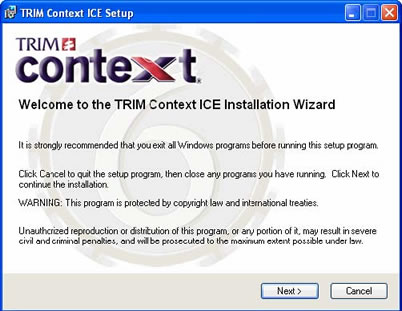
1. Select ice using the TRIMContextICE.msi file. The Welcome dialog will display first.

2.Click Next The License Agreement dialog will display.
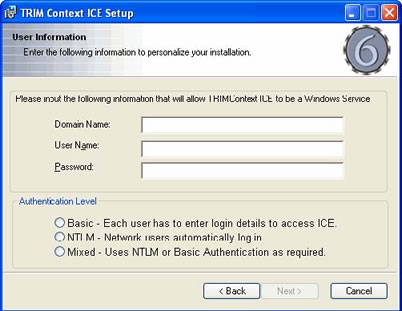
3. Click Next The User Information dialog will display.
Domain Name â enter the Domain Name where the ice service will be run
User Name â enter the User Name that will run the service.
! Note: It is advisable to use a specially set up Security Account, rather than one of the system accounts like Local System and Network Services, because if the web server is compromised, it is preferable that the account does not have access to anything outside its directories. |
Password â enter the User Nameâs Password.
Select the Authentication Level that you will be using.
Basic â Displays the Login dialog when a user accesses ice
NTLM â Bypasses the Login dialog
Mixed â Uses NTLM by default, if that is not available, it will use Basic and the user will be presented with the Login dialog.
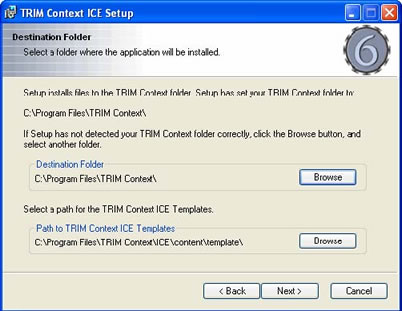
4.Click Next The Destination Folder dialog will display.
Destination Folder â Set the directory that ice will be installed to
Path to TRIM Context ice Templates â Set the directory for the Templates to be installed to.
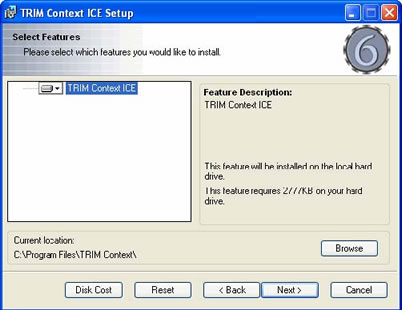
5. Click Next The Select Features dialog will display.
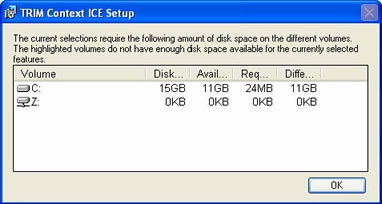
6. Click Disk Cost to see how much disk space is available and how much the ice installation requires.
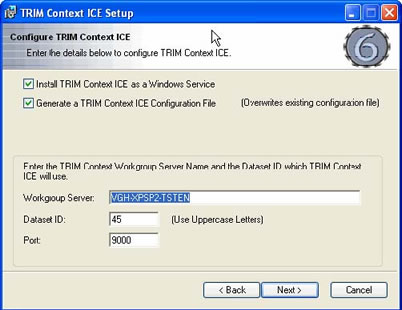
7. Click Next The Configure TRIM Context ice dialog will display.
Install TRIM Context ICE as a Windows Service â Select to install the ice service
Generate a TRIM Context ICE Configuration File â Create a configuration file that contains ice server configuration details
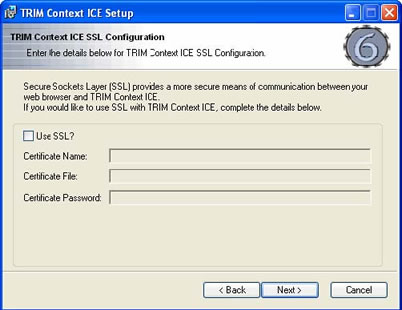
8. Click Next The TRIM Context ICE SSL Configuration dialog will display.
Use SSL? â Select to active SSL usage.
Certificate Name â Enter the name of the Certificate
Certificate File â Enter the path/location of the Certificate file
Certificate Password â Enter the password for the Certificate file.
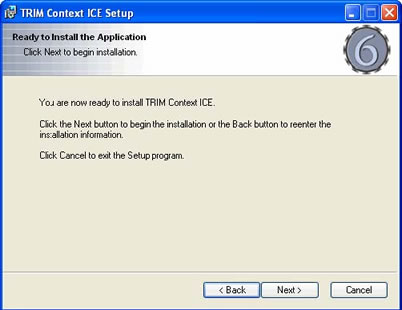
9. Click Next The Ready to Install the Application dialog will display.
10. Click Next to start the installation process.
11.Once the installation process has completed, you will need to run the Formgen executable to generate record entry templates for your record types. (See Template Generator for details about running this executable.)
ice Configuration
Once installed, you will need to configure your ice Server(s) and Clients.
User Configuration
ice has been designed to be a zero footprint deployment. This means that there is nothing required to be installed on the client in order to start using the software.
This is entirely true in practice, as outside of a compliant Web browser, nothing else is required. However, there are several things that can assist the ice user to provide a richer and easier experience.
These include
A WebDAV compliant authoring application like Microsoft Office 2000 or later. With an authoring application that supports WebDAV, the user can author files directly on the Server.
Microsoft Outlook 2003 for Zero footprint Mail integration. For details on how to configure Outlook 2003, see HTTP Mail â Configuring Outlook 2003 on page 25.
A shortcut to ice placed in their network places.
Depending on the ice configuration, users may be presented with a login dialog and may need to prefix their username with the domain name to log in.
Security Settings
Security settings will need to be set so that users may open an office document through ice At the very least the client machine needs to have “Download unsigned ActiveC controls” set to “Prompt”. If you do not wish to be prompted each time, set it to “Enable” (advisable for Local Intranet zone sites).
Trusted Sites
Adding ice as a Trusted site is required when the client is not connected to the network/domain or if the organizations internet access is locked down.
! Note:Template Generator and Windows 2003 Environments - Internet Explorer on Client machines must have access to the ice web site. You will need to add the ice web page to the Trusted site for the Template Generator to operate correctly. The ice Template Generator uses ActiveX Controls, so if Internet Explorer does not have access to the ice site, then the Template Generator will not preview the ice templates. |
Server Configuration
Operating the Server
The ice Server, like other TRIM Servers, runs as a windows service. You can start and stop the service from the command line (using the NET Command) , or the Windows Service Control Panel.
The service needs to run under a low privileges account for optimal security.
During the installation process, you are prompted to enter a User account and Login that will run the server. It is advisable to use a specially set up Security Account, rather than one of the system accounts like Local System and Network Services, because if the web server is compromised, it is preferable that the account does not have access to anything outside its directories.
Configuring the Server
When the Server is running as a windows service, the Configuration information is drawn from a configuration file (called Serverconfig.xml), which needs to be present in the directory where the executable resides.
This file is generated by the installation process, but can be edited by hand. Any changes made will require the service to be restarted before they take effect.
The format of this file is as follows:
<ContentPath>c:\ice\content</ContentPath>
This is the path to the content directory
<StorePath>c:\ice\store</StorePath>
This is the path to the directory where ice will store user drafts and configuration information. By default, this is set to content\store.
<Port>9000</Port>
This is the port the Server will listen and respond on
<Workgroup>TRIMServer</Workgroup>
This is the Workgroup Server that the Server will communicate with
<DBID>TD</DBID>
This is the TRIM dataset ID
<CertificateName>orgcertificate1</CertificateName>
This is the name of the SSL Certificate to be used
<CertificatePath>c:\certs\ice.pfx/</CertificatePath>
This is the path to the SSL certificate
<CertificatePass>mushy23</CertificatePass>
This is the password for the certificate
<ServiceXmlLogPath>c:\ice\logs</ServiceXmlLogPath>
This is where the ice service log files will be outputted to
<Authentication>Basic</Authentication>
This sets Server authentication to Basic Authentication - Each user is required to enter login details to access ice
<Authentication>NTLM</Authentication>
This sets Server authentication to NTLM authentication - Network users are automatically logged in
<Authentication>Mixed</Authentication>
This sets Server authentication to NTLM. If NTLM authentication fails, reverts to Basic authentication (Uses NTLM or Basic Authentication as appropriate)
! Note (1): If the Authentication entry is not set, the login dialog will display. (2): For Mac environments, use either Basic or Mixed authentication. NTLM will not operate with a Mac. Use Mixed when you have both Windows (who will use NTLM) and Mac clients (who must use Basic). |
Configuring the Server Directories
The ice server impersonates the user when the user accesses his/her drafts folder, and so it is important that all users who will be using ice are given full control over the store directory (specified in Server Configuration), and the cache directory (content\cache).Make sure that a defined NT group containing all users that will be accessing ice has âfull controlâ access to this directory.
! Note: Users should only be given full control access to the directories described above. Giving them access to the root ice directory may compromise the security of the server. |
Multiple ice Services
TRM Context ice has a command line application that will allow you to setup or remove ice services for different datasets.
1. From the command line, navigate to the ice directory (usually in c:\Program Files\TRIM Context\Ice)
2. Type Iceservice followed by the appropriate parameters:
–Help â Displays the help dialog listing the available parameters
–Install â Install a new ice service
–Uninstall â Uninstall a service
–Quiet â Run the ice service setup in quite mode
–Name â Set the service name
–Displayname â Set the service display name
–User â Set the username that will run the service
–Password â Set the password that will run the service.
Adding Users
Adding users to ice is done using TRIM Context. Administrators need to configure access controls, permissions and relationships using TRIM. For more information, see the Locations chapter in the TRIM Context Help file.
All users with Login access to TRIM automatically receive access to ice
HTTP Mail - Configuring Outlook 2003
! Note: HTTP Mail uses Basic Authentication, regardless of whether the server is configured to use NTLM. (2): As HTTP Mail cannot run over HTTPS, it is not recommended to use HTTP Mail when exposing ice to the outside of the organization. |
In addition to the standard WebDAV (used for ice draft storage), the ice Server also supports HTTPMail, a modified version of WebDAV created by Microsoft for access to mail messages. In the case of ice , it uses the protocol to provide a zero-footprint way to catalog mail from Outlook 2003 into TRIM.
To use this feature, Outlook 2003 users need to add an ice account to their profile. This can be done by selecting Tools - Accounts:
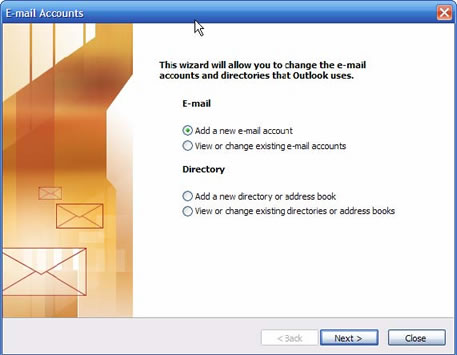
1. From this screen, choose Add a new e-mail account
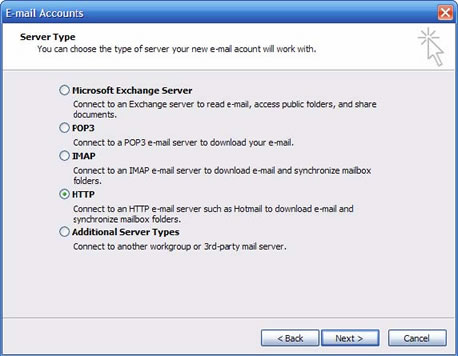
2. Select HTTP mail from the list of account types:
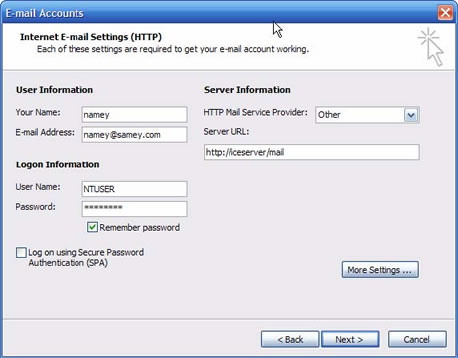
3. Click Next to display the configuration screen:
Here, the important options to select are the Other option from the dropdown for HTTP Mail Service Provider
Set the Server URL to point at the ice Server, + the suffix /mail. For example, http://IceServer/mail The Name and e-mail address values are not used, and can be filled in with nonsense (as displayed here).
The User Name and Password values need to be set based on the NTLM account of the user. These will be the credentials used to log on to TRIM by Outlook 2003. Check the Remember Password box unless you want to be continually distracted by login dialogs.
The user will then be presented with a folder hierarchy underneath their Inbox. For each active label they have decided to include, there will be a folder. Dragging mail messages to this folder will catalog them into TRIM.
! Note (1): Because the contents of ice folders are read-only, you cannot move or delete items between ice folders, however copying items is permitted. (2): Because the contents of ice folders are read only, you cannot move or delete items between ice folders, however copying items is permitted. (3): If for some reason, mail canât be cataloged, it will appear in the userâs draft folder for manual processing. |
Modifying Date Formats in ice
ice uses the regional settings of the Microsoft Windows Operating System on the Server to determine which way to store dates. In order to change the ice Serverâs date display and validation, simply change the Microsoft Windows Regional Settings, and restart the ice server. ice will pick up the new settings.
Monitoring ice
This section deals with monitoring a running instance of ice.
Monitoring the ice Service
It is useful to check the Microsoft Windows Event Viewer (found under Administrative Tools in Control Panel) periodically for any ice service errors. The errors found in the event log provide valuable information that you can use to debug the service. Errors typically occur when the service crashes, or cannot run.
Running the Server in Interactive Mode
The ice Server usually runs as a windows service, and reports all information into the log files, which are stored in the operating directory for the executable file.
If further monitoring is required (for example, for fault diagnosis or performance analysis) an interactive version of the Server is available. The interactive version displays each event in real time as the Server processes requests, and allows for the administrator to modify such parameters as the operating port, content directory and attached TRIM Workgroup. The interactive version of the Server is considerably slower than the service version as a result of having to report all this information.
To run the interactive Server, the utility tower.ice.interactive.exe needs to be run, which can be found in the installation directory for the Server.
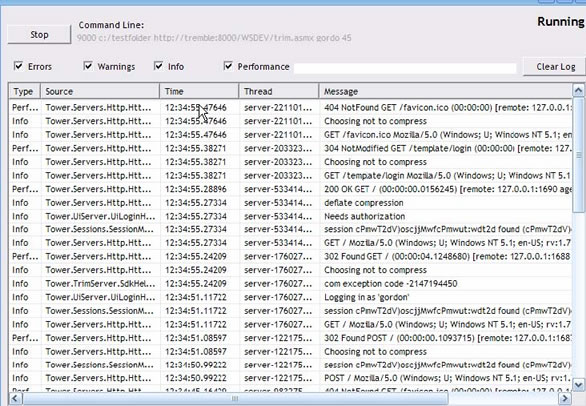
Figure 3.0: ice running in interactive mode.
The interactive Server responds to requests in real time, and will display all logging events received on the specified port to the screen. An administrator can change the command line parameters by clicking the âstopâ button, and entering other command line parameters at the prompt.
! Note: Remember to stop an existing running ice service before starting the interactive Server. |
Template Generator
Because TRIM can hold a vast amount of different metadata about different Record Types, administrators will need to choose what information is relevant about different Record Types, and additionally, what information is editable and what is only for display. Similar to the notion of defining Record Entry Forms in TRIM Context, ice comes with the Template Generator application specifically designed for creating templates to define this information.
ice is shipped with a standard set of templates for most TRIM Context 6 objects, such as Locations, Schedules, Classifications etc. However, because of the varying uses of TRIM Context from one organization to the next, it is not possible to deploy a standard set of record templates.
The installation process will deploy a set of standard templates based on your database configuration. After the installation process has completed, the Administrator will need to run formgen.exe to create a set of record templates.
If you change your Record Types at any time, you can re-run the formgen.exe to update your set of templates to include the changes. This will overwrite the existing templates, including any you have modified.
The formgen.exe file can be found in the ice installation directory. Usage is:
formgen.exe <workgroupservername> <database id> <output-path>
This allows you to generate a set of templates directly into the template directory or into a separate directory and transfer them later.
You may modify these templates using the Template Generator application.
How to Run Formgen.exe
1. Select Run from the Start menu.
2. Enter cmd and click OK
3. Navigate to the TRIM Context ice directory (for example, type cd\ and press enter, then cd C:\Program Files\TRIM Context\ice and press enter)
4. Formgen usage is as follows:
(for example, formgen vgh-xpsp2-tsten 45 Content\Template) Templates will be automatically generated both from ice defaults and from the Record Types setup in your dataset. If you are generating the templates to the default ice templates directory, simply use Content\Template for the Output Path component. If you are generating the templates to a different directory, enter the whole Output Path and surround the path statement with double quotes (for example, âc:\Program Files\TRIM Context\ICE\Content\Templateâ) .
5. Once completed, stop the TRIM Context Workgroup and TRIM Context Synchronization Servers. Stopping the Workgroup Server will automatically stop the TRIM Context ICE Server.
6. Start the TRIM Context Workgroup, the TRIM Context Synchronization and TRIM Context ICE Servers.
Further Customizing ice
ice is shipped with the Template Generator application specifically designed for creating templates to define information that you wish to display.
The ice templates are standard XHTML documents, and can be edited with any WYSIWYG Editor, such as Dreamweaver or FrontPage 2003 (earlier versions of FrontPage are not recommended).
The XML namespace included on all the templates (xmlns:d=’http://towersoft.com/schema/jstemplate‘) is the namespace for unique processing elements and attributes that render TRIM Content into the pages.
! Note: If the default templates are dramatically different from the standard templates the TOWER Software Help Desk will have difficulty providing support. |
For information on customizing your ice templates using the Template Generator, see the ice Customization Guide ( TRIMContextICE_Customisation_Guide.pdf).
Upgrading ice
When upgrading an ice installation, you must perform the following steps;
1. Make a copy of any templates that you have created or modified and wish to retain
2. Backup the ice content\templates directory
3. Uninstall the old version of ice
4. Follow the installation process (See Installing ice).
5. Review your copied templates and determine which ones you require
6. Use the copied templates as a comparison basis to create a new set of templates in the Template Generator.
Appendix 1: Common Problems and Resolutions
Q. The ice Service wonât start - or it starts and then stops.
A. You would resolve this by looking in the Microsoft Windows EventViewer. This often happens because the account the service is running as doesnât have full control over the content directory. It is recommended that you give the service a special account that has full control access to the content directory (and subdirectories), but no access to any other directory, thereby ensuring that even if the web server is hijacked, it cannot be used to access other parts of the system or network.
A2. This can also happen because the account does not have the Log on as a service User Right on the server. This is resolved by checking the Log on as a Service user right contains the account, and the Deny logon as a service right does not have the account (these can be found in Local Security Policy, Computer Configuration Windows Settings Security Settings Local Policies User Rights Assignment).
Q. Everything installed okay, the templates generated, and the service is running, but the Server wonât let me log in.
A. Make sure you have a valid ice license. The Server will refuse access to everyone until the TRIM License is installed correctly. Also, check your username and password, and that you have a login to the TRIM dataset you are using.
Q. On installation, I get an error that says âFormgen.exe generated an exceptionâ.
A. This problem may occur when the account that runs the MSI doesnât have permissions to execute a program on the local machine. The Formgen.exe application is run on completion of the MSI in order to generate the templates for your TRIM dataset. You may need to run the formgen.exe utility manually using an account that has sufficient privileges on the server. Alternatively, use the interactive template generator to build your templates and export them to your content directory.
A2. Alternatively, it could be because one of the Server requirements has not been met. Please refer to the Server requirements. For instance, we have found that this problem can occur if .NET 2.0 is not properly installed, or if the MSI is run on an Operating System (such as Windows 2000) that is not supported by ice
Q. After installation, trying to access the ice site with a web browser gives me an error that says: âError Creating or Accessing the Document Store directoryâ.
A. This error occurs when permissions on the content\cache and content\store directories arenât configured correctly. The ice server impersonates the user when the user accesses their drafts folder, and so it is important that all users who will be using ice are given full control over the directory. Make sure that a defined NT group containing all users that will be accessing ice has âfull controlâ access to this directory.
Q. When I run the installer, Windows asks me if I âHave the correct privileges to install a serviceâ.
A. This is caused by the account that youâve specified to run the service not having the group policy privilege Log on as a service Make sure that the account you are using to run the ice service has this privilege granted.
Troubleshooting
If you encounter problems accessing ice, they are usually resulting from the configuration of the server computer. The client requires only a current version of either Internet Explorer or Mozilla Firefox.
In the event of templates not generating correctly, look in the server log, and it will report missing HTML files. If a user login fails for any reason (for example, if the user entered incorrect details, if ice is not licensed or if TRIM Context is unavailable) , information about your (ICE) problem should be displayed.
TRIM Context
Ensure you have TRIM Context 6 (with ice included in the license) setup on the computer you are installing ice on.
Microsoft .Net
Ensure you have .Net 2.0 (DotNet) setup on the computer you are installing ice on (may also require Windows Installer 3.1).
Environment Variable
Check that the Environment Variable is set correctly. This should be set automatically during installation, but is worth checking.
1. Open Control Panel â System â Advanced tab and click Environment Variables,
2. In the System Variables field, add the TRIM Context directory to the Path statement (for example, C:\Program Files\TRIM Context)
Trusted Site
Client Only. Adding ice as a Trusted site is required when the client is not connected to the network/domain or if the organizations internet access is locked down. Check that the site is added set as a Trusted site in Internet Options.
1. Open Control Panel â Internet Options â Security tab and select the âTrusted sitesâ zone
2. Click Sites and add the ice website to the zone (for example, http://localhost ).
! Note: Template Generator and Windows 2003 Environments - Internet Explorer on Client machines must have access to the ice web site. You will need to add the ice web page to the Trusted site for the Template Generator to operate correctly. The ice Template Generator uses ActiveX Controls, so if Internet Explorer does not have access to the ice site, then the Template Generator will not preview the ice templates. |
TRIM Context ICE Server
Check the TRIM Context ICE Server in the Services console.
1. Open Start menu â All Programs â Administrative Tools and select Services.
2. Scroll down the list in the Services window and select the TRIM Context ICE Server entry. It should be set to automatic. If it is, but is failing to start, you may need to alter its âLog Onâ properties to use an account that has permissions to Log on as a service, and access the \content directory of the ice installation.
If the ice service won’t start, and the Event Viewer contains no errors (or useful feedback on the ice service), this may be because of missing files, or incorrect configuration settings. To resolve this, stop the service, and run ICEInteractive.exe. This will show you a real-time log of server messages, including errors. Press ‘Start’, and then look at the messages (for example, if ‘errLogin.html’ is missing, an entry will appear here saying that the server cannot find the file. To resolve this, you need to find errLogin.html, and put it in the location where the server is looking)
Template Generator
Has all the templates needed by ice been generated? Formgen.exe (the command-line auto-template generator tool) must be run after installation. You will also need to manually run Formgen, or the Template Generator if you have created new Record Types (or modified existing ones). (See Template Generator for details about running the Formgen executable.)
Alternatively, you may also generate and modify your templates using the Template Generator found in TRIM Context Administrative Tools. This is a graphical tool, which gives you the ability to customise your own templates before they are generated.
TRIM Context ice Interactive Server
If you are encountering problems accessing ice , you may run the TRIM Context ice Interactive Server program. This may be accessed from the TRIM Context Start menu.
! Note: You MUST stop the TRIM Context ICE Server in the Services window before running the TRIM Context ice Interactive Server program. |
The TRIM Context ice Interactive Server will display details regarding the calls made to the ice server from a client and the responses of the server.
Appendix 2: List of Operating Files
Server Directory
Formgen.exe - This file is a silent command line only version of the ice template Generator. Running it with the appropriate command line parameters will regenerate your templates to the defaults, based on your record entry forms in TRIM.
Tower.ice.Interactive.exe - This file is the interactive version of the Server. By running the Server in interactive mode, you can see each request as it passes which can be useful for troubleshooting. Itâs much slower than the normal Server though, so donât run it for production purposes.
Iceservice.exe - The ice Service. You can use this to setup alternative ice services for different datasets.
AxInterop.SHDocVw.dll
Interop.SHDocVw.dll
Org.Mentalis.Security.dll
SharpZipLib.dll
Tower.Blog.dll
Tower.Servers.dll
Tower.Servers.TemplateServer.dll
Tower.Ice.Core.dll
Tower.Ice.dll
Tower.Ice.Formgen.dll
Tower.TrimServer.dll
TRIMNet.dll (resides in the core TRIM directory)
These Libraries contain all the rules and processing information used by the ice service.
serverConfig.XML - This is the Server configuration file.
Content Directory
Cache - This Folder contains the supporting files used by TRIM when running as a Server-side service. This folder can be deleted - Thereâs no valuable data in it, and the ice Server will recreate it when it is re-started. Most importantly, This folder needs to be enabled so that all users who will use ice can write to it. The Cache directory is used by TRIM during the authorization process.
! Note: Make sure that users have read and write permissions to the cache directory. |
Static - The static directory contains static content thatâs served through the ice Web Server. Folders contained within it include:
Help - This folder contains static help content used in the ice interface
Js - This folder contains all the javascript files used by the ice interface
Template - This folder contains supporting files that assist with the rendering of templates. This includes the icons and images directory, which is where all the icons and images displayed in the interface can be found.
Store - The store directory contains a collection of directories that map to URIs of people who can log into the ice Server. This is where all drafts are stored for each individual who logs into ice For each user, youâll find two files for each draft they have. Each of these files is given the same number, but two discreet extensions. The first file is the x.edoc file. This file contains the electronic document that is in the draft. The other file, x.obj contains all the metadata that is stored against the draft.
Template - The files stored here are the heart of the ice interface - the templates. As well as some special templates, like home, there is a template for every object that can be viewed in TRIM. Editing the HTML in these files will affect the way the ice interface looks.