Summary
Updates to KM473960 “How to clear any existing properties or files after uninstalling SiteScope” for 11.x installations
Question
Some steps exposed in KM473960 are no longer applicable to 11.x versions and higher, such the vpd.properties file no longer checked by new “Install Anywhere” installers.
How manually wipe out an existing SiteScope 11.x installation?
Answer
Follow the next steps:
1. Stop the service to allow deletion of all files.
2. Rename or delete the entire SiteScope folder.
3. Eliminate the service by running the command sc delete <SiteScope service name>
4. Clean up the registry:
-
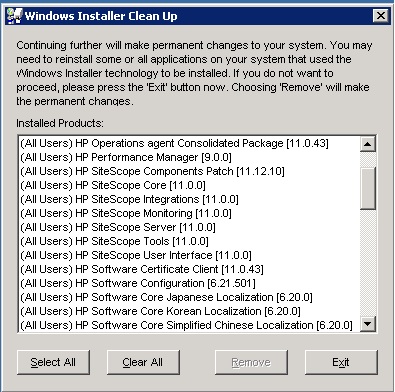
To remove every new SiteScope 11.x packages registration install in the server the MS tool called Windows Install Clean up. Download it from here: msicuu2.zip.
-
Launch the App and select all components with the word “SiteScope” (notice some other non-SiteScope HP components may appear):
-
To remove the registration of SiteScope as a program installed in the control panel list remove the following registry keys; they are the most important ones looked for by the “Install Anywhere” installer:
HKEY_LOCAL_MACHINE\SOFTWARE\Hewlett-Packard\SiteScope
And if x64 OS:
HKEY_LOCAL_MACHINE\SOFTWARE\Wow6432Node\Hewlett-Packard
Notes:
-
Sometimes a reboot of the server is needed to apply registry changes.
-
It might be needed to eliminate Environment variable %SITESCOPE_HOME%
-
Some other random behaviors might appear in the next run of the “Install Anywhere” installer if last 2 registry keys are left, such not stopping installation progress due to “already installed” error, but continuing picking up last installation exact folder location.
-
If the old service is left behind by a failing uninstallation and you proceed with re-installation the process with fail during post installation phase. Exit the installation process and delete old service as explained in step #4; then manually install the new service definition with the following command:
<SiteScope root directory>\tools\SiteScopeService.exe -install <servicepath> <serviceparams> <servicename> -force
Use the following information:
Servicepath: <SiteScope root directory>
eg: C:\SiteScope
ServiceParam:
"-Dcom.sun.management.jmxremote=true -Dcom.sun.management.jmxremote.port=28006 -Dcom.sun.management.jmxremote.authenticate=false -Dcom.sun.management.jmxremote.ssl=false -server -Xmx1024m -Xms512m -Xmn160m -Xrs -XX:+UseParNewGC -XX:+UseConcMarkSweepGC -XX:MaxPermSize=240m -XX:+HeapDumpOnOutOfMemoryError -showversion -Dcatalina.home="<SiteScope root directory>\Tomcat" -Djava.security.auth.login.config=file://///${catalina.home}/../conf/jaas.config -Dflipper.param.file=..\conf\flipperSiteScope.properties -Dtopaz.home=.. -Dnetworkaddress.cache.ttl=86400 -Dnetworkaddress.cache.negative.ttl=0 -Djavax.xml.parsers.DocumentBuilderFactory=com.sun.org.apache.xerces.internal.jaxp.DocumentBuilderFactoryImpl -DSiteScope=true -cp "<SiteScope root directory>\Tomcat\bin\bootstrap.jar" org.apache.catalina.startup.Bootstrap start"