Environment
Situation
During installation, an error message appears indicating that PlateSpin Migrate cannot connect to IIS with HTTP or HTTPS, when Setup attempted to connect with the existing IIS Server. The cause of this error generally indicates a problem with the IIS Server.
Resolution
Ensure that IIS and ASP.NET are installed properly.
Windows 2003 Server Procedures:
NOTE: For Windows 2003 R2 Servers, please see the section below.
STEP ONE: INSTALLING INTERNET INFORMATION SERVICES (IIS) and ASP.NET
Under Windows 2003, ASP.NET is a separate Windows Component and can be installed as follows:
- Open the Windows Control Panel
- Open the 'Add or Remove Programs' utility
- Click on the button labelled 'Add/Remove Windows Components'. This will bring up the Windows Component Wizard.
- Highlight the 'Application Server' option and click on the Details button to bring up the available components.
- Ensure that ASP.NET and Internet Information Server (IIS) are checked and click on Ok. Click on the Next button to proceed to complete the installation.
- IIS and ASP.NET should now be installed on the system.
STEP TWO: INSTALLING .NET 2.0
.NET Framework 2.0 can be installed as follows:
- Download .NET 2.0 package from the Microsoft web site (See Related Links at the bottom of the article)
- Install the .NET 2.0 package
To ensure that ASP.NET 2.0 is properly registered with IIS, run the command:
"C:\WINDOWS\Microsoft.NET\Framework\v2.0.50727\aspnet_regiis.exe" -iWithin the IIS Management console, ensure that ASP.NET v2.0 is properly setup by right clicking on the Default Web Site, select Properties and clicking on the ASP.NET tab.
Windows 2003 Server R2 Procedures:
Since Windows 2003 R2 has .NET 2.0 Framework installed (but not ASP.NET), the procedures are slightly different:
- Open the Windows Control Panel
- Open the 'Add or Remove Programs' utility
- Click on the button labelled 'Add/Remove Windows Components'. This will bring up the Windows Component Wizard.
- Highlight the 'Application Server' option and click on the Details button to bring up the available components.
- Ensure that Internet Information Server (IIS) are checked and click on Ok. Ensure that ASP.NET is NOT CHECKED - as doing so will install and bind ASP.NET 1.1. Click on the Next button to proceed to complete the installation.
- Install .NET 2.0
To ensure that ASP.NET 2.0 is properly registered with IIS, run the command:
"C:\WINDOWS\Microsoft.NET\Framework\v2.0.50727\aspnet_regiis.exe" -iWithin the IIS Management console, ensure that ASP.NET v2.0 is properly setup by right clicking on the Default Web Site, select Properties and clicking on the ASP.NET tab.
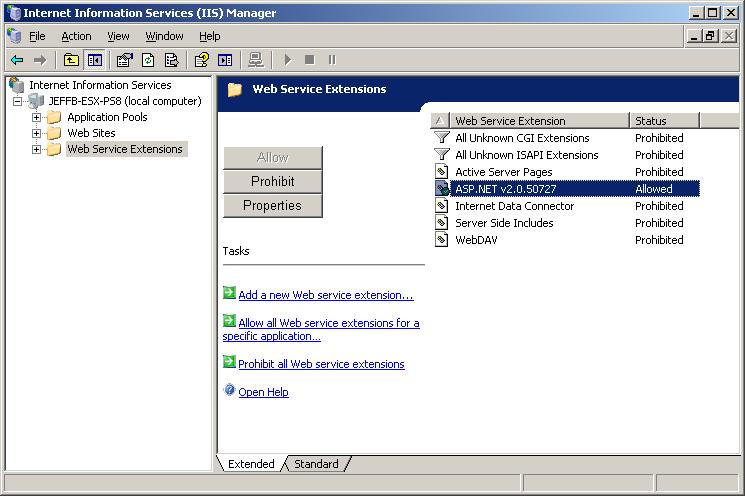
NOTE: You may need to set the ASP.NET v2.0 web service extension in IIS to allowed as listed below.