Environment
Access Manager 4.4
Access Gateway Appliance or Service
Groupwise WebAccess 2014
Access Gateway Appliance or Service
Groupwise WebAccess 2014
Situation
Multiple single sign on options exist when the Access Gateway is used to accelerate Groupwise including formfill and identity injection. With formfill, and it's dependency on HTML login pages, there is always a risk that a change in the Groupwise login page through an upgrade can cause formfill to fail.
Using Identity injection is a safer approach and mitigates the risk of changing login pages. The following document outlines how you can configure a reverse proxy for GroupWise 2014 and single sign on with Identity Injection.
Using Identity injection is a safer approach and mitigates the risk of changing login pages. The following document outlines how you can configure a reverse proxy for GroupWise 2014 and single sign on with Identity Injection.
Resolution
The following are basic instructions on how to configure a domain based
proxy service as well as what to configure for Identity Injection The concepts also applies to path based multi-home
configurations as well:
1. Create the new protected resource for WebAccess. (please refer to the documentation on more details on how to configure a protected resource if you have any questions on how to do so: https://www.netiq.com/documentation/access-manager-44/admin/data/b1wyfmu.html)
2. Give the protected resource the path of /gw/*
3. Give the protected resource an authentication procedure of Secure Name/Password-Form
Identity Injection:
1. On the Identity Injection tab click on manage policies to open a separate window and create the policy.
2. Click new > Access Gateway: Identity Injection (also give the policy a name)
3. Under Actions select New > Inject into Authorization Header
4. For User Name: Select Credential Profile (LDAP Credentials:LDAP User Name will come up by default)
5. For Password: Also Select Credential Profile (on this one you will have to manually select LDAP Credentials > LDAP Password)
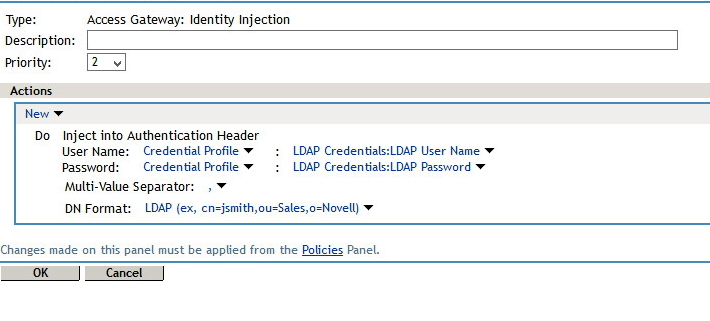
6. Click OK > OK > then Apply Changes > Close.
7. The Identity Injection policy will now show up in the policy list in the protected resource list. Select it, and choose Enable.
8. OK out of all screens and update the Access Gateway Configuration.
You will then need to enable basic authorization on the WebAccess Server:
On the WebAccess server, open the webacc.cfg file in a text editor.
Search to find the following line:
#Cookie.domain=.novell.com
Remove the pound sign (#) to activate the setting.
Replace .novell.com with the part of your organization’s Internet domain name that is common between NAM and the Web server where the WebAccess Application is installed.
For example, if the LAG is at lag.novell.com and the WebAccess Application is at webacc.novell.com, the domain name used to create cookies would be .novell.com, so that the cookies are accepted by both servers.
Next, find #Security.Authenticate.header=
Remove the pound sign (#) to activate the setting.
Add the IP address of your LAG after the =
*optional but preferred*
If you want to enable simultaneous logout (logs out of WebAccess and NAM simultaneously):
Search for #Security.Logout.Url
Remove the pound sign (#) to activate the setting (either IP or DNS name).
Change IP or DNS name to match you LAG IP or Published DNS name and add =/AGLogout after it.
example: Security.Logout.Url.192.168.1.102=/AGLogout or Security.Logout.Url.mail.test.com=/AGLogout
Save the webacc.cfg file.
Restart Tomcat to immediately enable the changes, or wait 10 min for the refresh routine to put changes into place (no service disruption).
1. Create the new protected resource for WebAccess. (please refer to the documentation on more details on how to configure a protected resource if you have any questions on how to do so: https://www.netiq.com/documentation/access-manager-44/admin/data/b1wyfmu.html)
2. Give the protected resource the path of /gw/*
3. Give the protected resource an authentication procedure of Secure Name/Password-Form
Identity Injection:
1. On the Identity Injection tab click on manage policies to open a separate window and create the policy.
2. Click new > Access Gateway: Identity Injection (also give the policy a name)
3. Under Actions select New > Inject into Authorization Header
4. For User Name: Select Credential Profile (LDAP Credentials:LDAP User Name will come up by default)
5. For Password: Also Select Credential Profile (on this one you will have to manually select LDAP Credentials > LDAP Password)
6. Click OK > OK > then Apply Changes > Close.
7. The Identity Injection policy will now show up in the policy list in the protected resource list. Select it, and choose Enable.
8. OK out of all screens and update the Access Gateway Configuration.
You will then need to enable basic authorization on the WebAccess Server:
On the WebAccess server, open the webacc.cfg file in a text editor.
Search to find the following line:
#Cookie.domain=.novell.com
Remove the pound sign (#) to activate the setting.
Replace .novell.com with the part of your organization’s Internet domain name that is common between NAM and the Web server where the WebAccess Application is installed.
For example, if the LAG is at lag.novell.com and the WebAccess Application is at webacc.novell.com, the domain name used to create cookies would be .novell.com, so that the cookies are accepted by both servers.
Next, find #Security.Authenticate.header=
Remove the pound sign (#) to activate the setting.
Add the IP address of your LAG after the =
*optional but preferred*
If you want to enable simultaneous logout (logs out of WebAccess and NAM simultaneously):
Search for #Security.Logout.Url
Remove the pound sign (#) to activate the setting (either IP or DNS name).
Change IP or DNS name to match you LAG IP or Published DNS name and add =/AGLogout after it.
example: Security.Logout.Url.192.168.1.102=/AGLogout or Security.Logout.Url.mail.test.com=/AGLogout
Save the webacc.cfg file.
Restart Tomcat to immediately enable the changes, or wait 10 min for the refresh routine to put changes into place (no service disruption).