Environment
Reflection for the Web 2011 (All Editions)
Reflection Security Gateway 2014
Reflection Security Gateway 2011
Situation
This technical note explains how to configure Reflection for the Web or Reflection Security Gateway to automatically use a digital certificate, obtained from a Common Access Card (smart card), to authenticate to the Reflection for the Web Management Server or to connect to a host.
This technical note assumes that you have already configured Reflection for the Web or Reflection Security Gateway for x509alt Client Authentication as documented in KB 7022205.
Resolution
Enable Caching of Digital Certificate Selection
Follow these steps to configure Reflection for the Web or Reflection Security Gateway to cache your digital certificate selection.
- Use a text editor to create a custom login page template file named customcert.jsp with the following code:
<%@ taglib uri="/WEB-INF/rweb.tld" prefix="rweb"%><html><head> <meta http-equiv="Cache-Control" content="no-cache"> <meta http-equiv="Pragma" content="no-cache"> <meta http-equiv="Expires" content="0"> <title>Reflection for the Web</title><style type="text/css"></style></head> <body><img src="RWeb_M.png" align="top"><BR> <rweb:applet userequest="true"> <rweb:param name="showCloseLinksListButton" value="false"/> <rweb:param name="customCertificatePrompt" value="c"/> </rweb:applet></body> </html> |
- Save customcert.jsp to the following folder:
<install path>/ReflectionServer/apache-tomcat/webapps/rweb/templates- In the Administrative WebStation, click Settings in the left pane, then on General tab in the right pane, enter the filename, customcert.jsp, in the "Custom login page" field.
- Click the Save Settings button at the bottom of the General tab.
How to Cache Your Digital Certificate Selection
Once the custom launcher template file, customcert.jsp, has been added, when users access the Reflection Server or select a session that requires client authentication from the Reflection for the Web Links List, they can configure Reflection to automatically use a specific digital certificate for the connection.
Follow these steps to use this feature.
- Use a client web browser to access the Reflection Sever, for example: http://<servername>:<port>/rweb.
- When prompted, enter the PIN number (Personal Identification Number) of the smart card being used for authentication.
- The "Choose a digital certificate" dialog box opens displaying a check box in the bottom-left corner labeled "Always use this certificate without prompting,” and a new column called "Type" will be visible.
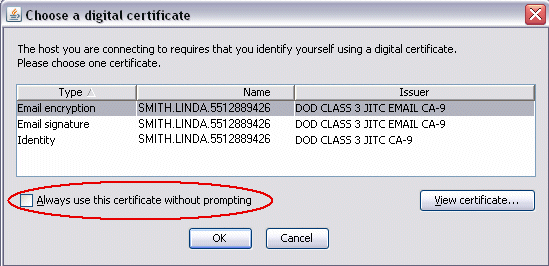
- Click the correct certificate for the connection you are making. Use the Type column to help identify the proper certificate.
- Select the "Always use this certificate without prompting" check box to save the certificate for this connection. When you select this option, the user will not be prompted to select the certificate on subsequent logons.
- Click OK.
How to Delete a Cached Certificate Selection
Once a digital certificate selection has been cached, by default, there is no way to delete the selection. This section describes how to configure the Reflection Server to allow users to delete their certificate cache selection. Once deleted, users will be prompted to select their certificate the next time they log on to the Reflection Server.
Why Delete a Saved Certificate Selection?
A user may need to delete a saved certificate selection if the certificate expires or becomes corrupt, or if the user selected and saved the wrong certificate.
How Is a Certificate Selection Deselected?
Before users are able to delete a certificate, the Reflection Server administrator must first create an HTML page that loads the Certificate Manager applet.
The Certificate Manager utility has the following limitations:
- The Certificate Manager displays only certificates used for authentication to the Reflection Server.
- The utility can be used only to manage client-based certificates, not server-based resources such as single sign-on (SSO) macros or server-based credentials.
- The Reflection resource store file, where certificate preferences are stored, is unique to the user currently logged in to Windows. The Certificate Manager, therefore, displays only certificates that apply to the currently logged in user. If multiple users share a computer, each user must run the utility while logged on using his or her own Windows account.
Create an HTML Page that Loads the Certificate Manager
Follow these steps to create an HTML page that opens the Certificate Manager user interface to the Reflection Server.
- Using a text editor, such as Notepad, copy the following html code and paste it into the text editor:
<HTML><HEAD><TITLE>Reflection for the Web Certificate Manager</TITLE><META HTTP-EQUIV="Content-Type" CONTENT="text/html"><META HTTP-EQUIV="charset" CONTENT="iso-8859-1"></HEAD><BODY><H3>Certificate Manager</H3><applet MAYSCRIPT name="CertManager" codebase="ex/" code="com.wrq.rweb.Launcher.class"width="560" height="400" archive="Launcher.jar"><param name="cabbase" value="Launcher.cab"><param name="launcher.sessions" value="ResInspector"></applet></BODY></HTML> |
- Save the document as an html file. For the purposes of this technical note, name the file CertManager.html.
- Copy CertManager.html to the root directory of your Reflection Server installation. For example, <path>/Attachmate/ReflectionServer/apache-tomcat/webapps/rweb.
Access the Certificate Manager and Delete a Certificate
Follow these steps to access the Certificate Manager from a client workstation logged on as a user that has previously saved their certificate selection.
- Using the client’s web browser, browse to the Certificate Manager page by entering the following URL in the address field:
http://<servername>:<port>/rweb/CertManager.html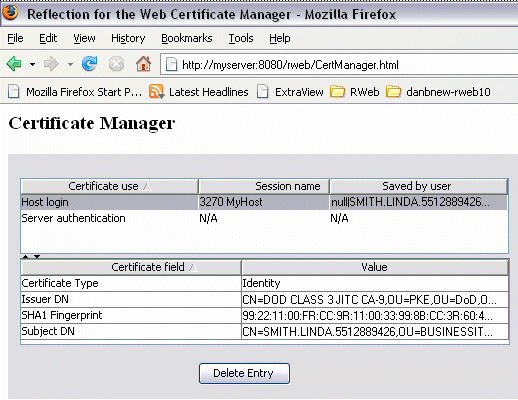
- In the top pane of the Certificate Manager, click the certificate to delete. When selected, the certificate details are displayed in the lower pane.
- Click Delete Entry.
- Close the browser or navigate away from the Certificate Manager page.
This removes the certificate cache from the user’s workstation. The next time the user accesses the Reflection Server, the user will be prompted to select the appropriate certificate during authentication.