Environment
Reflection X 2014 R1 SP1
Reflection Pro 2014 R1 SP1
Reflection for IBM 2014 R1 SP1
Reflection for the Web 2014 (All Editions)
Reflection for the Web 2011 (All Editions)
Situation
This technical note provides instructions for Reflection 2014 users to configure and use Reflection for the Web ID Management Server to establish host sessions.
ID Manager, optionally installed with Reflection for the Web, configures and monitors a pool of resource IDs that a client can use to establish a host session, thereby eliminating the need for administrators to create configurations for every client. Depending on the type of terminal or printer, these resource IDs may represent addresses or identifiers as required.
You can use ID Manager with the following types of Reflection terminals and printers:
- IBM 3270 Terminal
- IBM 3270 Printer
- IBM 5250 Terminal
- IBM 5250 Printer
Resolution
Prerequisites
To use the ID Manager feature, you need:
- Reflection 2014 R1 SP1 or higher.
- Access to Reflection for the Web 2014 or 2011 with ID Manager configured.
To configure ID Manager, see:
- Setting up ID Management: https://docs.attachmate.com/reflection/rweb/2014/r1/installguide/en/readme_confg_idmgr_cre.html
- Configure Sessions to use ID Manager to Assign Terminal IDs: https://docs.attachmate.com/extra/x-treme/9.3sp1/help-update/en/32297.htm
Procedure
Use the following procedure to create a terminal session in Reflection that accesses IDs from the ID Manager server each time you connect to the host:
- Make sure that you have the following information for the ID Manager server:
- The complete URL. For example, http://server.name/rwebidm, where rwebidm is typically case sensitive, but server.name is not.
- The parameters required by the ID Manager server to allocate an ID, such as a pool name).
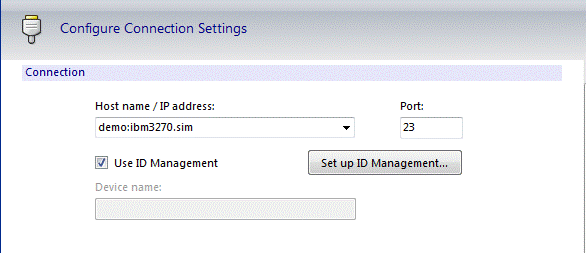
- Open the Document Settings dialog box by going to File > Settings > Document Settings.
- Under Host Connection, select Configure Connection Settings.
- Under Connection, select Use ID Management and then click Set up ID Management.
- Under Server, enter the Reflection ID Management Server URL.
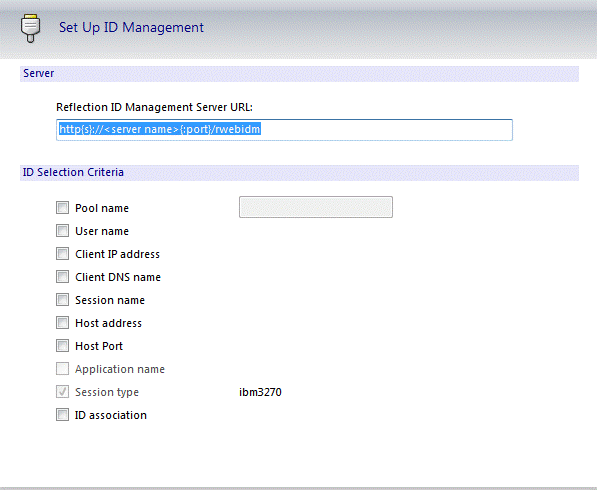
- Select the ID Selection Criteria, such as Pool name.
Configure a Printer Session Document To Use ID Manager
Use the following procedure to create a printer session in Reflection that accesses IDs from the ID Manager server each time you connect to the host.
- Make sure that you have the following information for the ID Manager server:
- The complete URL. For example, http://server.name/rwebidm, where rwebidm is typically case sensitive, but server.name is not.
- The parameters required by the ID Manager server to allocate an ID, such as a pool name).
- Open a Reflection Printer Session Document File.
- From the Connection menu, choose Session Setup.
- Under Transport, select Use ID Management and then click Set up ID Management.

- In the ID Management dialog box, enter the Reflection ID Management Server URL.
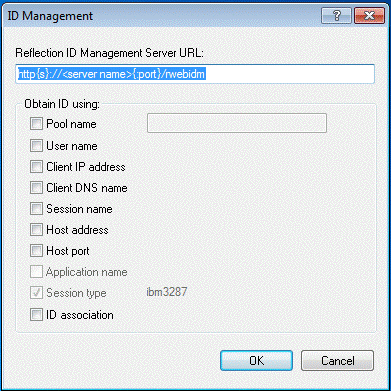
- Select the ID selection criteria, such as Pool name.