Environment
Situation
Follow the directions in this technical note if you run the DATABridge Client 6.1 from a command line and want the service to run it or if you need to add existing data sources to the service.
These instructions assume that you've successfully installed the Client Console, which allows you to control and customize the service. For instructions on installing the Client Console, see the DATABridge Installation Guide, https://docs.attachmate.com/databridge/6.1/install.pdf.
Note: If you're in the process of upgrading your DATABridge software, instead, use the instructions in the DATABridge Installation Guide for upgrading the Client.
Resolution
To Switch to the Service-based Client (Windows)
- If you use a binary Client configuration file (that is, the configuration file has not been exported to text and edited), skip steps 1 and 2. From the working directory for your data source, in the config folder, copy the text configuration file dbridge.cfg to a file named dbridge.ini.
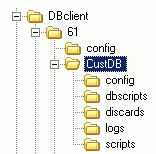
For example, the working directory for a data source called CustDB (C:\DBclient\61\CustDB)will have the following structure:

Figure 1. Subfolders: config, dbscripts, discards, logs, scripts
- From a command prompt, go to the working directory for your data source, and run the dbutility IMPORT command. This creates a binary configuration file required by the service.
- Make sure that the service is running. For instructions, see the DATABridge Installation Guide.
- Start the Client Console. If a service hasn't been added, see the Client Console Help (Help > Help Contents).
- From the DataSource menu, select Advanced > Add Existing Data Source, type the data source name (for example, CUSTDB), and then click OK.
To Switch to the Daemon-based Client (UNIX/Linux)
- Log on as the userid specified in the USERID parameter of the file globalprofile.ini. This is the same userid you currently use to run the command-line client.
- Set the current directory to the home or other directory to which you have write access and copy the script dbdaemon from the install directory to it. This allows you to make changes to the script.
- In an editor, open the script dbdaemon.
- Make sure that the environment variables (such as INSTALL_DIR, WORKING_DIR, ORACLE_HOME) are correct for your system and edit them as needed.
- In the section # Source function library, locate the else statement.
- After the else statement, type echo and then type a text string enclosed in quotation marks, such as "The daemon cannot start because script 'functions' cannot be found."
This echo statement ensures that a message is returned if the daemon doesn't start.
- Save and close the script.
Note: If you run SUSE Linux, you can delete the entire else section in place of step 4.
- Start the daemon by typing the following:
dbdaemon start- To verify whether DBClntControl is running, from a command line, use the ps function.
- If DBClntControl is running, it returns an entry similar to the following:
donaldduck@VMOPENSUS114-64:~> ps -ef | grep DBCdonaldduck 1110 1 0 12:00 ? 00:00:00 /opt/dbridge70/DBClntControl- If DBClntControl isn't running, in the script dbdaemon, make sure that the WORKING_DIR and INSTALL_DIR environment variables are correct or the daemon won't be able to start. Also, check the Client working directory to see if a file dbdaemon.log was created and may contain clues about reason for the failure.
- Start the Client Console. If a service hasn't been added, see the Client Console Help (Help > Help Contents).
- From the DataSource menu, select Advanced > Add Existing Data Source, type the data source name (for example, CUSTDB), and then click OK.
- (Optional, but recommended) To make the daemon automatically start upon reboot, type su to switch to the root user and then copy the script dbdaemon from the location you specified in step 5 to the following location:
- (Windows) /etc/init.d/
- (HP-UX only) /sbin/init.d