Environment
Reflection for Secure IT Windows Server version 7.2 or higher
Reflection for Secure IT Web Edition version 8.1 or higher
Situation
The example in this technical note provides basic steps to configure PKI in a Windows environment. Use this information as a starting place to understand how to configure PKI for your environment.
Resolution
Configuring PKI in a Windows Environment – An Example
Configuring PKI is a multi-step process:
B. Configure the server (or clients) to use the PKI Services Manager validation services
C. Configure the clients (or server) to authenticate using certificates
Note: The example in this technical note provides basic steps to configure PKI on Windows Server 2008. Use this information as a starting place to understand how to configure PKI for your environment.
A. Configure the PKI Services Manager
The following steps use a Windows PKI Services Manager and a Local Store for the CA Certificate Trust Anchor and CRL checking. When configuring the PKI Services Manager, you must be logged in as an administrator.
- Launch the Reflection PKI Services Manager console (Start > All Programs > Attachmate Reflection > PKI Services Manager).
Note: On Windows, starting the console or the service for the first time initializes PKI Services Manager. This creates the required data folders and default settings files.
- On the Server menu, click Start to start the PKI Services Manager server. (The PKI Services Manager service also starts automatically when you restart Windows.)
- Download a CA certificate (*.cer) to the server running the PKI Services Manager and copy that certificate to the Reflection PKI local store, which is typically located in the following location:
C:\ProgramData\Attachmate\ReflectionPKI\local-store- Download the CRL file(s) (*.crl) to the same local store folder. URL paths for the CRL Distribution Points are normally listed on the Details tab of the Certificate:
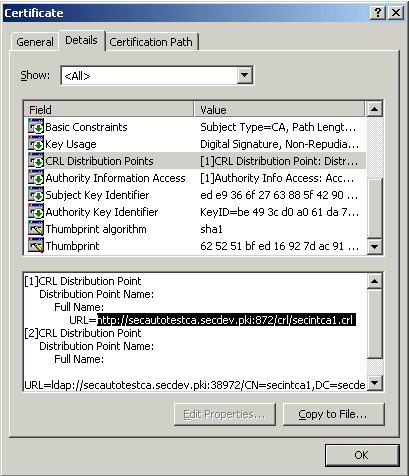
Figure 1 - Identifying URL Paths for the CRL Distribution Points
- In the PKI Services Manager Console, click the Local Store pane. The contents of the default local store are listed by default. You should see the certificates and crls you placed in this store.
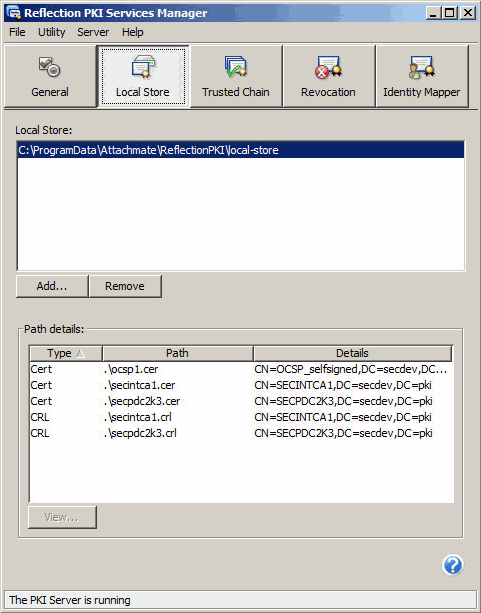
- Click the Trusted Chain pane. Under Trust Anchors, click Add. Leave "Local store certificate" selected and click Browse. Select the CA certificate you want to use as the Trust Anchor. Click OK twice. At this point, settings can be saved since a Trust Anchor has been established.
- Click the Revocation pane and ensure that the Local Store is selected since the Certificate Revocation List (CRL file) resides here (see step 3 above).
- Click the Identity Mapper pane, which is used to define rules that map certificates to identities. There are separate procedures for mapping user certificates and for mapping server certificates.
Mapping User Certificates:
- Click Add. From the first drop-down list, select "User Certificate (identifies a user to a server).
Select the “Apply this rule only to this server” check box and enter the server name, for example, winserv1. (Do not use the server’s DNS host name).
Note: This step is required if you are using Windows local accounts. You may skip this step if you are using Windows domain accounts.
- Specify one or more identities for the mapped certificate using a comma separated list in the field provided, for example:
<domain name1>\<username1>,<domain name1>\<username2>- Specify how the contents of the certificate affect authentication:
- Enable "Allow authentication if the following condition is met."
- Select "Subject Common Name" from the first drop-down list.
- Select "Contains" from the second drop-down list.
- In the third field, enter a value found for Subject when viewing details of the client certificate.
- Click OK. The rule will display as follows:
User-address=winserv1{<domain name1>\<username1>,<domain name1>\<username2>}Subject Contains <Value>.Note: The status bar will display the rule as you build it.
View Full Size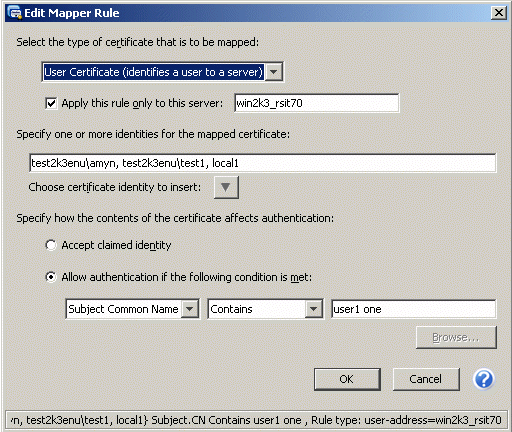
Figure 3 - Sample Mapped User Certificate
Mapping Server Certificates:
- Click Add. Select “Host Certificate (identifies a server to a user)”.
- Specify one or more identities for the mapped certificate using a comma separated list in the field provided, for example:
ServerIPAddress, ServerName- Specify how the contents of the certificate affect authentication:
- Enable "Allow authentication if the following condition is met."
- Select "Subject Common Name" from the first drop-down list.
- Select "Contains" from the second drop-down list.
- In the third field, enter a value found for Subject when viewing details of the client certificate.
- Click OK. The rule will display as follows:
host{<ServerIPAddress>, <ServerName>} Subject.CN Equals <Value>.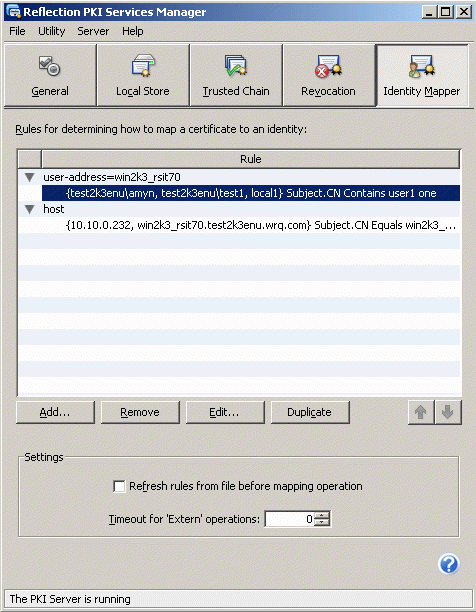
- Click File > Save. This updates the configuration files.
- Click Server > Reload. This ensures that the server is using the current settings.
B. Configure the server (or clients) to use the PKI Services Manager validation services
To use PKI Services Manager for validation, you must configure the application to connect to your configured PKI Services Manager. The following steps use the Reflection for Secure IT Server for Windows Server as an example.
- Launch the Reflection for Secure IT console (Start > All Programs > Attachmate Reflection > Reflection SSH Server Configuration).
- Click the Configuration tab and go to Authentication > Public Key > Certificates.
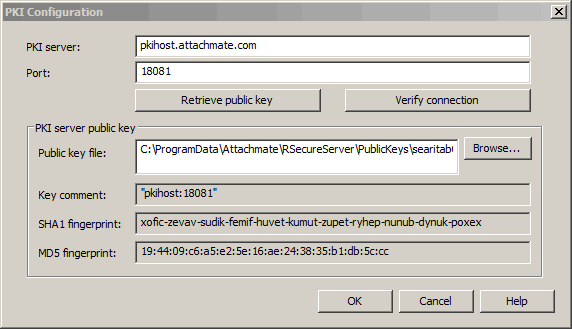
- The server is configured by default to connect to a PKI Services manager on the local host. Click Edit. For PKI server, specify your PKI Services Manager host name or IP address.
- Click Retrieve public key. A dialog box displays with the PKI Services Manager key fingerprint. (You can confirm this fingerprint from the PKI Services Manager console by clicking Utility > Public Key.) Click Yes to accept this key, then save the key to the default location.
- Click OK to close the PKI Configuration dialog box.
- Click the Save button or click File > Save Settings to save the PKI settings.
For information about configuring Reflection for Secure IT Web Edition, see the Administrator's Guide, which is available from https://support.microfocus.com/manuals/rsit-web-edition.html. In the User Manager Administration chapter, find the section titled "Configure Certificate Authentication."
For information about configuring the Reflection for Secure IT for UNIX, see the Users Guide, which is available from https://support.microfocus.com/manuals/rsit_unix.html. Find the sections titled "Configure Certificate Authentication for Users" and "Configure Server Certificate Authentication."
C. Configure the clients (or server) to authenticate using certificates
For instructions about configuring the Reflection for Secure IT clients and servers to authenticate using certificates, see the appropriate product documentation:
For Reflection for Secure IT Client for Windows documentation, see https://support.microfocus.com/manuals/rsit_win_client.html.
For Reflection for Secure IT Server for Windows documentation, see https://support.microfocus.com/manuals/rsit_win_server.html.
For Reflection for Secure IT Client or Server for UNIX documentation, see https://support.microfocus.com/manuals/rsit_unix.html.
Additional Information
Reflection PKI Services Manager Technical Resources:
Reflection for Secure IT Server for Windows Technical Resources:
Reflection for Secure IT Client for Windows Technical Resources:
Reflection for Secure IT Client and Server for UNIX Technical Resources:
Reflection PKI Services Manager Supported Platforms: KB 7021871