Environment
Situation
The Microsoft Windows Firewall is automatically enabled on all network connections and is configured to block all unsolicited incoming traffic. This note describes how to configure the Windows Firewall to work with Reflection X Advantage.
Note: The examples in this technical note are from Windows 7; the steps for other Windows operating systems are similar.
Resolution
About the Windows Firewall
The Windows Firewall is a stateful host firewall that runs in Windows and blocks all unsolicited incoming traffic, unless configured to allow the traffic. Outgoing traffic is not blocked by the firewall.
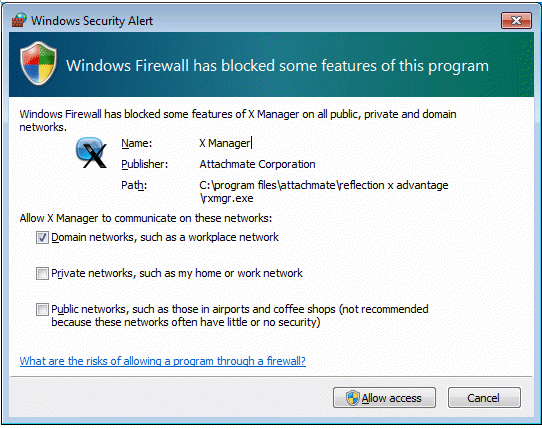
When the firewall detects unsolicited inbound application traffic, a Windows Security Alert is displayed. In Windows 7, the Alert window enables users to select whether or no to allow the incoming traffic, and for which networks: Domain, Private, or Public.
Running Reflection X Advantage
The first time you run the X Manager and start a session, or run the X Manager for Domains and log into a domain, the Windows Security Alert dialog box may open, depending on your firewall settings. To allow Reflection through the firewall on Windows XP, click Unblock (to always allow) or Ask Me Later (to allow the connection only this once). To allow Reflection through the firewall on Windows 7, ensure that the appropriate network check box is selected, and click Allow access.
On Windows XP, selecting Unblock adds the application to the Windows Firewall Exceptions list and enables the exception. Selecting Ask Me Later allows the current connection, but does not add the application to the Exceptions list. (You will be prompted with the Windows Security Alert again the next time you try to access this product or component.)
Note: The firewall does not need to be opened in the following instances:
- If you use X Manager with the connection method of Secure Shell to start a Xsession.
- When Remote session services is configured for High-latency network performance (regardless of connection method chosen).
- When Domain Services is configured for anything but None (regardless of connection method chosen).
If you disallow access for Reflection X Advantage and later want to change this setting, you must manually add Reflection to the Exceptions list, as described next.
Manually Adding Applications to the Windows Firewall Exceptions List
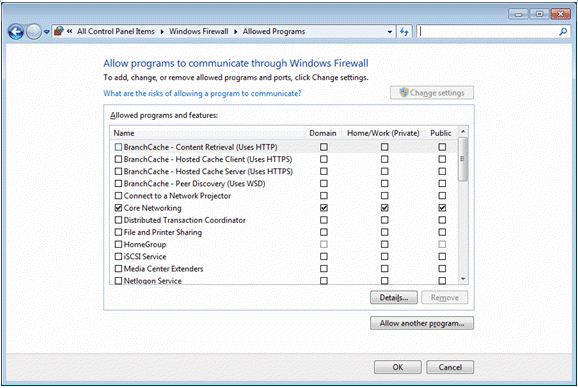
To manually add Reflection X Advantage to the Exceptions list, follow the steps for your operating system to open the dialog box:
On Windows 7
- From the Windows Control Panel, click Windows Firewall.
- From the left pane, click Allow a program or feature through Windows Firewall.
- Click Allow another program.
Selecting the Reflection File
Once you have opened the dialog box, select the executable file as follows:
Note: If Reflection X Advantage is installed as part of Reflection Desktop for X or Reflection Desktop Pro, the path to the Reflection X Advantage executables is:
C:\Program Files\Micro Focus\Reflection\<filename>.
If Reflection X Advantage is installed as part of Reflection X 2014, Reflection Pro 2014, Reflection X 2011, or Reflection Suite for X 2011, the path is:
C:\Program Files\Attachmate\Reflection\<filename>.
- Browse to and select the appropriate Reflection executable file(s):
- X Manager (standalone): rxmgr.exe
- X Manager for Domains: rxmgrdomains.exe
- Reflection X Service: rxs.exe
- Java package installed with Reflection X Advantage at:
C:\Program Files\Common Files\Micro Focus\JDK\<version>\bin\java.exe
-or-
C:\Program Files\Common Files\Attachmate\JRE\<version>\bin\java.exe
- Click OK to save the change.
For more information about manually adding applications or port exceptions to the Windows Firewall in Windows 7, see How to Configure Windows Firewall on a Single Computer on the Microsoft web site: https://msdn.microsoft.com/en-us/library/cc875811.aspx.

