Environment
Situation
Resolution
Verifying or Modifying Settings
To enable QuickTest Professional to work with your installation of EXTRA!, the settings in EXTRA!, QuickTest Professional, and the Windows Registry must be properly configured.
Follow these steps to verify or modify the required settings.
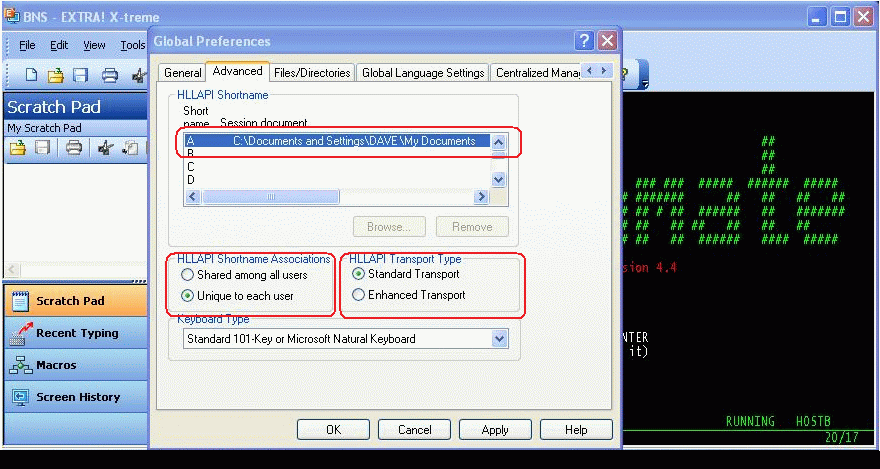
- In EXTRA!, on the Global Preferences > Advanced tab, select the required settings, shown in the screen shot below:
- HLLAPI Shortname: Short Name âAâ (only)
- HLLAPI Shortname Associations: Unique to each user
- HLLAPI Transport Type: Standard Transport
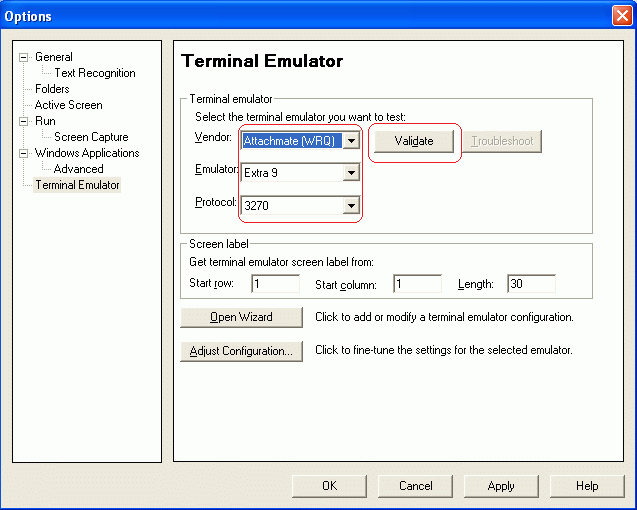
- In QuickTest Professional, on the Terminal Emulator screen, select the appropriate options, shown below:
- Vendor: Attachmate (WRQ)
- Emulator: Extra 9
- Protocol: 3270
- A representation of the EXTRA! session should display below the Validate button.
If the session displays, click OK. Configuration is complete.
If the session does not display, open the Windows Registry Editor and review the entries.
Warning: Proceed with caution when editing the Windows Registry. It is critical to back up the Registry before you proceed. For full details and warnings regarding editing the Windows Registry, see Microsoft Article 256986: http://support.microsoft.com/default.aspx?scid=kb;en-us;256986
- To open the Windows Registry Editor, click Start > Run. In the Open: field, enter regedit.
- Open the HKEY_CURRENT_USER registry key to the Extra 9 folder, as specified in the sample below.
- Locate the HllapiDllName and HllapiPath entries. If the values for these two keys are blank, then modify the lines to match the correct values highlighted in red below.
Note: The sample registry settings reflect an installation of EXTRA! that was installed using the default settings.
Sample Registry Entries (with Registry Editor Version 5.00)
[HKEY_CURRENT_USER\Software\Mercury Interactive\QuickTest Professional\ MicTest\Packages\TePackage\Terminal Emulators\Extra 9]"ChildClass"="Afx:400000:202b:""CompanyName"="Attachmate (WRQ)""DisplayName"="Extra 9""EmulatorType"="Extra""formatMode"=dword:00000000"HllapiDllName"="C:\\Program Files\\Attachmate\\EXTRA!\\ehlapi32.dll""HllapiPath"="C:\\Program Files\\Attachmate\\EXTRA!\\""HllapiProcName"="hllapi""HorizontalCenter"="yes""MainClass"="SDIMainFrame""OS"=dword:00000020"Protocol"="3270""RecordMode"=dword:00000002"RunSameProcess"=dword:00000001"standard"=dword:00000000"StatusBarClass"="msctls_statusbar32""SyncTime"=dword:000000c8"ToolBarClass"="""TrailingFieldLength"=dword:00000005"TrailingMode"=dword:00000001"CharHeight"=dword:00000000"CharWidth"=dword:00000000"LeftScreenOffset"=dword:00000000"TopScreenOffset"=dword:00000000"columns"=dword:00000050@="""rows"=dword:00000018"blanklines"=dword:00000000"hllapiproctype"=dword:00000000"unprotectedfieldsinlabel"=dword:00000000"windowtitle"="""recordsyncmode"=dword:00000001- Close the Registry Editor, and close QuickTest Professional.
- Open QuickTest Professional with EXTRA!

