Environment
Reflection Suite for X version 14.x
Situation
This technical note describes how to make a Reflection X 14.x connection through a Virtual Private Network (VPN).
Resolution
Connecting to a Host Using Reflection X
By default, Reflection X automatically loads your PCâs IP address from your Windows TCP/IP settings. This IP address is passed to the host when you make a Reflection X connection, and all display information is sent back to this IP address for the duration of this Reflection X connection.
Connecting to a Host Using Reflection X through a VPN
When connecting to your host through a Virtual Private Network, the VPN assigns a client IP address to your PC. This address is different from the address set in the Windows TCP/IP settings and is used for the duration of your VPN connection.
If the Microsoft VPN Client or Cisco 5000 VPN Client is installed on your workstation, Reflection X will automatically locate and use the VPN assigned IP address.
If you are using any other VPN client, Reflection X may not automatically detect the VPN IP address change and will continue to use the IP address loaded from the Windows TCP/IP settings for Reflection X connections. This results in the X client on the host sending display information to the incorrect IP address. If this occurs, you will see the following error message: "Cannot open display."
To allow Reflection X to connect through the VPN you must establish a VPN connection, determine the IP address assigned to the PC by the VPN, and manually configure Reflection X to utilize this IP address.
Note: VPN clients typically assign a different IP address each time a new VPN connection is made, you will therefore need to perform these steps each time you make a new VPN connection.
Determining the VPN-Assigned IP Address
You may be able to use the Reflection IPID daemon to automate the detection of the VPN-assigned IP address. For details, see KB 7021772.
If you are unable to use the Reflection IPID daemon, you will need to manually determine the VPN-assigned IP address. How you determine what IP address the VPN has assigned to your PC depends entirely upon the VPN client. You may be able to see the new IP address somewhere on the VPN login screens while making the VPN connection to your network. Or, after the connection has been made, you may be able to view the VPN client properties/settings (often accessed by right-clicking the VPN client icon on the Windows taskbar or system tray).
If you cannot locate the IP address assigned by the VPN in either of these manners, refer to the VPN documentation to determine the proper steps for obtaining this information.
Configuring Reflection X with the VPN-Assigned IP Address
Once you have made a VPN connection to your network, and identified the IP address assigned to your PC by the VPN, follow the steps below to configure Reflection X to use the IP address assigned by the VPN:
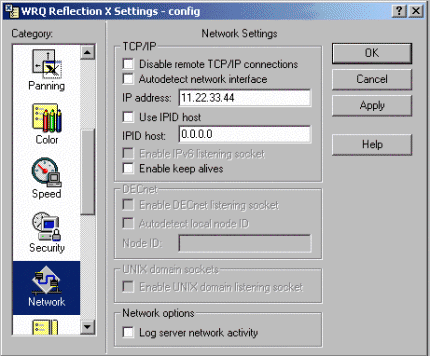
- Click Settings and then click Network.
- In the Network Settings dialog box, clear Autodetect network interface (in prior versions of Reflection X, this feature was called Autodetect local address).
- Once Autodetect network interface has been disabled, enter the IP address assigned to you by the VPN into the "IP address" field.
- Click Apply.
- Click OK.
Reflection X will retain this IP address until you either manually edit the IP address or re-select Autodetect network interface (or Autodetect local address).
Reconfiguring Reflection X for a LAN Connection
Follow the steps below to reconfigure Reflection X so that it once again utilizes the LAN rather than the VPN to connect to your host:
- Click Settings and then click Network.
- In the Network Settings dialog box, select Autodetect network interface.
- Click Apply.
- Click OK.
