Environment
Reflection for IBM version 14.x
Reflection for UNIX and OpenVMS version 14.x
Reflection X version 14.x
Reflection FTP Client version 14.x
Reflection for Secure IT Windows Client version 7.x
Situation
This technical note describes how to configure Reflection to use a smart card reader (CAC) that conforms to PKCS#11 specifications.
Resolution
Prerequisite
You must install the software supplied by your token provider before you can configure Reflection to authenticate using a hardware token. To configure authentication using the token, you will also need to know the name and location of the library file (*.dll) used by that provider to provide access to your hardware device.
In the following example, Reflection for UNIX and OpenVMS is the application, and ActivIdentity's software, ActivClient, is the middleware.
Note: If ActivClient 7.0.2 and later is installed, please use MSCAPI as the provider.
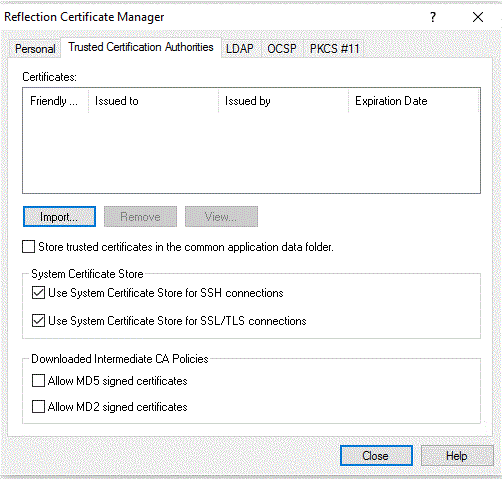
As of Reflection for HP, IBM, UNIX and OpenVMS version 14.1, MSCAPI can be used as a provider. If MSCAPI is used then a token provider is not used, and the “Configure Reflection” section is skipped. Instead the two check boxes “Use System Certificate Store for SSH connections” and “Use System Certificate Store for SSL/TLS connections” under ‘Reflection Certificate Manager/Trusted Certificate Authorities” need to be checked.
Configure Reflection
Follow the steps in this technical note to configure Reflection to use a smart card reader. Smart card reader support is available for Network protocols TELNET over SSL, VT-MGR over SSL, and SECURE SHELL, and the Reflection FTP Client’s SFTP and FTP over SSL sites.
Note: In each Reflection dialog box, click the Help button for detailed information on each setting.
- In the Reflection session, click Connection > Connection Setup.
- In the Connection Setup dialog box, select SECURE SHELL. Under Host name, enter the server name. Then click the Security button
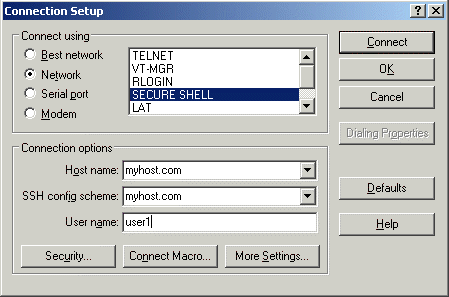
- On the General tab, under User Authentication, select the Public Key check box. Then click the PKI tab.
- On the PKI tab, click the Reflection Certificate Manager button.
- In the Reflection Certificate Manager dialog box, click the PKCS #11 tab.
- If you have a provider (also called reader) installed, information under Providers and Device Contents will display. Select the Provider you want to use and click Close.
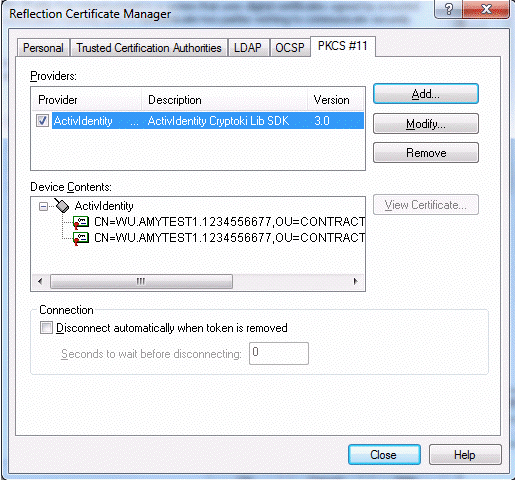
Figure 3 - Select the Provider on the PKCS #11 tab.
If your provider is not listed, verify that the provider software is installed, and then follow these steps:
- Click the Add button and browse to the appropriate provider *.dll.
- In the PKCS #11 dialog box, click the Browse button and browse to and select the provider *.dll that you want to use. Click OK.
- Verify that the Provider is selected and that the Provider and Device Contents are displayed (as shown in the graphic above).