Environment
KEA! 2000 version 5.0
KEA! 340 version 5.1
KEA! 420 version 5.1
Situation
KEA! (VT) provided an option to capture incoming data and replay captured data. This technical note provides instructions on how to create equivalent functionality in Reflection by configuring toolbar buttons or menu items to start, stop, and display traces.
Resolution
Using Reflection VBA to Duplicate the Capture Functionality
Reflection VBA language provides commands to access methods that are unavailable directly from the Reflection menus. You can access these commands by creating custom toolbar buttons in Reflection 2011 or Reflection 14.x or menu items in Reflection 14.x.
Reflection 14.x
Figures 1 and 2 below demonstrate the two options available to you with Reflection 14.x. Select the method that suits your needs.
Create a Custom User Menu
 Figure 1: Example of Custom Toolbar Buttons in Reflection
 Figure 2: Example of Custom User Menu in Reflection
Create Custom Toolbar Buttons
In this section, you will create three custom toolbar buttons in Reflection; one to start capturing incoming data, one to stop capturing data, and one to replay the captured data.
Step 1âCreate a Button to Start Capturing Incoming Data
- In Reflection, click Setup > Toolbar.
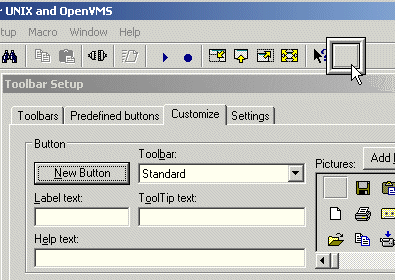
- On the Customization tab, click New Button. A blank button with a picture frame around it appears in the far right on the toolbar.
- Fill in the fields you want to customize in the Button group area of the Customization tab (top half).
- If you want a picture to appear on the button, select one from the Pictures pane.
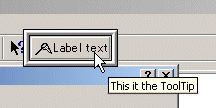
- If you want text to appear on the button, enter it in the Label text field. The text appears in the toolbar button as you type.
- If you want text to appear when the mouse pointer hovers over the button, enter that text in the ToolTip field.
- If you want help text to appear in Reflection's status bar (bottom left) when the mouse pointer hovers over the button, enter that text in the Help text field.
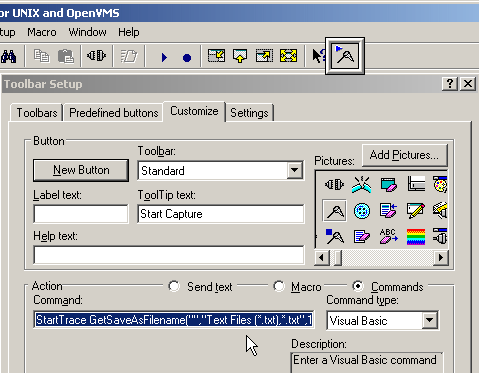
- In the Action group area (bottom half), select the Commands radio button.
- In the Command type field, select Visual Basic.
- In the Command field, enter:
StartTrace GetSaveAsFilename("","Text Files (*.txt),*.txt",1,"Save Capture File","Save"), rcOverwrite, rcTraceIncomingOnlyStep 2âCreate a Button to Stop Capturing Incoming Data
- Repeat steps 2 - 4 above changing the labels or pictures as appropriate for stopping the capture.
- In the Command field, enter StopTrace.
Step 3âCreate a Button to Replay Captured Data
- Repeat steps 2 - 4 above changing the labels and pictures as appropriate for replaying the captured data.
- In the Command field, enter:
DisplayFile GetSaveAsFilename("","Text Files (*.txt),*.txt",1,"Display Capture File","Play")Step 4âSave the Buttons
When you have completed creating the three new buttons, click Close to save your edits.
Create a Custom User Menu
Reflection menu mapping also enables you to create a custom menu for capturing and replaying data. Use this procedure if you prefer to create a menu item instead of a toolbar button.
Step 1âAdd a New Menu Item to the Menu Bar
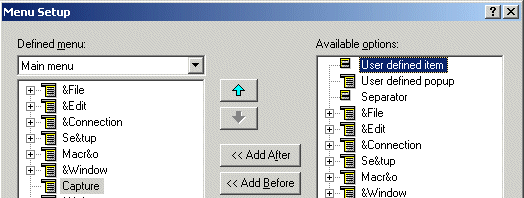
- In Reflection, click Setup > Menu.
The Defined menu list shows the current Reflection menu structure. New menu items may be placed under an exiting main menu item, such as Edit, or you may create a new main menu item.
Decide where you want to position the new menu item. This example creates a new main menu item called Capture between the Window and Help menus.
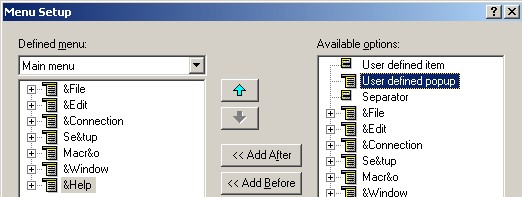
- Select &Help.
- In the Available options list, select User defined popup.
- Click Add Before.
- In the Name field of the Menu Item Properties dialog box, enter the menu name (up to 50 characters) you want to appear on the menu bar. For this example, enter Capture.
- If you want help text to appear in Reflection's status bar (bottom left) when the mouse pointer hovers over the button, enter that text in the Description field. If left blank, the text in the Name field appears in the status bar. To prevent text from appearing in the status bar, enter a single space in this field.
- Click OK.
Step 2âAdd a Sub-Menu Item to Start Capturing Incoming Data
- In the Defined menu list, select the menu item you created above, for this example the menu item is called Capture. This is the menu you are adding sub-menu items to.
- In the Available options list, select User defined item.
- Click Add After.
- In the Name field, enter a name for the menu command (up to 50 characters). For this example, enter Capture Incoming Data.
- If you want help text to appear in Reflection's status bar (bottom left) when the mouse pointer hovers over the button, enter that text in the Description text field. If left blank, the text in the Name field appears in the status bar. To prevent text from appearing in the status bar, enter a single space in this field.
- Select the Commands radio button.
- In the Command type field, select Visual Basic.
- In the Command field, enter:
StartTrace GetSaveAsFilename("","Text Files (*.txt),*.txt",1,"Save Capture File","Save"), rcOverwrite, rcTraceIncomingOnly- Click OK.
The new command menu item, Capture Incoming Data, now appears under the Capture menu item.
Step 3âAdd a Sub-Menu Item to Stop Capturing Incoming Data
- Repeat steps 1 - 5, as shown in "Step 2âAdd a Sub-Menu Item," changing the name and description as appropriate.
- Select the Commands radio button.
- In the Command type field, select Visual Basic.
- In the Command field, enter StopTrace.
- Click OK.
Step 4âAdd a Sub-Menu Item to Replay Captured Data
- Repeat steps 1 - 5, as shown "Step 2âAdd a Sub-Menu Item," changing the name and description as appropriate.
- Select the Commands radio button.
- In the Command type field, select Visual Basic.
- In the Command field, enter:
DisplayFile GetSaveAsFilename("","Text Files (*.txt),*.txt",1,"Display Capture File","Play")- Click OK.
Step 5âSave the Menu Bar Items
When you have completed creating the new menu items, click OK to save your edits.
