Environment
Reflection 2014
Reflection for IBM 2014
Reflection for IBM 2011
Reflection Standard Suite 2011
Situation
This technical note describes how to set up Reflection Desktop 16, Reflection 2014, Reflection for IBM 2014, or Reflection for IBM 2011 to connect over SSL-enabled Telnet to z/OS using a self-signed certificate.
Resolution
Considerations Before You Begin
Security for Reflection depends upon the security of the operating system, host, and network environment. We strongly recommend that you evaluate and implement all relevant security service packs, updates, and patches recommended by your operating system, host, and network manufacturers.
The recommendations in this note are general guidelines and should be evaluated in the context of your own computing needs and environment. These general steps can also be used to configure Reflection to utilize a registered digital signature and key pair (from a certifying authority); however, it is recommended that you configure and test your SSL environment using a self-signed certificate before implementing a production certificate from a certificate authority
The Process
Setting up Reflection Desktop 16, Reflection 2014, Reflection for IBM 2014, or Reflection for IBM 2011 to connect to z/OS over SSL involves these steps:
- Configure the Mainframe for SSL
- Verify that the Mainframe is Configured to Support SSL
- Create a Self-Signed Certificate for the Server
- Transfer or Extract the Certificate
- Optional: Create a Client Certificate
- Make a Connection
Note the following:
- Once you have fully tested the SSL/TLS support, you can repeat steps 4 and 5 using a Certificate Authority (CA) signed certificate.
- Reflection's SSL/TLS support requires that Microsoft Internet Explorer be installed on the client machine. It need not be the primary browser, but Internet Explorer must be installed and configured to be able to manage and use the certificate.
Configure the Mainframe for SSL
The working TCP/IP profile dataset on z/OS must be configured to
support SSL connections. This process varies depending on the operating
system and version. For detailed setup instructions, refer to IBM
publication SC31-8776, "z/OS IBM Communications Server: IP Configuration
Reference" for the version of z/OS you are using at https://www-05.ibm.com/e-business/linkweb/publications/servlet/pbi.wss
During the configuration process, you must define a secure port and key database reference for the TCP/IP SSL connection, and add an entry to the VTAM parameters.
The following is a generic example of a PROFILE.TCPIP dataset. (Use this example only as a guide when configuring your dataset.)
TELNETPARMS KEYRING SAF TN3270RING ; RACF keyring name SECUREPORT 23001 ; Secure port number CONNTYPE SECURE SSLTIMEOUT 30 TIMEMARK 28800 WLMCLUSTERNAME TN3270E ENDWLMCLUSTERNAMEENDTELNETPARMSBEGINVTAMPORT 23 23001 ; Add entry for secure port. TELNETDEVICE 3278-3-E NSX32703 TELNETDEVICE 3279-3-E NSX32703 . . .ENDVTAM |
Verify that the Mainframe is Configured to Support SSL
To activate the updates to the TCP/IP profile dataset, recycle the z/OS TCP/IP stack. Once you have done this, you will be able to see that the port you have configured for the secure connections is listening.
Execute the Display Telnet PROFILE command to verify that the port is up and attached to the proper key database.
Sample display:
D TCPIP,TN3270,T,PROF,PROF=SECUREEZZ6060I TELNET PROFILE DISPLAY 145 PERSIS FUNCTION DIA SECURITY TIMERS MISC (LMTGCAK)(OATSKTQSWHRT)(DRF)(PCKLECXN2)(IPKPSTS)(SMLT) ------- ------------ --- --------- ------- ---- ******* **TSBTQ*W*RT EC* SSS*D**** IP**STS SMD*----- PORT: 23001 ACTIVE PROF: CURR CONNS: 0------------------------------------------------------------ FORMAT SHORT TCPIPJOBNAME TCPIP TNSACONFIG DISABLED KEYRING SAF TN3270RINGCreate a Self-Signed Certificate for the Server
Security certificates (also known as server certificates, site certificates, digital certificates, or SSL certificates) are used as part of the authentication process. Certificates are either self-signed or signed by a Certificate Authority (CA).
There are numerous ways to create a self-signed server certificate,
such as using the RACDCERT RACF commands, or the Gskkyman utility (which
runs under UNIX System Services). Refer to IBMâs documentation for
information on using these commands or utilities (https://www-05.ibm.com/e-business/linkweb/publications/servlet/pbi.wss)
Note the following:
- While creating the certificate, enter the fully-qualified host name in the Common Name field of the certificate.
- If you plan to implement client authentication, you must also create a client certificate.
- The administrator must maintain physical security of the management server and proxy server. That is, no one other than the administrator should be able to physically access the servers, and no unauthorized individuals should be able to access the key store folders on the server. The security of the servers is important to prevent compromise of the certificates.
Once you have created the self-signed server certificate, save it to a file, transfer the file to the end user's computer, and import the certificate into Internet Explorer's Certificate Store.
Transfer or Extract the Certificate
Use an FTP client (such as the Reflection FTP client or Microsoft Windows FTP client) to transfer the self-signed certificate file to the client computer, and then follow these steps to integrate it with Internet Explorer:
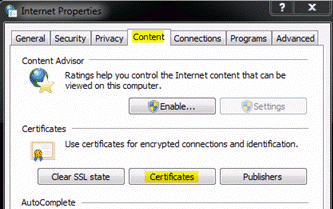
- In Windows, click Start > Control Panel > Internet Options.
- On the Content tab, click Certificates.
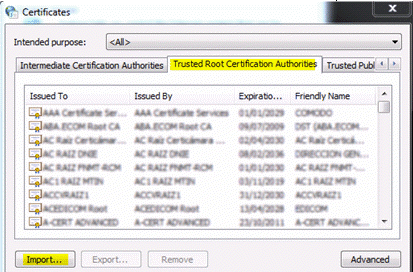
- On the Trusted Root Certification Authorities tab, click Import > Next.
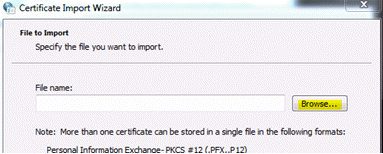
- Click Browse. Browse for and select your self-signed certificate file, and then click Open.
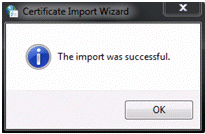
- Click Next, and then click Finish.
- When asked, "Do you want to ADD the following certificate to the Root Store," click Yes.
The new certificate is displayed in the Trusted Root Certification Authorities list.
Create a Client Certificate
Client certificates are not required to establish SSL connections using Reflection for IBM. However, if client certificates are required in your network environment, see KB 7021686, which describes how to create and import a client certificate for use connecting to z/OS using SSL and Reflection for IBM.
Make a Connection
To make an SSL connection using Reflection Desktop 16, Reflection 2014, Reflection for IBM 2014, or Reflection for IBM 2011:
- Start Reflection.
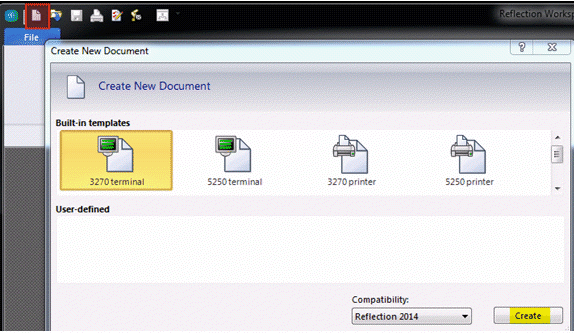
By default, Reflection opens by displaying the Create New Document dialog box. (Alternate navigation to Create New Document: click the upper-left icon and click New.)
- Click 3270 Terminal. Click the Create button (lower right).
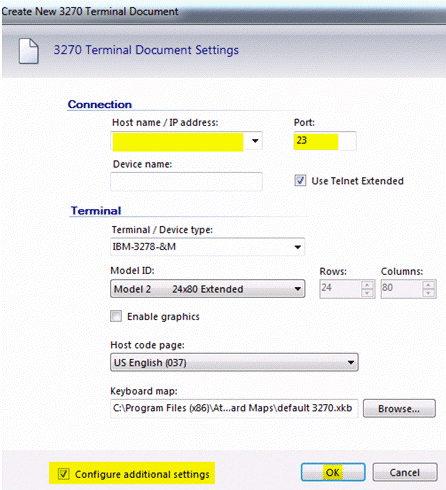
- In the Host name/IP address field, enter the name of your mainframe as it appears in the Common Name field of the self-signed certificate. Typically, this is the fully qualified host name.
- In the Port field, enter the mainframe's secure port number (23001 in the earlier example).
- In the bottom-left, select the check box to Configure additional settings. Click OK.
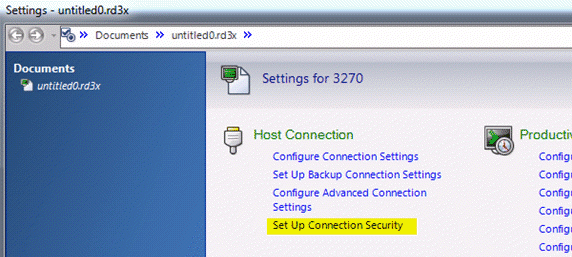
- In the Settings dialog box under Host Connection, click Set up Connection (or 3270) Security.
View Full Size
This link is a shortcut to the Security section of the Configure Advanced Connection (or 3270) Settings dialog box.
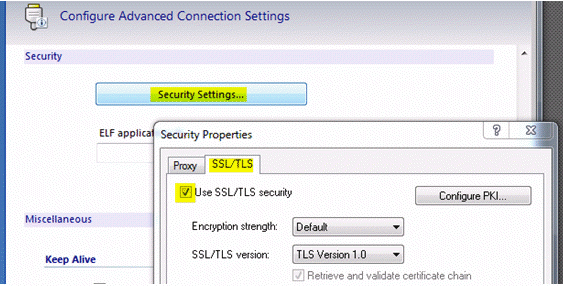
- Click Security Settings.
- Select the check box to Use SSL/TLS security. For testing purposes, leave the Encryption strength at Default.
- Click OK, and OK again to Connect.
Once you have successfully connected, a blue and gray padlock icon displays in the Reflection display status bar, indicating that your connection is secure.
