Environment
EXTRA! 6530 Client Option version 9.2 or higher
Situation
Resolution
Before applying an EXTRA! service pack, note the following:
- Windows administrative rights may be required to install the service pack.
- You must have the appropriate EXTRA! version installed in order to apply the EXTRA! service pack. For example, you must have version 9.3 installed before applying 9.3 Service Pack 1.
To apply an EXTRA! service pack to a workstation installation
- Download the service pack from the Attachmate Downloads website.
- Close all running applications so that system files can be updated if needed.
- Locate the downloaded service pack file and double-click the file. By default, files are extracted to one of the following locations:
C:\Attachmate\EXTRA!-v9.3.1
C:\Attachmate\EXTRA!-6530-Option-9.3.1
C:\~Attachmate\EXTRA!-v9.2.1
C:\Users\<user name>\Documents\EXTRA!-v9.2.1-sp
C:\Documents and Settings\<user name>\Local Settings\Temp\EXTRA!-v9.2.1-sp
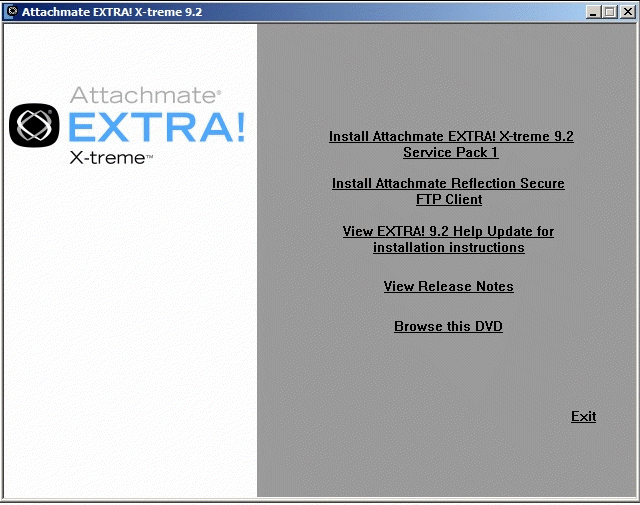
- The autorun install.exe displays a menu:
- Click the first option to install the EXTRA! service pack. This will run the Attachmate Patch Wizard utility (rpatch.exe).
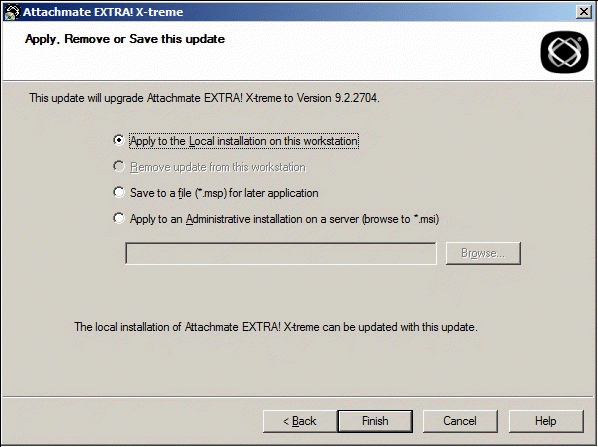
- You will be prompted to accept the software license agreement. After you accept the license, the Attachmate EXTRA! X-treme dialog box opens:
- Select "Apply to the Local installation on this workstation," and then click Finish to apply the service pack.
To upgrade the Reflection Secure FTP Client
The Reflection Secure FTP Client must be upgraded separately from EXTRA! Follow the steps below to upgrade the Reflection Secure FTP Client on a workstation:
- Locate the downloaded EXTRA! service pack file and double-click the file. After the files needed to install the patch are extracted and the menu displays, click "Install Attachmate Reflection Secure FTP Client."
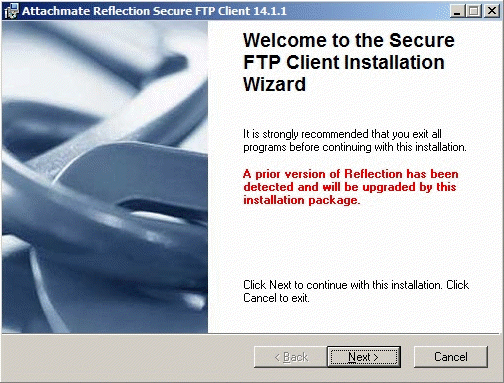
- The Secure FTP Client Wizard will open. If you have an earlier version of Reflection Secure FTP Client installed, the wizard will detect and upgrade the installation. Click Next.
- You will be prompted to accept a license agreement, and then confirm your customer information (name and organization), destination folder, and installation type (Typical or Custom). Click Next through these dialogs and then again to begin the installation.
- Click Finish to exit setup; Secure FTP Client has been installed/upgraded on the workstation.
Applying a Service Pack to an Administrative Installation
You must first apply the service pack to the administrative installation point. You can then upgrade or install EXTRA! on your user workstations (depending on whether or not EXTRA! was previously installed on the workstations).
Before applying an EXTRA! service pack, note the following:
- Windows administrative rights may be required to install the service pack.
- You must have access to the EXTRA! administrative installation point in order to apply the EXTRA! service pack.
- You must have the appropriate EXTRA! version installed in order to apply the EXTRA! service pack. For example, you must have version 9.3 installed before applying 9.3 Service Pack 1.
To patch the administrative installation
- Download the service pack file.
- Close all running applications so that system files can be updated if needed.
- Locate the downloaded EXTRA! patch file and double-click the file. After the files needed to install the patch are extracted, you will be prompted to accept the software license agreement.
- After you accept the license agreement, the Attachmate EXTRA! X-treme dialog box opens.
- Select "Apply to an Administrative installation on a server (browse to *.msi)." Browse to the administrative installation location and select the EXTRA! MSI Installer Package, and then click Finish to apply the service pack.
To upgrade workstations from an administrative installation point
After the service pack has been applied to the administrative installation, workstations can be upgraded to the newer version of EXTRA!. To upgrade EXTRA! workstations from the patched administrative installation, you must run the following command line parameter at each workstation:
msiexec /fvomus <path>\<MSI file name>The <path> parameter must conform either to a UNC path or a mapped drive character shared by all workstations. <MSI file name> represents the specific MSI package for your product.
The example below uses a UNC path and the EXTRA! 9.3 Installer Package:
msiexec /fvomus \\MyServer\MyPath\ATMEE93.msiTo install EXTRA! from an administrative installation point
If the workstation has not had EXTRA! previously installed, you can install EXTRA! as you would a new installation by running Setup.exe from the administrative installation point or creating a shortcut.
For more information, see the "Preparing an Administrative Installation" topic in the EXTRA! X-treme Help Update: https://docs.attachmate.com/extra/x-treme/9.3sp1/help-update/en/23794.htm.
Saving an *.msp File for Later Application
Alternatively, you can select "Save to a file (*.msp) for later application" in the Attachmate EXTRA! X-treme dialog box if you want to save the file and construct your own msiexec command line (with /p option) to apply the service pack.
For more information about installing a *.msp file, see KB 7021467.
For a list of Msiexec command line options, see the Microsoft (MSDN) Article http://msdn2.microsoft.com/en-us/library/Aa367988.aspx.


