Environment
Secure GatewayGWAVA (Secure Messaging Gateway) 7
Situation
How is the end user Black list and White list set up, so the users can manage their own lists?
Resolution
To configure Black list and White list for users and groups in Secure Messaging Gateway, the elements need to be added to the policy first.
Configure Black list:
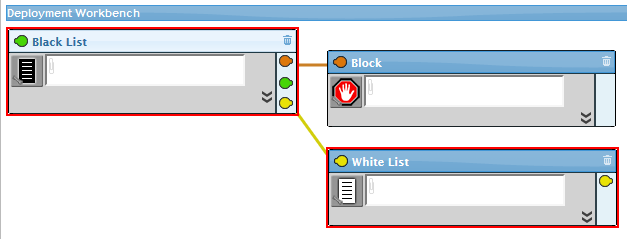
Add the Black list filter to a policy and connect it to a Block service.
QMS Configuration
Log into the QMS as admin.
The White list and Black list buttons should show up as actions in the Quarantine.
To grant groups rights to use Black list and White list select a group the Group tab and enable the right.
Configure Black list:
Add the Black list filter to a policy and connect it to a Block service.
- Configure the Black list by clicking on the black list icon to open the configuration dialog box.
- From the Black List Data Source dropdown menu select a source or use the plus (+) button to create a data source. For example, "Black list addresses".
- Press OK and Save changes.
- Configure it again by clicking on the icon on the left, link the data source to the QMS system by clicking on the link (chain) button. The data source will now have (QMS link) added to the name.
- Sender and Recipient email addresses need to be added in pairs and can be added or removed in the configuration dialog box.
- Press Ok and click the Save icon.
Configure White list:
- Add the White list exception to a policy and connect it to a Black list service.
- Configure the White list node by clicking on the white list icon to open the configuration dialog box.
- Click ok and save changes.
- Configure the white list node again, from the White List Data Source dropdown menu select a source or use the plus (+) button to create a data source. For example, "White list addresses".
- Link the data source to the QMS system by clicking on the link (chain) button. The data source will now have (QMS link) added to the name.
- Sender and Recipient email addresses need to be added in pairs and can be added or removed in the configuration dialog box.
- Press Ok.
- Click the Save icon.
QMS Configuration
Log into the QMS as admin.
The White list and Black list buttons should show up as actions in the Quarantine.
To grant users rights to use Black list and White list select a user the User tab and enable the right.
To grant groups rights to use Black list and White list select a group the Group tab and enable the right.


