Environment
GWAVA 4
NETWARE 6.5, 6, 5.1
LINUX OES, SLES9.3, SLES10.x (this info is forth-coming)
Situation
No mail in Quarantine back to a certain date Error in QMS log or on console, "Database is malformed…" Error in QMS log or on console, "DB Error: file is encrypted or is not a database" Error in QMS log or on console, "Failed to Write Records: Error 9"
Resolution
NEW ARTICLE to simplify the QMS rebuilding process:
TO REBUILD the QMS Database without stopping mail flow or creating additional files, try the following link:
https://support.microfocus.com/kb/doc.php?id=7020339
continued...
NOTE: If the QMS sync does not work, try the QMS Rebuild section in the lower half of this article.
In this case the QMS database has become corrupted and GWAVA can no longer place items into the Quarantine system. To fix this the QMS database must be restored back to a time prior to corruption. If that is not possible, a complete rebuild of the database will be required.
1. Shutdown GWAVA4 by executing the GWAVADN.NCF from the server console.
2. Browse to the directory GWAVA4 was installed to, by default, <volume>:/OPT/BEGINFINITE/GWAVA/SERVICES/QMS/DATA, and rename the QMS_DATA.DB file.
3. In the same directory location, browse to the BACKUP directory. Using the most recent YYYYMMDD.zip file, extract the backed up QMS_DATA.DB file, and put it in place of the file renamed above.
NOTE: Because the original database is being replaced by an older one, only records of mail stored up to the date of the backup are in the replaced database. It is necessary to "SYNC" the database with the storage area, so the system may add all of the new entries and bring the Quarantine database up to date.
4. Next, create a new NCF file called QMSSYNC.NCF in <GWAVA4>/ASSETS/BIN directory. Open the GWAVAUP.NCF file and copy the following lines (your paths may be different) from the GWAVAUP.NCF into the new QMSSYNC.NCF.
LOAD address space=GWAVA4CFG SYS:\OPT\BEGINFINITE\GWAVA4\ASSETS\BIN\gwavaman /ConsoleLog /Root=SYS:\OPT\BEGINFINITE\GWAVA4
LOAD address space=GWAVA4QMS SYS:\OPT\BEGINFINITE\GWAVA4\ASSETS\BIN\gwavaqms /ConsoleLog
NOTE: All of the other lines are not necessary. Only GWAVAMAN and GWAVAQMS are needed for DB maintenance
Edit the 2nd line (QMS) to read as such:
LOAD address space=GWAVA4QMS SYS:\OPT\BEGINFINITE\GWAVA4\ASSETS\BIN\gwavaqms /recovery=sync /recoverdays=n /ConsoleLog
NOTE: The /recoverdays is not necessary, but can be used to sync up to a certain amount of days if you don't need to go back through the entire storage system.
For the switch recoverdays=n, enter in a number for n on how many days you would like to sync back into the system.
For example: recoverdays=14.
This will recover 14 days of Quarantined messages.
SAVE THE FILE and exit.
5. Run QMSSYNC.NCF at the server prompt.
.png)
NOTE: Be patient here. This part can be short or long. It has taken as little as 2-3 minutes, and as long as 20 or more. After a little time, the GWAVAQMS screen will show progress as it counts the number or records and how many inconsistencies.
6. After the GWAVAQMS console screen shows the SYNC is complete, type GWAVADN.NCF at the console prompt.
7. Now load all of GWAVA by executing GWAVAUP.NCF at the console.
8. After loading is complete, login to GWAVAQMS and verify the items have been fixed/restored.
There are a few more options that can be used as well in the /recovery option. SYNC is covered in this article, REBUILD can be used to create a new qms_data.db, the old one will be renamed, and finally SALVAGE, this one is not used often, but can repair a damaged database. It is recommended that these be used under the direction of GWAVA technical support.
HOW TO REBUILD THE QMS DATABASE
1. Unload GWAVA4 by typing "gwavadn" at the system console.
2. Create a new NCF file called QMSREBUILD.NCF in <GWAVA4>/ASSETS/BIN directory. Open the GWAVAUP.NCF file and copy the following lines (your paths may be different) from the GWAVAUP.NCF into the new QMSREBUILD.NCF.
LOAD address space=GWAVA4CFG SYS:\OPT\BEGINFINITE\GWAVA4\ASSETS\BIN\gwavaman /ConsoleLog /Root=SYS:\OPT\BEGINFINITE\GWAVA4
LOAD address space=GWAVA4QMS SYS:\OPT\BEGINFINITE\GWAVA4\ASSETS\BIN\gwavaqms /ConsoleLog
NOTE: All of the other lines are not necessary. Only GWAVAMAN and GWAVAQMS are needed for DB maintenance
3. Edit the 2nd line (QMS) to read as such:
LOAD address space=GWAVA4QMS SYS:\OPT\BEGINFINITE\GWAVA4\ASSETS\BIN\gwavaqms /recovery=rebuild /ConsoleLog
4. Type "qmsrebuild" at the console prompt to launch the rebuild function. Only GWAVAMAN and GWAVAQMS consoles should start.
To view the progress of the rebuild, switch to the GWAVAQMS screen on the server. It should look like the following:
NOTE: "Maximum age of imported message is 7 days" is set to whatever your qms retention days are set to.
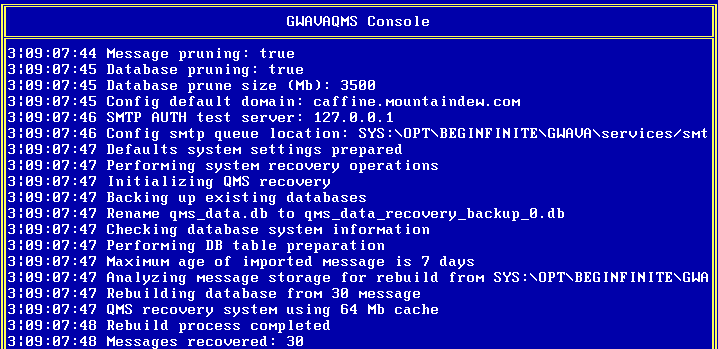
5. After the GWAVAQMS console screen shows the REBUILD is complete, type GWAVADN.NCF at the console prompt.
6. Type "gwavaup" to bring gwava completely back up.
If you still are having problems with QMS after attempting the rebuild, it is recommeded to contact GWAVA technical support for assistance.
Additional Information
This article was originally published in the GWAVA knowledgebase as article ID 40.