Environment
Situation
1. Set up an NFS Server export of the GWDR profile
2. How to setup a permanents NFS Client mount from the GroupWise server to the GWDR Server
3. How to define a GroupWise Restore Area
Resolution
There are four main steps in configuring Restore Mode for a Linux post office:
1. Link the backup to the restore area.
2. Export the GWDR profile directory.
3. Create a permanent NFS client mount from the post office server to the GWDRexported profile directory.
4. Set up the Restore Area Management feature within GroupWise Administration. This setting is found under SYSTEM | Restore Area Management
LINK BACKUP TO RESTORE AREA
1. Access GWDR Web Administration.
2. Edit the post office profile for which you would like to enabled Restore Mode integration
3. On the Configure Tab choose the panel titled "User Access to Backups"
4. Set "Link Backup to Restore Area" to Enabled
OPTIONAL: Set "Auto-Restore" to Enabled.
This setting causes GWDR to automatically update the "restore" directory symbolic link to point to the latest backup every time a backup has completed.
EXPORT THE GWDR PROFILE DIRECTORY (Instructions based on SLES11)
1. Launch the YaST Control Center.
2. Select Network Services.
3. Select NFS Server.
4. Select the radio button to start the NFS services (should default to that).
5. On the Directories to Export screen: Select the Add Directory button.
6. Add the GWDR profile path to the parent directory of the profile.
For example, if PO1 has a profile path of "/data/po1", set the export path to "/data". This is especially efficient when there are multiple profiles. It saves you from creating an export path for every profile. Creating an export is analogous to creating a Windows share. Everything beyond the root of the shared folder is accessible.
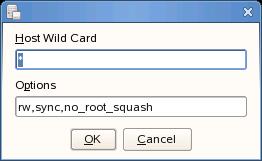
7. When prompted in the next dialog for the Hosts wildcard and Options:
a) Hosts Wildcard Field: *
The asterisk " * " means that any host in the network can access the share. If you want to be more secure, you can specify the hostname or IP address of the post office server; however, this adds extra complexity and - if not specified correctly - can prevent the POA from accessing the backups; also, if you ever move the post office to another server or change the server name, you'll have to remember to change this value. Using the asterisk increases your chances of Restore Mode working now and in the future).
b) Options Field: rw,no_root_squash,sync
8. Select OK and then Finish for the changes to take effect.
PERMANENT CLIENT MOUNT ON POST OFFICE SERVER (Instructions based on SLES11)
This section explains how to: Configure the NFS Client software on the Linux server where the GroupWise post office is installed, and create a mount point to the NFS export on the GWDR server. This is analogous to creating a permanent drive mapping in Windows to a shared folder on another computer. In this case, you are "mapping" (mounting) a drive (mount point) to the "shared folder" (export) on the GWDR server's profile parent directory.
1. In a Terminal session or a File Manager on the Linux server, create a new mount point local directory called "backup".
The local mount point does not need to be named "backup" - it can be named anything you wish, but just remember it because it becomes part of the path to the GWDR profile's backup. Generally mount points are made off of the /mnt directory (but, again, can be created anywhere. For the sake of standardization, /mnt is generally used). In this example, we will make a directory as follows using the "mkdir" command: mkdir /mnt/backup
2. Launch the YaST Control Center.
3. Select Network Services.
4. Select NFS Client.
5. Select the Add button (to add a new NFS mount point).
6. Fill in the fields, for example:
a) NFS Server Hostname: <IP Address or DNS host name of the GWDR server>.
b) Remote File System: <The NFS export created on the GWDR server>.
c) Mount Point (local) <The local mount point that will become the link over to the GWDR server>. In this example, it would be /mnt/backup. Again, this is analogous to creating a drive mapping in Windows to a shared folder.

7. Select OK and then Finish to complete the NFS client mount point.
GROUPWISE SETUP
In order for the post office POA to access the backup on the GWDR server, the GroupWise Restore Area has to be created in ConsoleOne or GroupWise Administration (2014 or better). This gives the POA the Linux UNC path to use to access the backup.
1. Launch ConsoleOne or GroupWise 2014 Administration.
2. Connect to the Primary Domain.
3. In the GroupWise view, highlight a domain in the GroupWise system, and select Tools | GroupWise System Operations | Restore Area Management.
For GroupWise 2014 and above go to the GroupWise Administration Interface, select System and Restore Area Management.
The reason for this is that GroupWise Restore Areas are considered System Level Records and as such, they are owned by the Primary Domain.
4. Select the Create button to create a new Restore Area.
This Restore Area will be specific to a particular post office that GWDR is backing up. Each post office that GWDR is backing up will need its own Restore Area.
5. Give the Restore Area a name (it can be named anything you wish).
6. In the UNC path field, indicate the following path: /<path of the NFS client mount specified in step 6.c in the "Permanent Client Mount" section of this document>/<GWDR profile name>/connect/restore.
In our example, it would be "/mnt/backup/po1/connect/restore", where "/mnt/backup" is the NFS client mount created on the post office server, "/po1" is the post office's profile directory name on the GWDR server, and "/connect/restore" is always appended to the profile directory because this is the symbolic link that GWDR creates in the profile directory, which points to the location of the latest backup. A symbolic link is analogous to a Windows shortcut.
7. In the Linux path field, use the same path that was entered for the UNC Path. Again, in this example, it is /mnt/backup/po1/connect/restore.

8. At the Membership tab, select the Add button, and add the GroupWise post office that this Restore Area represents. This will give all users that are part of the post office rights to the restore area.

*Check documentation for more details.
*The POA is accessing the GWDR backup message store. Because of this, this feature should not be enabled in a condition in which the GWDR server is across slow or un-reliable WAN links from where the user's client is connecting.