Environment
NetIQ eDirectory 9.0
NetIQ eDirectory 8.8 SP8
NetIQ eDirectory 8.8 SP8
NetIQ LDAP Proxy 1.5.2.
Situation
The NetIQ LDAP Proxy acts as a middleware layer between LDAP clients and a server's eDirectory LDAP services. Among the many existing and new features 1.5.2 adds to LDAP services:
- Health monitoring and fallover- Connection-based, hash-based or dynamic load balancing- Access control policies based on a client's address, request, location, etc.- Policies to limit what data is returned to a client- A feature called ModDNCache can ensure a user logs into the server with their most recent modifications.- Allow IPv4-only clients to access IPv6-only services
- Enforce TLS 1.2 connections from clients but allow for TLS 1.0 and\or SSLv3 connections to the back-ends
Though this Quick Start Guide focuses on an eDirectory environment the Proxy also supports Microsoft Active Directory on the backend servers. Certificates can be generated with eDirectory, OpenSSL or AD.
Resolution
While extremely light-weight and flexible, depending on the required configuration, the LDAP Proxy can be a challenge to set up initially. This TID's goal is to provide a quick working setup with a few example policies so that the product can be more easily evaluated.
INSTALLATION OVERVIEW
The following is an overview of the major steps involved in initial configuration.
LDAP (initial non-secure connection setup with simple load balancer policy)
- Installing the LDAP Proxy service
- Run nlppath
- Extract and start NLP Manager to setup the initial nlpconf.xml file with listeners and backends.
- Start the LDAP Proxy and test the connections to back-ends. NLPtrace.
- Start the LDAP Proxy and test the connections to back-ends. NLPtrace.
LDAPS
- Export and test the back-end Root CA self-signed certificate(s) and copy to the LDAP Proxy trusted store for back-end TLS connections (/trustedcert)
- Create and export as PKCS12 a new server certificate from eDirectory for the Proxy's listener-side.
- Run the PKCS12 file though the NLPcert utility and copy the resulting pem file to ../private.
- Modify nlpconf.xml to reflect LDAPS connections to the back-end as well on the listener(s).
- Re-start the LDAP Proxy
- Test connections.
- Test connections.
SETUP DIAGRAM
-----> Backend 1 (192.168.211.4)
LDAP WS (151.155.211.134) ---> (151.155.211.145) LDAP PROXY (192.168.211.3) ----|
-----> Backend 2 (192.168.211.5)
For this exercise all servers are running SLES11. There will be a single LDAP Proxy server running only the Proxy service (not eDirectory). The server has two nics each on a seperate subnet. One is for servicing the clients (151.155.211.x) and the other for communication with the backend eDirectory servers (192.168.211.x). The eDirectory servers are both in the same tree though this does not have to be the case.
For this exercise the following policies will be configured:
- A LDAPS listener on port 636- Load balancing for LDAPS traffic to two back-end eDirectory servers- NLPtrace functionality
Additional policy examples will be covered in the Additional Information section of this TID.
INSTALLATION\CONFIGURATION
1.
Install SLES11 SP4
Install SLES11 SP4
A. A minimal installation was chosen.
B. To further simplify the environment both Apparmor and the Print Server were de-selected when Yast presents the default patterns to be installed. If Apparmor is installed it can be disabled by typing the following:
----service boot.apparmor stop
----chkconfig boot.apparmor off
On SLES 12 it can be disabled via Services Manager in Yast.
On SLES 12 it can be disabled via Services Manager in Yast.
C. It is also recommended to disable the firewall for this exercise. The Yast firewall configuration module can assist in doing so.
D. Ensure the following libraries are installed
- For the Proxy
------- libstdc++.so.5
------- libstdc++.so.6
- For NLP Manager
------- expat
------- libXrender
------- libXfixes
------- pango
------- libXinerama (this is delivered via xorg-x11-libs)
------- freetype
------- libXcursor (this is delivered via xorg-x11-libs-32)
------- libXcomposite (this is delivered via xorg-x11-libs-32)
------- gtk2
Note: a minimal installation of SLES will include all of these but Redhat may not.
E. Verify that the Proxy server can resolve all the backend server addresses and DNS names. If not add them to the hosts file.
2.
Install the LDAP Proxy
Install the LDAP Proxy
A. The product can be found at the NetIQ Downloads Web site (https://dl.netiq.com/index.jsp) Download both the LDAP Proxy as well as NLPManager.
B. After extracting the Proxy tarball and navigating to the install directory the installation script can be started:
./nlp-install
Install logs: /var/opt/novell/ldapproxy/log/nlp-install.log
Configuration: /etc/opt/novell/ldapproxy/conf
Certificates: Configuration: /etc/opt/novell/ldapproxy/conf/ssl
Binaries: /opt/novell/ldapproxy/bin
Configuration: /etc/opt/novell/ldapproxy/conf
Certificates: Configuration: /etc/opt/novell/ldapproxy/conf/ssl
Binaries: /opt/novell/ldapproxy/bin
C. IMPORTANT: set the environment for the Proxy. Without the proper path Proxy utilities such as nlpcert will not function.
. /opt/novell/ldapproxy/bin/nlppath
(Note the space between the leading dot and first forward slash.)
3.
Use NLPManager to create a minimal non-secure configuration.
Use NLPManager to create a minimal non-secure configuration.
Prior to starting the Proxy for the first time a basic configuration must be created. This includes:
-
A Listener: the address and port the Proxy will listen to for incoming client requests. By default it listens to all.
-
A Backend Server Group: the address and port numbers of the backend LDAP servers to which requests will be directed. There must be at least one configured.
-
A Connection Route Policy: this specifies where requests will be routed.
NLPManager will be used open the nlpconf.xml file the installation laid down and make the first changes. Later, the policies will added via a text editor. Of course, NLPManager need not be used. Simply modify the existing /etc/opt/novell/ldapproxy/conf/nlpconf.xml file with your preferred editor. The resulting file will be displayed at the end of this section.
NOTE: NLPManager is not supported on Red hat 7 or SLES 12.
NOTE: NLPManager is not supported on Red hat 7 or SLES 12.
A. Extract NLPManager and change to the NLPManager directory.
Run the following command: ulimit -n 65536
B. Start NLPManager
<path to app> /NLPManager/NLPManager.sh (from either the server's console or from an exported X Windows session)
C. Set up listeners and back-end servers
After loading NLP Manager open the Proxy configuration file:
Provisioning - Open - Navigate - then select the /etc/opt/novell/ldapproxy/conf/nlpconf.xml file. (It is recommended to save a backup first.)
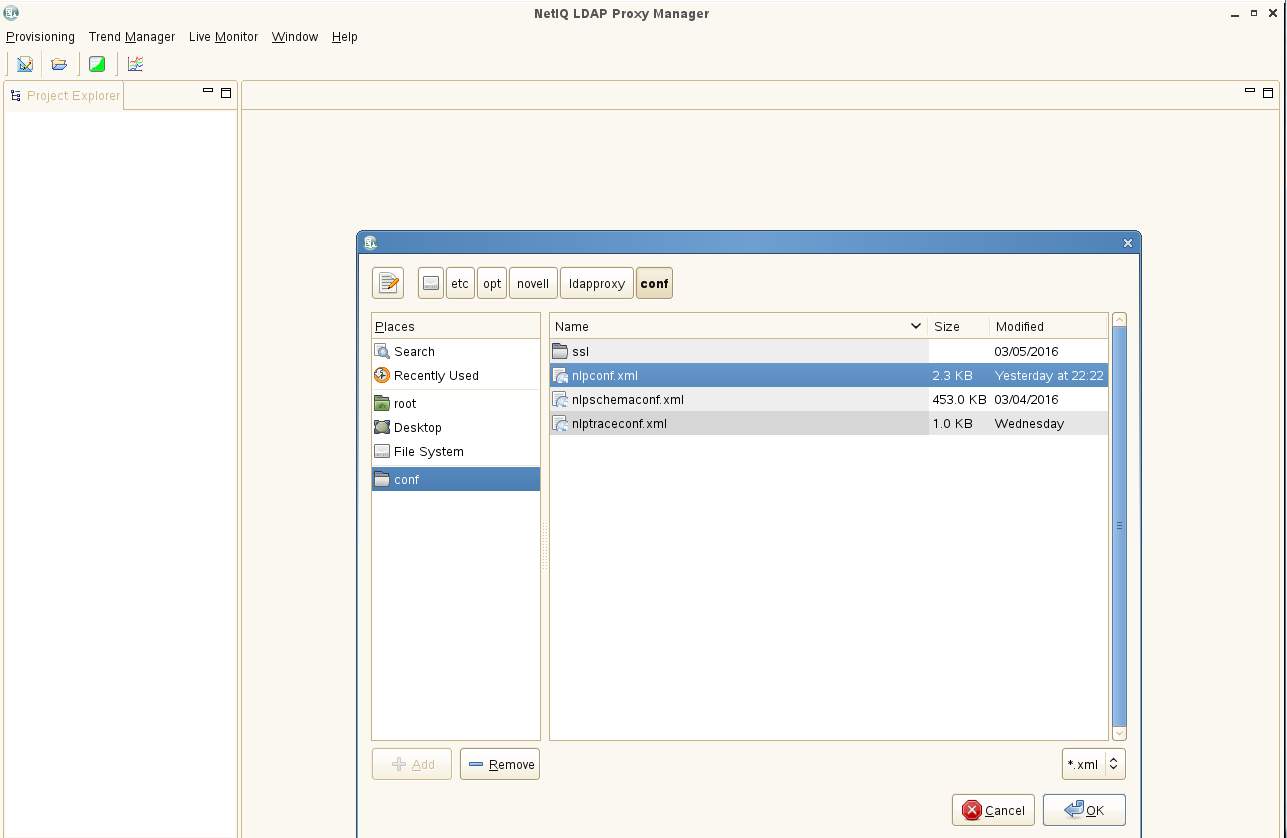
NOTE: Now would be a good time to create a bookmark for this directory in the NLPManager utility. Otherwise the conf file will have to be browsed to anytime a change is made. While highlighting the conf directory click on the +Add button to save this location.
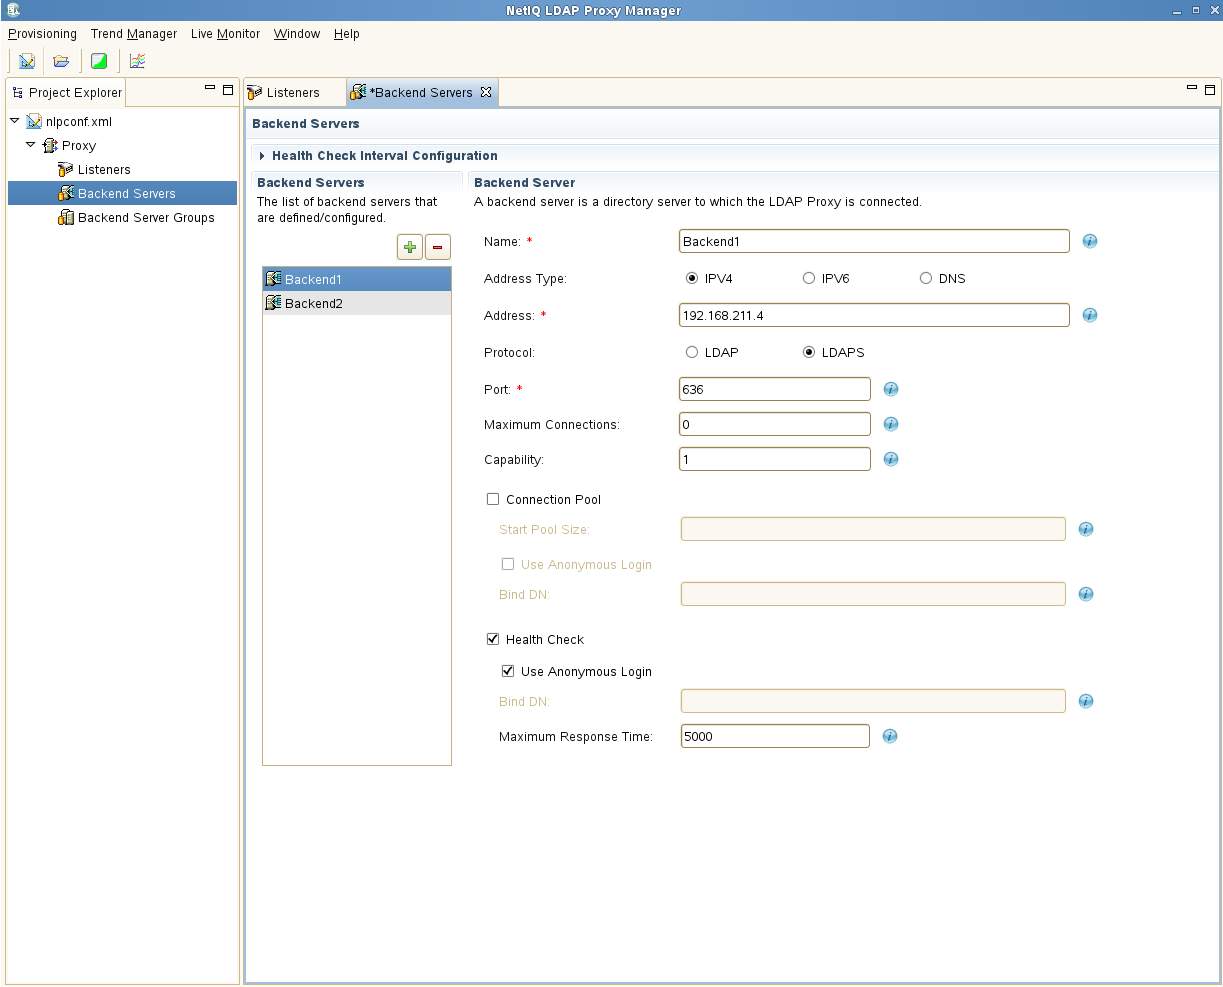
D. Once the configuration file is opened the default listener is shown.

It is recommended to first configure the LDAP Proxy using unsecure LDAP traffic on port 389. Once correct routing has been verified then the certificate files can be created and LDAPS enabled on port 636. Therefore nothing need change on this screen for now. If no IP address is specified the Proxy will listen on all interfaces.
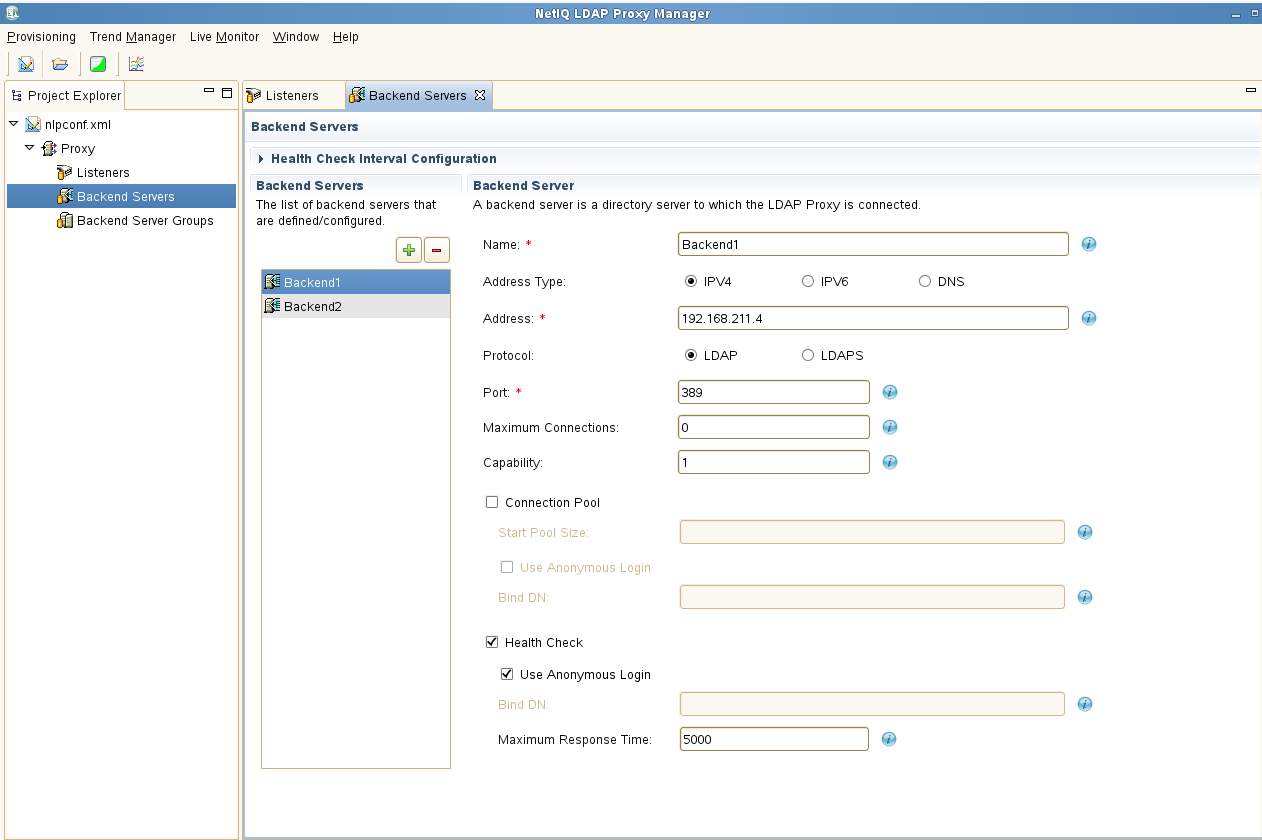
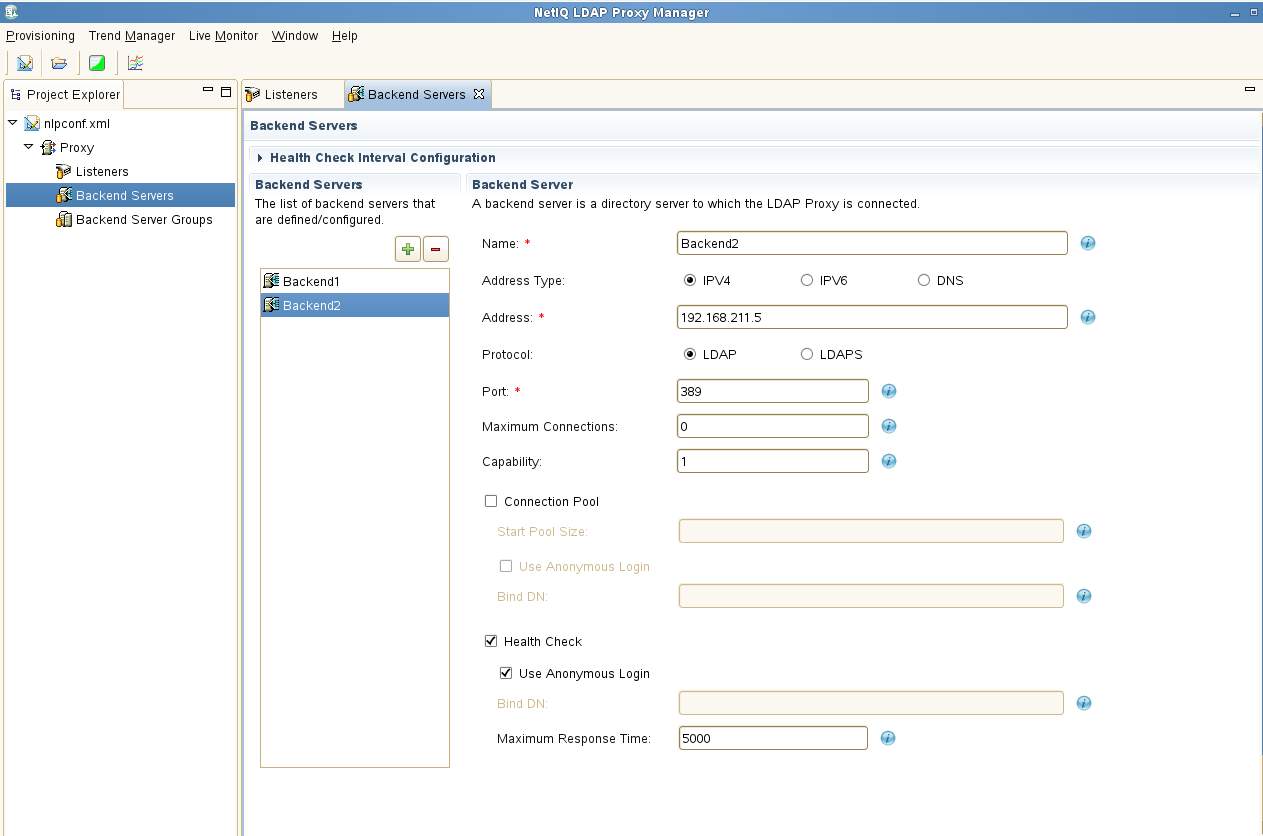
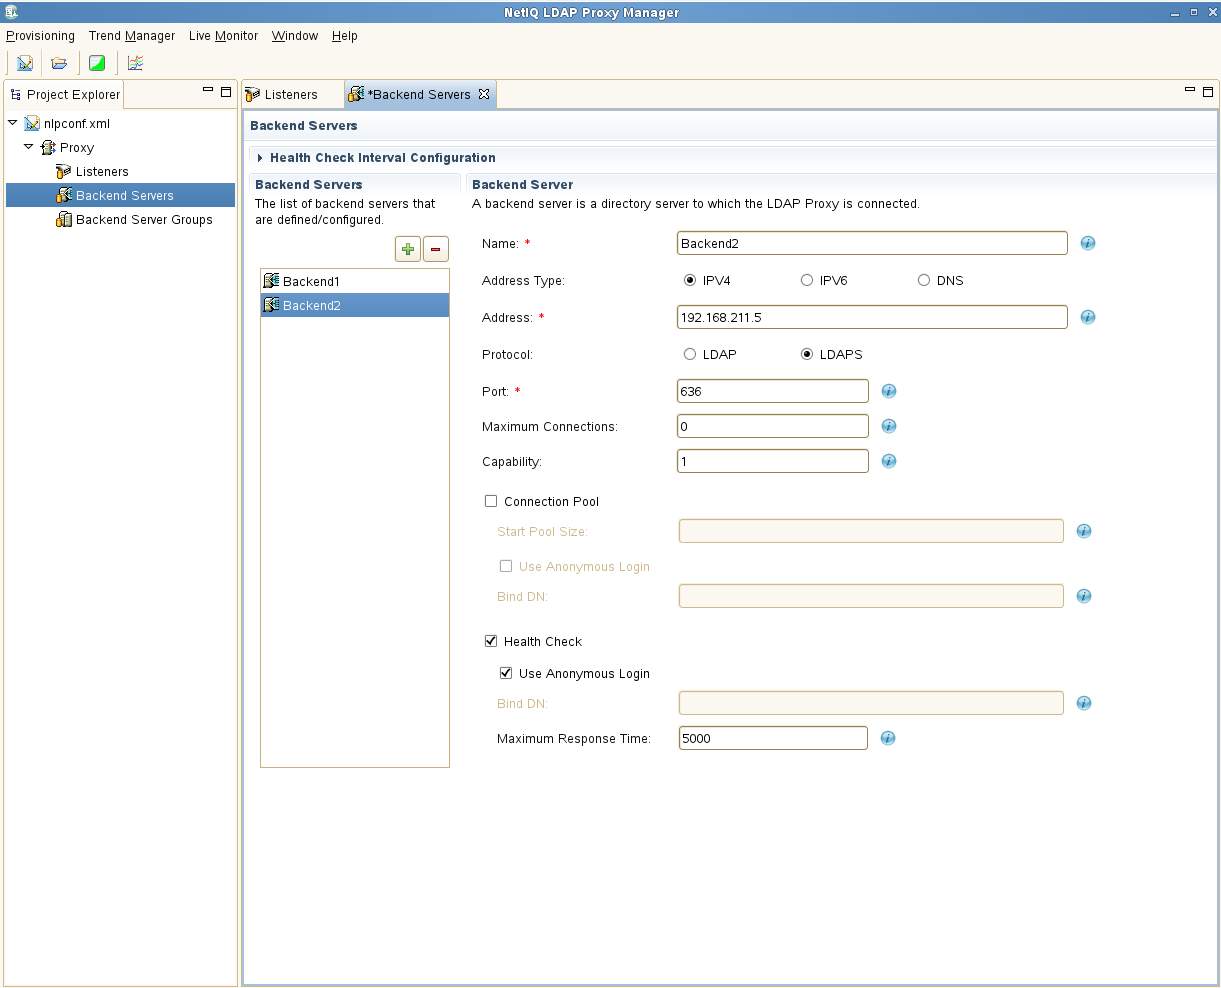
E. Once the Listener is configured the two backend LDAP servers need to be configured in the Backend Servers section. Use the "+" to add them. In this example the Health Check is also enabled. Anonymous login and port 389 has been enabled on the backend servers.
F. Create a Backend Server Group containing the two backend LDAP servers. Then add the two back-end servers by moving them from the Available column to the Selected column.
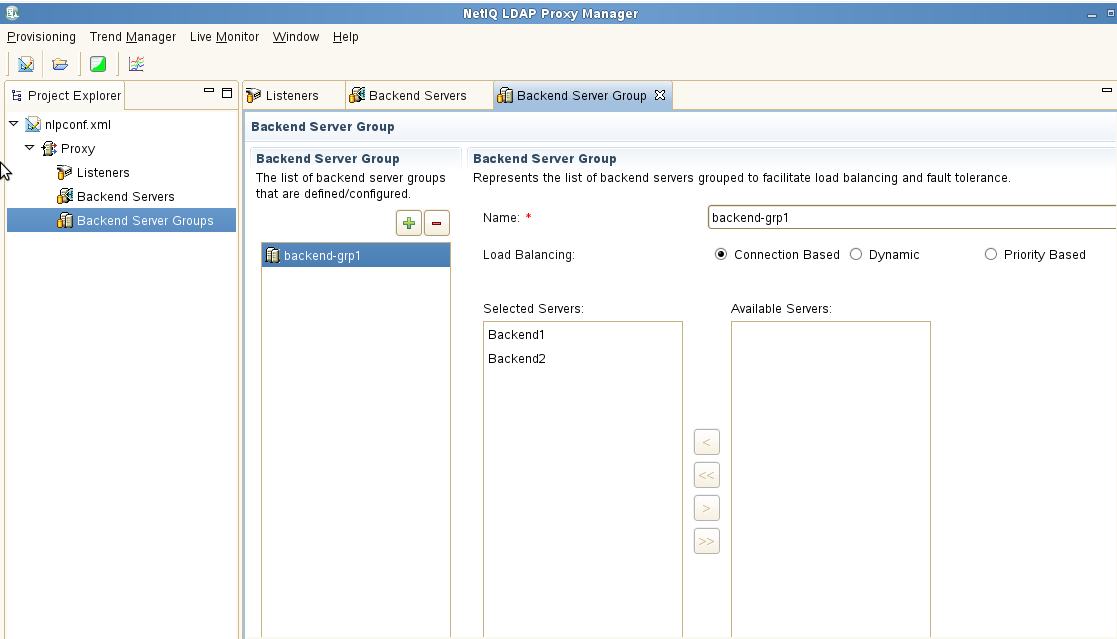
Note that for this exercise the Load Balancing mode is left at the default of Connection Based. If all servers are of equal capability then the balancing is done via a basic Round Robin approach which is purely connection based. It is recommended that Dynamic mode normally be selected. This provides better real-world balancing as this mode considers the number of outstanding requests as well as the average response time of each back-end server.
Save the configuration: Provisioning - Save
4.
Start the Proxy
Start the Proxy
/etc/init.d/nlpd start
5.
Test operations
Test operations
A. Setup NLPtrace. This utility is similar to the ndstrace utility except it logs to a file only. This is a good way of watching for any errors during initialization or operation.
Open the /etc/opt/novell/ldapproxy/conf/nlptraceconf.xml file and edit out the comment symbols "<!--" and "-->". Change the log-level to those shown below. Note that these options are case sensitive.
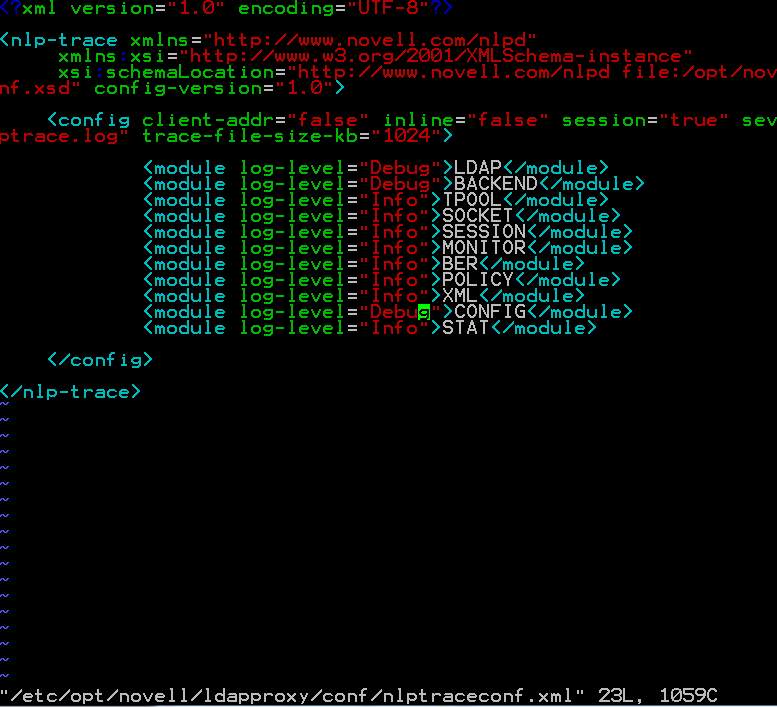
Open the /etc/opt/novell/ldapproxy/conf/nlptraceconf.xml file and edit out the comment symbols "<!--" and "-->". Change the log-level to those shown below. Note that these options are case sensitive.
Refresh the Proxy
SLES 11\RH 6.x: /etc/init.d/nlpd refresh
SLES 12\RH 7.x: systemctl reload nlpd.service
The log can now be tailed: tail -f /var/opt/novell/ldapproxy/log/nlptrace.log. Some of the messages to look for on startup:
Indicates the backend servers were successfully contacted.
[2016/03/15 17:30:46.323] 0:139986684499712 LDAP: OUT-CONN sending request to back-end service ldap://192.168.211.4:389.
[2016/03/15 17:30:46.323] 0:139986684499712 LDAP: OUT-CONN sending request to back-end service ldap://192.168.211.5:389.
Listener is up and route policy is in place.
[2016/03/15 17:30:46.323] 0:139986738358048 CONFIG: Connection Route Policy [conn-route-policy] added to the listener.
B. Run an unsecured rootDSE search on the listener end of the Proxy to determine if everything is working:
ldapsearch -x -H ldap://151.155.213.145 -b "" -s base -LLL
Note in nlptrace that binds are alternating between the two back-end servers.
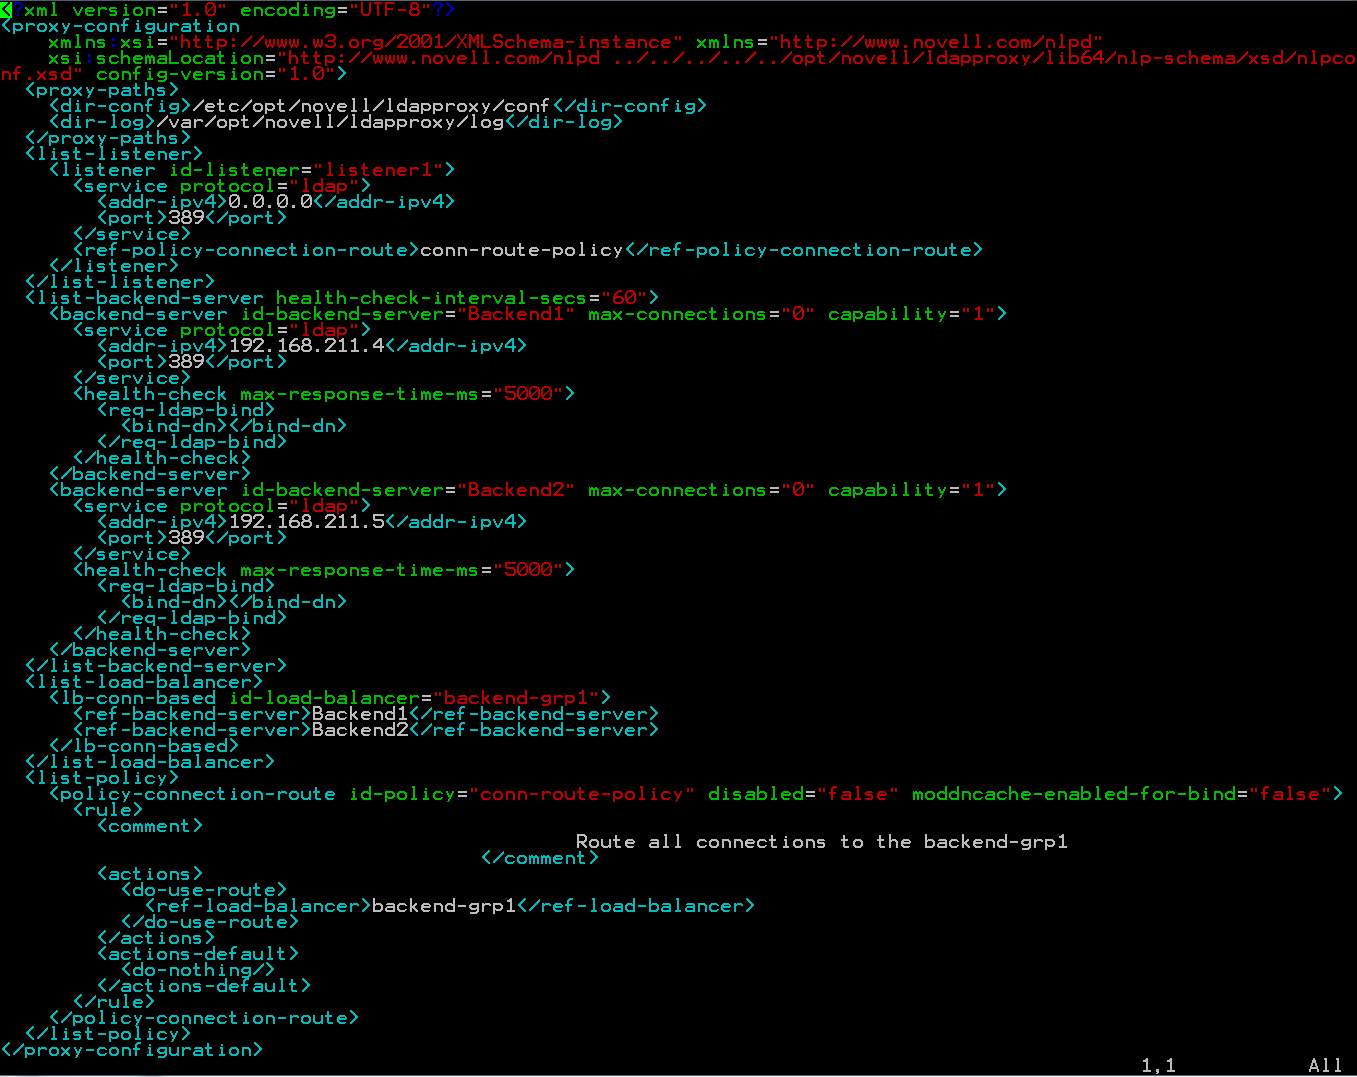
The resulting /etc/opt/novell/ldapproxy/conf/nlpconf.xml file.
SLES 11\RH 6.x: /etc/init.d/nlpd refresh
SLES 12\RH 7.x: systemctl reload nlpd.service
The log can now be tailed: tail -f /var/opt/novell/ldapproxy/log/nlptrace.log. Some of the messages to look for on startup:
Indicates the backend servers were successfully contacted.
[2016/03/15 17:30:46.323] 0:139986684499712 LDAP: OUT-CONN sending request to back-end service ldap://192.168.211.4:389.
[2016/03/15 17:30:46.323] 0:139986684499712 LDAP: OUT-CONN sending request to back-end service ldap://192.168.211.5:389.
Listener is up and route policy is in place.
[2016/03/15 17:30:46.323] 0:139986738358048 CONFIG: Connection Route Policy [conn-route-policy] added to the listener.
B. Run an unsecured rootDSE search on the listener end of the Proxy to determine if everything is working:
ldapsearch -x -H ldap://151.155.213.145 -b "" -s base -LLL
Note in nlptrace that binds are alternating between the two back-end servers.
The resulting /etc/opt/novell/ldapproxy/conf/nlpconf.xml file.
SETUP SECURE LDAPS
All certificates in this example will be created in eDirectory. However, OpenSSL and AD can be used as well. Two certificates are required in this setup to provide secure access to LDAP.
- A self-signed CA Root certificate so that the Proxy will trust the backend server's certificates. This file should be exported from iManager in pem format (Base64).
- A new server certificate in eDirectory for the Proxy. Though this certificate object will be associated to a server in eDirectory that server will never use it. We are simply creating a new certificate then exporting the whole thing, private keys included, to the file system so it can be used by the Proxy for listening to clients.
The CA root certificate will be copied to the ../trustedcert directory. The server certificate will be run through the nlpcert cert utility with the resulting pem file copied to the ../private directory. The last step will be to modify the nlpconf.xml file to now route LDAPS traffic.
1.
Self-signed CA Root certificate
Both of the back-ends are in the same tree so only the one Root CA file is required.
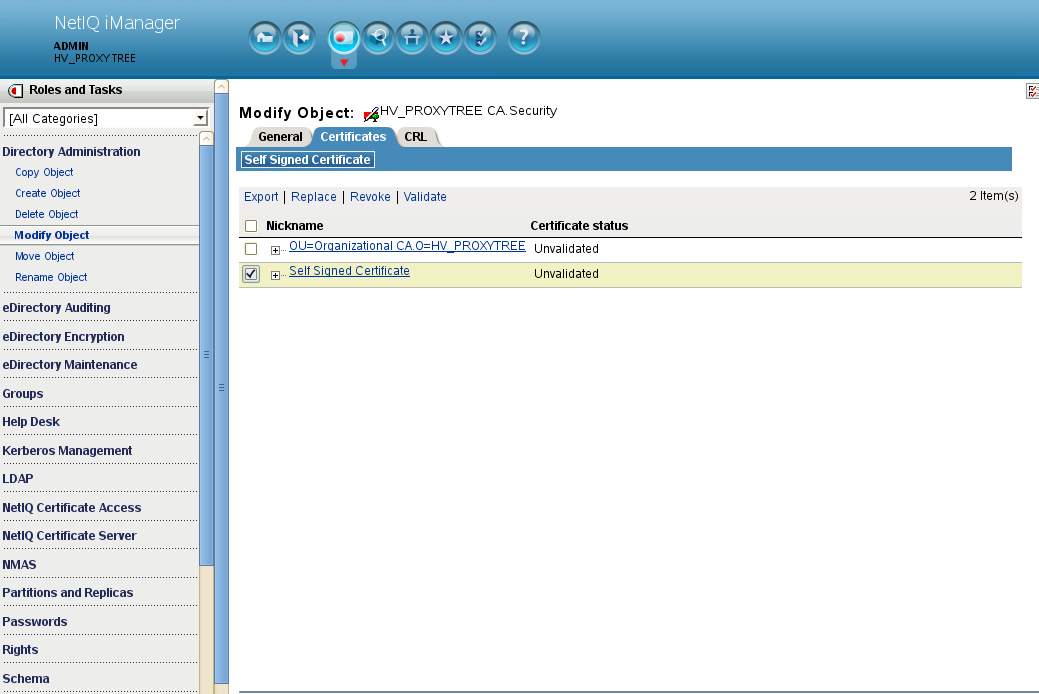
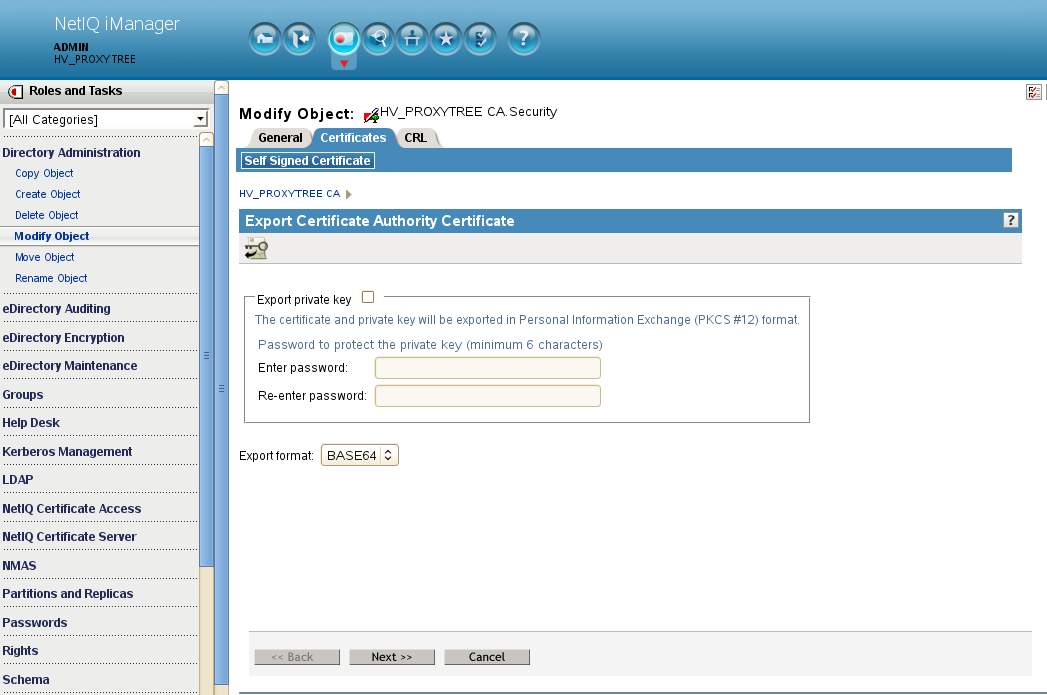
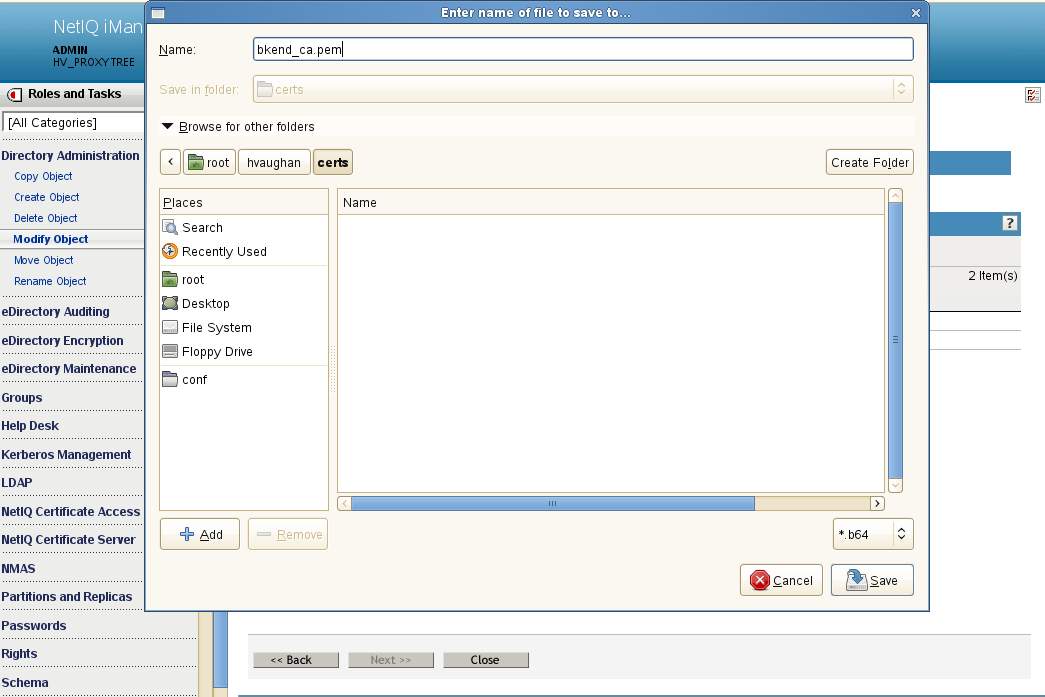
A. Have a browser connect to iManager on the back-end tree. Navigate to Directory Administration - Modify object. Select the RootCA object which will be named YOURTREENAME_CA.Security. Select the Certificate tab - checkbox selected for the Self-signed certificate. Select to Export the certificate. De-select to export the private key and save it in Base64 format. We will save it with a PEM extension as that is the format expected by the Proxy. This file will be saved as bkend_ca.pem.
B. Test the back-end ca certificate by running the following command from the Proxy machine itself to the back-ends. This performs a secured RootDSE search of the back-end servers.
LDAPTLS_CACERT=/pathtocert/cacert.b64.pem ldapsearch -x -H ldaps://192.168.211.5 -b "" -s base -LLL
C. If the test is successful copy the file to the Proxy's /etc/opt/novell/ldapproxy/conf/ssl/trustedcert/ directory. All certificates in this directory are loaded by the Proxy on initialization. There will be no need to specify them.
2.
New Server Certificate
A new server certificate will be created in iManager and exported to the Proxy's filesystem. During creation:
- The subject name will be changed from the associated eDirectory server's CN to the IP address assigned to the Proxy's outside (listener) interface.
- An alternative subject name of type DNS and populated with the DNS name of the Proxy's listener will be added.
- The existing suggested alternative name containing the IP address of the associated eDirectory server will be deleted.
Any certificate type can be created provided they are supported by the clients in use. In this example a standard 2K RSA certificate will be minted.
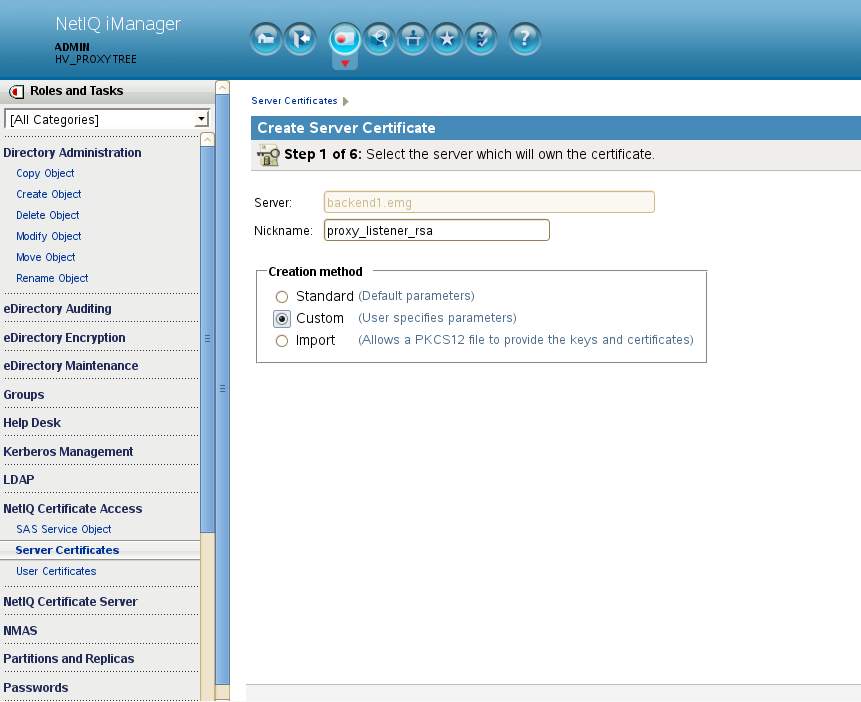
A. Have a browser connect to iManager on the back-end tree. Navigate to NetIQ Certificate Access - Server Certificates. The server currently selected does not matter. The eDirectory server associated to the certificate about to be created will never use this certificate.
Select New - Nickname=proxy_listener_rsa - Creation Method = Custom.
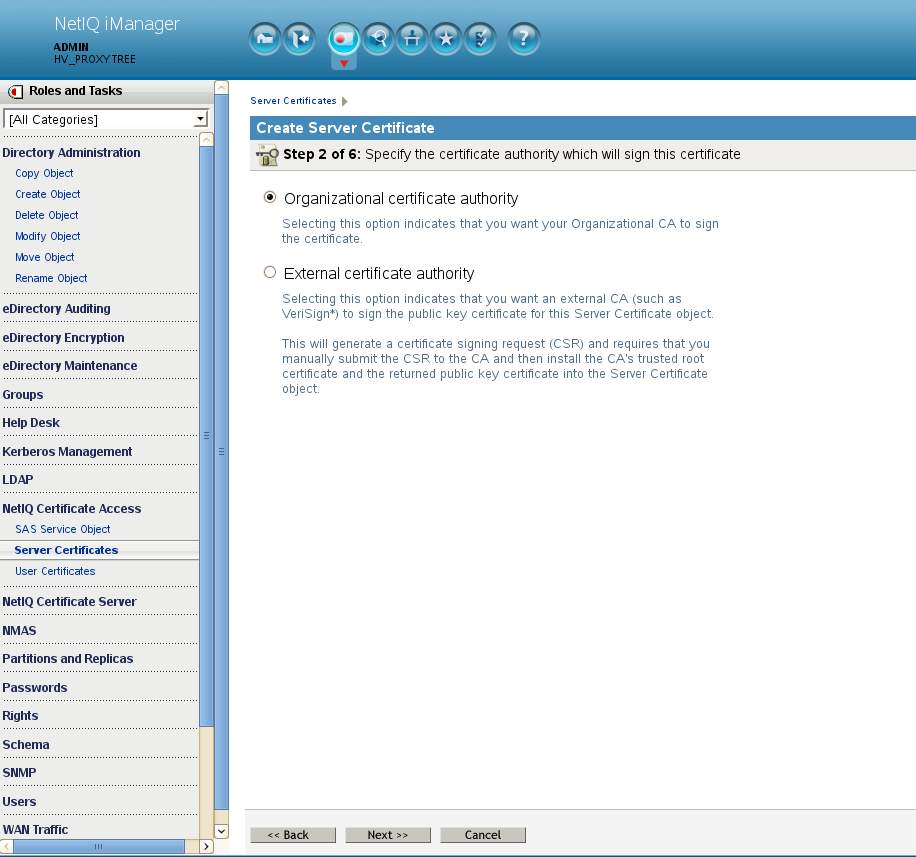
Step 2 of 6:
For the signing Certificate Authority select this Organizational certificate authority
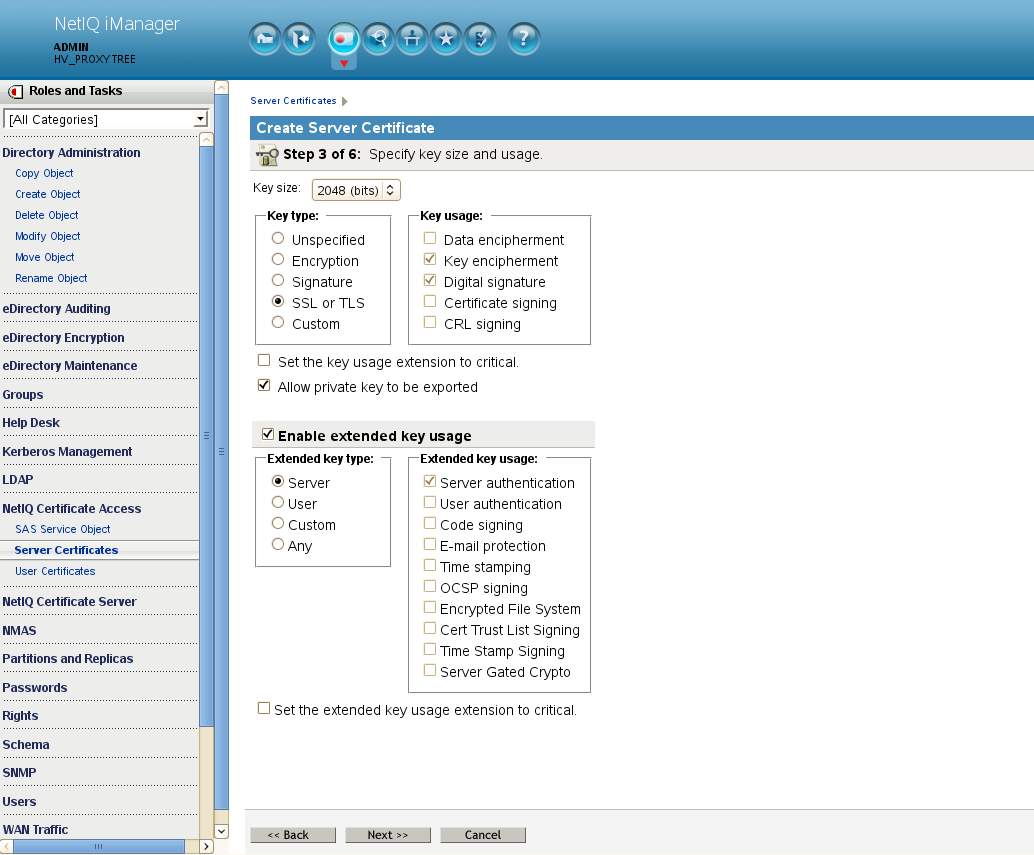
Step 3 of 6:
Accept all defaults on the following screen for key size and usage.
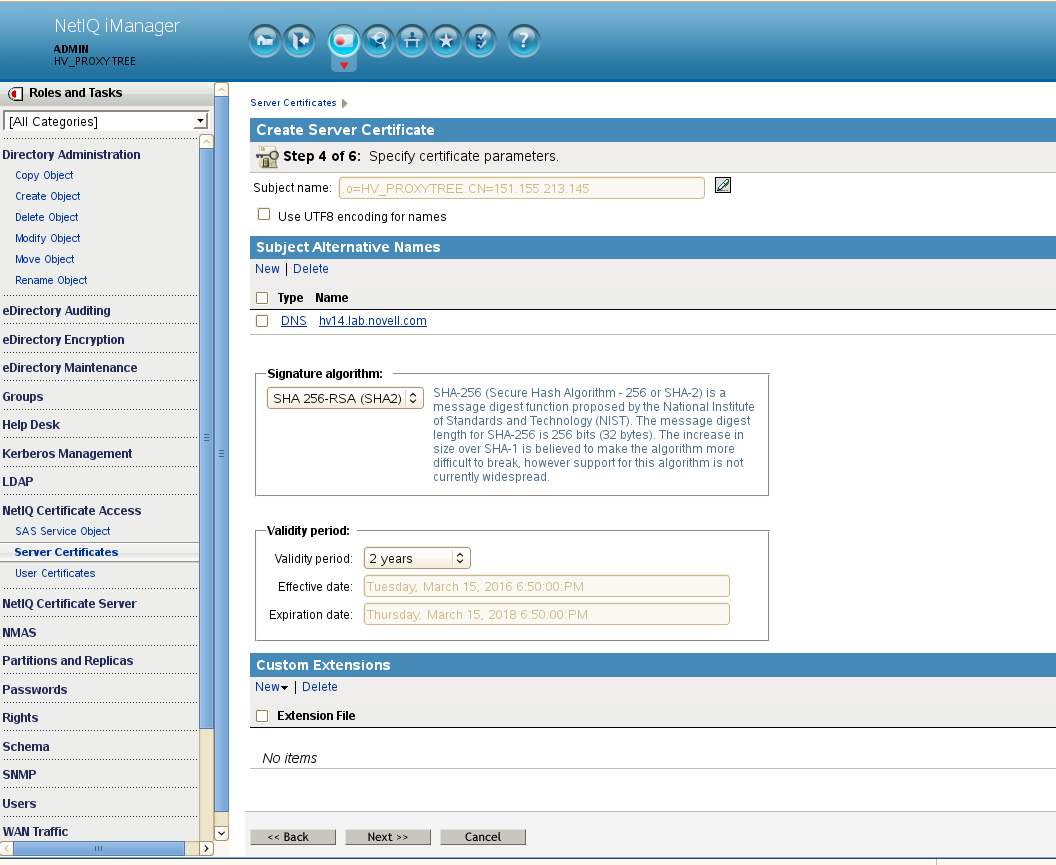
Step 4 of 6:
- Change the subject name to match the Proxy listener address and the Signature algorithm to SHA-256 (SHA-2).
- Add a new subject alternative name as type DNS with the Proxy listener's DNS name.
- Delete the existing subject alternative name of type IP address for the server in eDirectory that will be associated with this certificate.
Step 5 of 6: for the Trust Root Certificate dialog select Your organization's certificate.
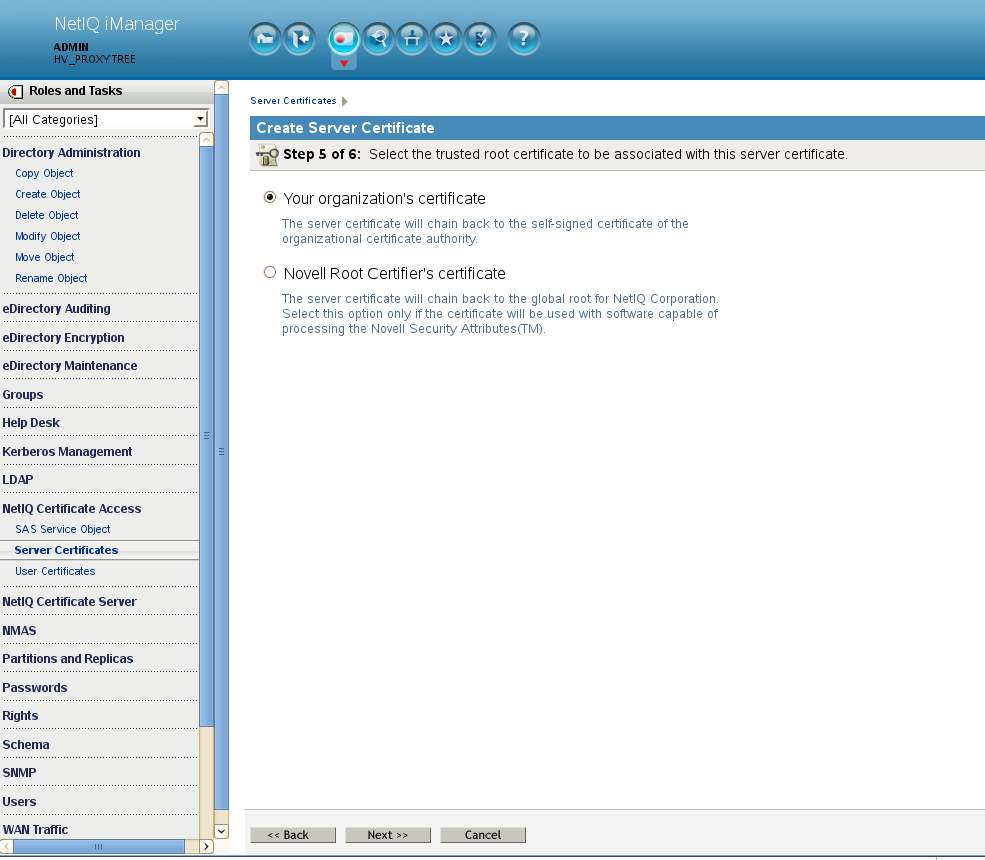
Review summary and select Finish to complete the creation of the server certificate.
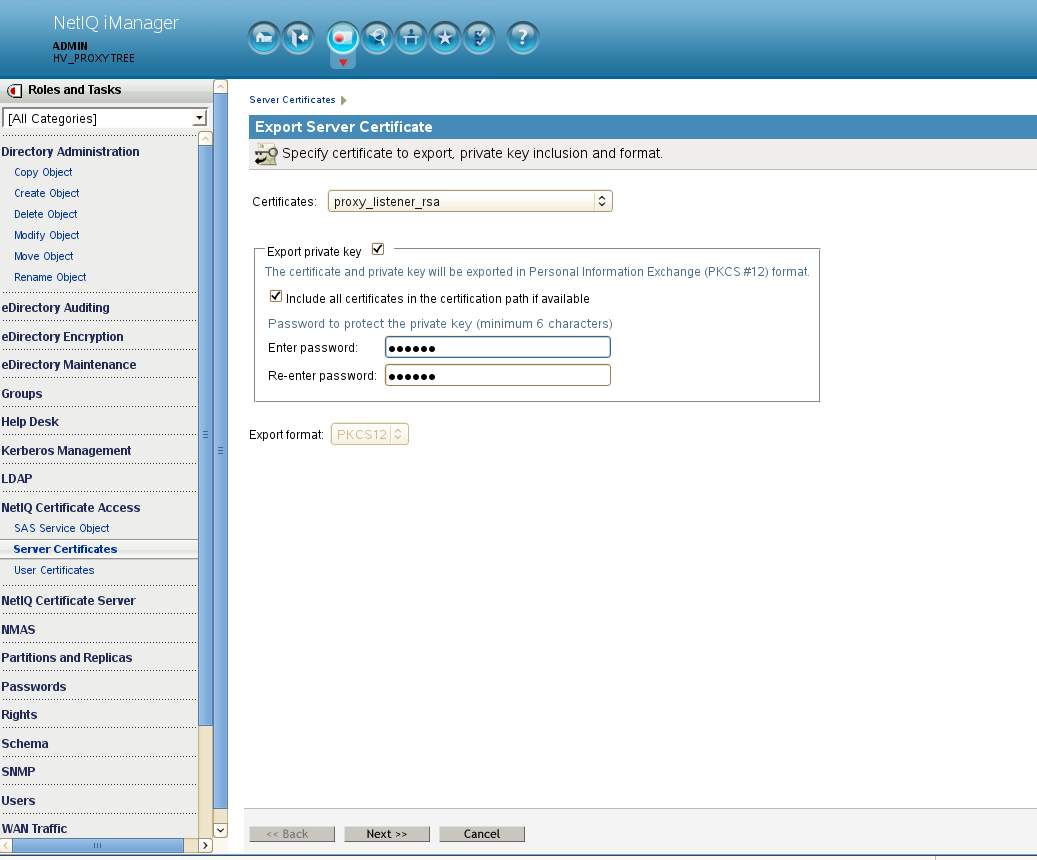
B. Export the newly created certificate.
Have a browser connect to iManager on the back-end tree. Navigate to NetIQ Certificate Access - Server Certificates. Select the certificate just created and select Export. Ensure that all certificates in the chain and the private key are selected. Enter a password to protect the private key. In this example we used "novell".
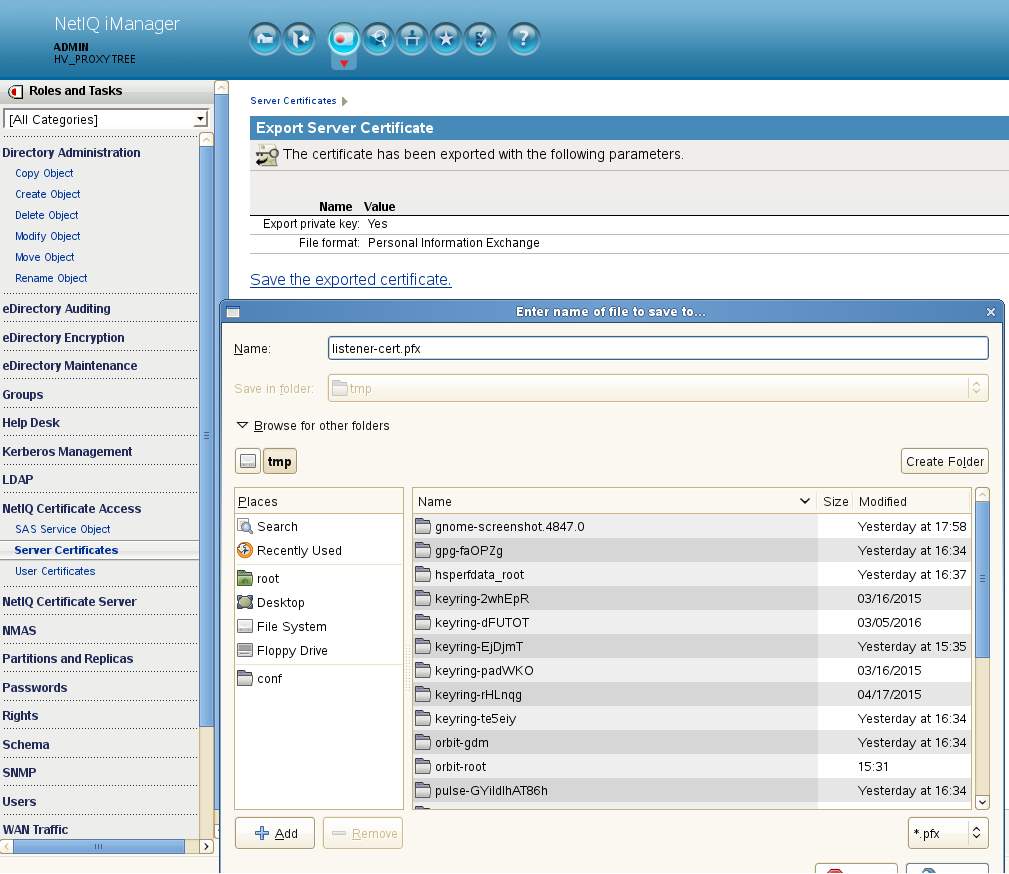
In the next dialog select to save the PKCS12 file in a folder of your choice. Here a file name of listener-cert.pfx is used.
3.
NLPCert Utility
The nlpcert utility must be run against the newly minted server PKCS12 file. This copies the keys into the Proxy's trusted store. Then the resulting pem file needs to be copied to the /etc/opt/novell/ldapproxy/conf/ssl/private/ directory. Example commands below:
hv14:/tmp # . /opt/novell/ldapproxy/bin/nlppath
hv14:/tmp # nlpcert -i listener-cert.pfx -o private-cert1.pem (You will be asked for the private key password. We wrapped it with "novell" earlier.)
hv14:/tmp # cp private-cert1.pem /etc/opt/novell/ldapproxy/conf/ssl/private
4.
Modify nlpconf.xml & restart
A. Using NLPManager
Change the listener to the LDAPS protocol using port 636. Lastly, specify the pem file copied to the ../private directory in Step 3 above.

Next, in the back-end server section, change both Backend1 and Backend2 to also use the LDAPS protocol and port 636. The certificate name is not required as all CA certificates in ../trustedcert will be loaded.
There is no change required on the back-end group. Select Provisioning - Save and close NLPManager.
B. Using an editor.
The resulting nlpconf.xml:
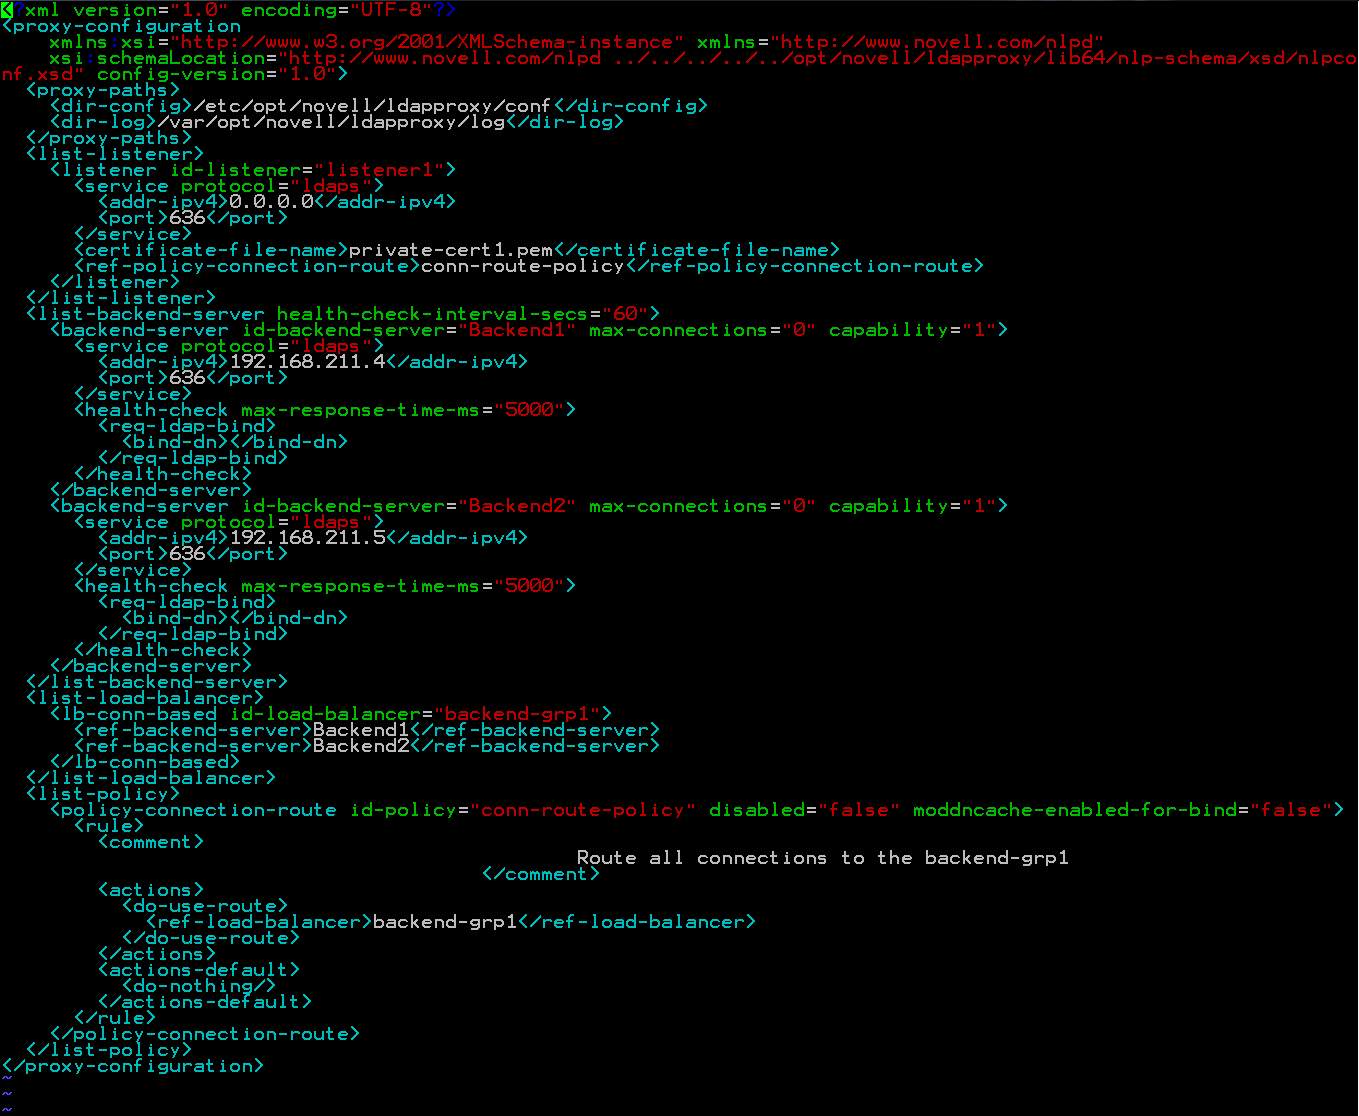
If modifying the xml file manually, it can be validated by running it against xmllint:
xmllint --noout --schema /opt/novell/ldapproxy/lib64/nlp-schema/xsd/nlpconf.xsd /etc/opt/novell/ldapproxy/conf/nlpconf.xml
C. Restart
While tailing the nlptrace log restart the Proxy: /etc/init.d/nlpd restart (SLES12: systemctl restart nlpd.service)
View the nlptrace. The following lines are a good sign.
Listener is setup:
[2016/03/16 16:40:42.909] 0:140680275347232 CONFIG: Listener [listener1] TLS Ciphers set to : HIGH:!eNULL:!aNULL .
[2016/03/16 16:40:42.909] 0:140680275347232 CONFIG: Listener [listener1] TLS initialization sucessfully completed.
[2016/03/16 16:40:42.909] 0:140680275347232 CONFIG: Listener [listener1] configuring TLS with certificate file = /etc/opt/novell/ldapproxy/conf/ssl/private/private-cert1.pem.
[2016/03/16 16:40:42.909] 0:140680275347232 CONFIG: Listener [listener1] PrivateKey from Passstore success, Length = 1704
[2016/03/16 16:40:42.909] 0:140680275347232 CONFIG: Listener [listener1] SSL_CTX_load_privKey SUCCESS returned 0
Back-ends have been contacted and certificates verified:
[2016/03/16 16:40:42.962] 0:140680275347232 CONFIG: TLS: SSL_CTX 0x7c30f0, CA certificate /etc/opt/novell/ldapproxy/conf/ssl/trustedcert/bkend_ca.pem loaded successfully.
[2016/03/16 16:40:42.962] 0:140680275347232 CONFIG: Listener [listener1] TLS configured successfully.
[2016/03/16 16:40:42.962] 0:140680275347232 CONFIG: Connection Route Policy [conn-route-policy] added to the listener.
[2016/03/16 16:41:41.004] 0:140680220690176 SOCKET: SAL_SktConnect failed 0xffffe8fc(SOCKET: operation in progress).
[2016/03/16 16:41:41.004] 0:140680220690176 SOCKET: SAL_SktConnect failed 0xffffe8fc(SOCKET: operation in progress).
[2016/03/16 16:41:41.012] 0:140680220690176 CONFIG: TLS: IPv4 field in subjectAlternativeName matched.
[2016/03/16 16:41:41.012] 0:140680220690176 LDAP: OUT-CONN sending request to back-end service ldaps://192.168.211.4:636.
[2016/03/16 16:41:41.015] 0:140680220690176 CONFIG: TLS: IPv4 field in subjectAlternativeName matched.
[2016/03/16 16:41:41.016] 0:140680220690176 LDAP: OUT-CONN sending request to back-end service ldaps://192.168.211.5:636.
D. Test
Verify Proxy status and that 636 is listening and grab the certificate information:
hv14:/tmp # /etc/init.d/nlpd status
hv14:/tmp # openssl s_client -connect 151.155.213.145:636 | openssl x509 -text -noout
Verify LDAPS operation:
Copy the same Root CA backend certificate used earlier to a machine on the listener side of the Proxy. Then attempt to establish an LDAPS connection to the Proxy:
hv18:/tmp # LDAPTLS_CACERT=/tmp/bkend_ca.pem ldapsearch -x -H ldaps://151.155.213.145 -b "" -s base -LLL
hv18:/tmp # LDAPTLS_CACERT=/tmp/bkend_ca.pem ldapsearch -x -H ldaps://151.155.213.145 -D "cn=admin,o=emg" -w novell -s sub cn=admin GUID
Additional Information
Sample Policies: