Environment
Overview
This document describes the procedure for re-configuring a Microsoft Windows 2008 R2 cluster environment (that is, either Windows Cluster Service or a Windows Fail-over Cluster) after a PlateSpin Forge or PlateSpin Protect failover/failback occurs.
Situation
Assumptions
This procedure assumes that the Protect/Forge user has run a full failback to the physical target and that shared storage is not yet attached.
Resolution
Restoring a Windows 2008 R2 Cluster after Failback
To restore the cluster after failback:
1. Log in to the failback computer and stop the cluster service to release the old cluster disks (former shared storage drives) from cluster use to allow changing of drive letters.
2. Reattach the shared storage (for example SAN storage connected via Fibre Channel or iSCSI storage).
3. (Conditional – if the former shared storage drives (that is, the old cluster disks) are online). In the Windows Disk Manager, change the drive letters of the old cluster disks to some other drive letter to prepare for assigning the original drive letters to the re-attached shared storage drives.
NOTE:Even if the cluster disks are not currently displayed with an Online status, they are brought online in Step 14.
4. In the Failover Cluster Manager, change the drive letters for the quorum disk and the resource applications to drive letters different from their original drive letters., then rename the cluster storage disks (for example, oldQuorum, oldDATA).
5. In the Windows Disk Manager, bring the reattached shared storage online and reassign the original drive letters to these shared drives.
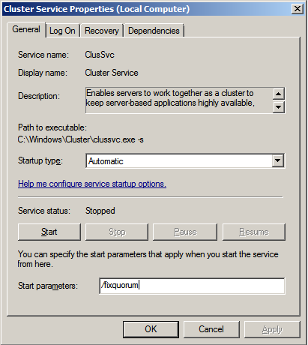
6. Start the Cluster service. If clustering is not loading properly on the failback computer, start the Cluster service with the /fixquorum switch.
7. From the Nodes folder in the Failover Cluster Manager, right-click the orphaned node > More Actions > Evict.
NOTE:You might receive a warning that the orphaned node could not be cleaned up. Follow the directions in the message for more information.
8. Add new shared storage as available Cluster shared disks.
1. In the Failover Cluster Manager, right-click the Storage folder > Add Disk.
2. Select the available shared disks and click OK.
3. (Conditional) If you receive this error message:
No disks suitable for cluster disks were found
you can add the disks by using the DISKPART utility to retrieve the Disk ID for each shared disk you add, and you can use the cluster resource command to add the disks, to assign an ID, and to bring the disks online:
1. Start the DISKPART utility and run the select command to select a disk, then run the detail disk command to retrieve the Disk ID for that disk. Write down the Disk ID.
2. Repeat Step 8.3.1 for each shared disk you are adding.
3. From the command prompt, run the cluster resource command with the proper parameters and property names to “create” each disk to be added. For example:
cluster res "Quorum" /create /group:"Available Storage" /type:"Physical Disk”
(where "Quorum" is the name you want to associate to the added disk)
4. From the command prompt, run the cluster resource command with the proper option to assign a Disk ID (retrieved and recorded in Step 8.3.1) to each disk created in Step 8.3.3. For example:
cluster res "Quorum" /priv DiskSignature=0x<DiskID>
5. From the command prompt, run the cluster resource command with the proper option to bring each cluster disk online:
cluster res "Quorum" /on
9. Reconfigure the cluster Quorum Disk to use the newly-added shared disk designated for the Quorum disk:
1. In Cluster Failover Manager, right-click the cluster object, select More Actions > Configure Cluster Quorum Settings.
2. Assign the Quorum to the newly-added Quorum Disk.
10. In the Failover Cluster Manager, add the newly-created shared disk for the cluster resource application:
1. Right-click the service/application object (in this example figure below, the MSSQL Server 2012), then select Add Storage.
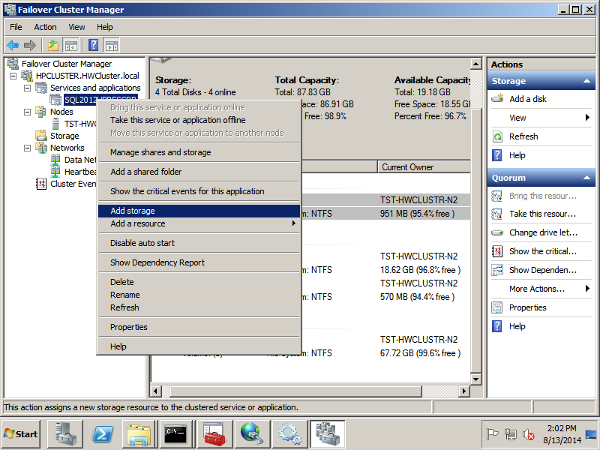
2. In the Add Storage dialog box, select the disk you want to add for the cluster resource.
11. Change the dependencies on the services for the cluster resource to the newly-added disk:
1. In the Failover Cluster Manager, expand the Service and applications container, right-click the service you want, then select Properties > Dependencies.
2. On the Dependencies tab, open the drop-down menu and select the new disk. This changes the dependencies.
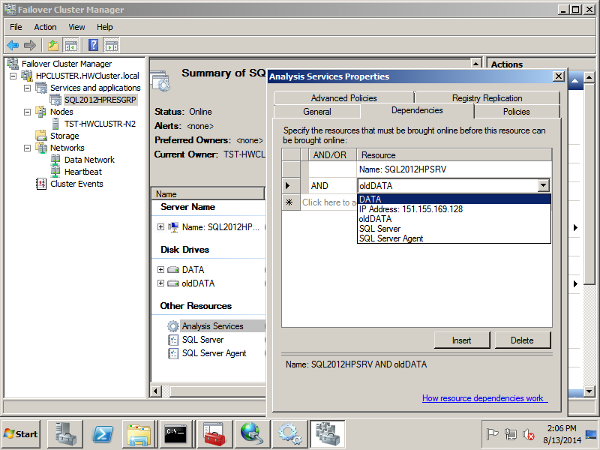
NOTE:You might have to repeat this step for multiple application services.
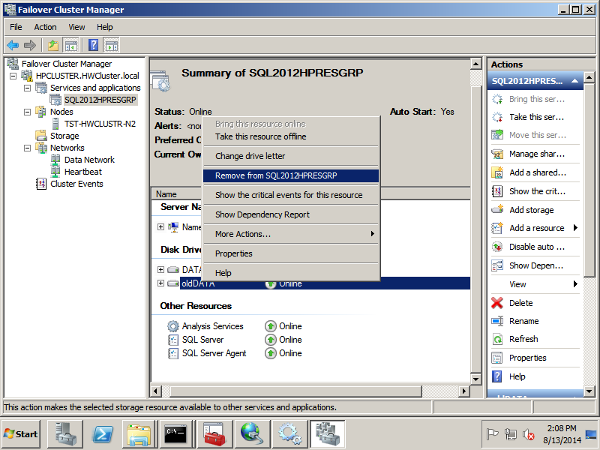
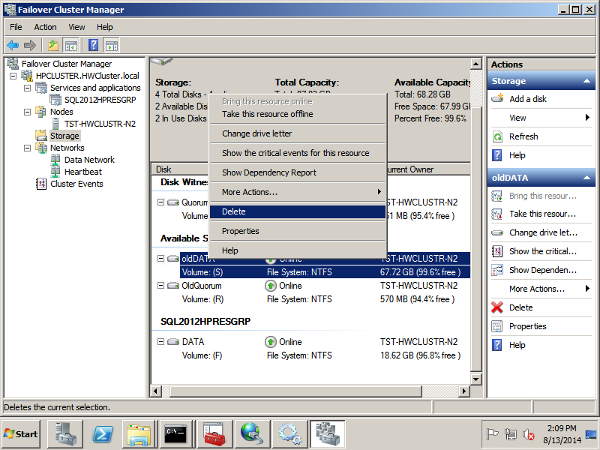
12. Right-click the old application disk and select Remove to remove the old disk from the application.
13. Select the Storage folder, right-click the old storage drives, then select Delete to remove the old disks from the cluster configuration and to allow them to operate as local disks.
14. (Conditional – if old cluster disks were not online in Step 3). In the Windows Disk Manager, bring the old cluster disks online as local disks and assign them a drive letter.
NOTE:Now that these disks have been removed from the cluster configuration in the Failover Cluster Manager, they will act as local disks.
15. From the command line, perform an xcopy of the application data from the old cluster resource disk to the new cluster resource disk. This ensures that security permissions persist.
You can use any of the following switches in this scenario:
|
Parameter |
Description |
|
/o |
Copies file ownership and discretionary access control list (DACL) information. |
|
/x |
Copies file audit settings and system access control list (SACL) information (implies /o). |
|
/e |
Copies all subdirectories, even if they are empty. |
|
/h |
Copies files with hidden and system file attributes. (By default, xcopy does not copy hidden or system files.) |
|
/k |
Copies files and retains the read-only attribute on Destination files if present on the Source files. (By default, xcopy removes the read-only attribute) |
Syntax example:
xcopy s:\*.* . /o/x/e/h/k
16. In the Cluster Failover Manager, bring all cluster resource services and drives online.
17. In the Windows Disk Manager, remove all old cluster drives that are no longer needed.
The cluster now functions on a single cluster node.
18. Connect additional nodes and add them to the cluster.