Environment
Novell GroupWise 8
Situation
Auto Archiving does not work till the folder exists
Users need to manually archive a message before Auto Archiving starts working
Auto Archiving does not create the Archive Folder automatically
Resolution
This is working as designed but has been Reported to Engineering as an Enhancement.
Workaround Steps:
These workaround steps makes sense only if the Archive folders are kept in a Central Location. These steps will allow the Administrator to create the Archive Folders for all the users at once so that Auto Archiving starts working as soon as it is set
- Use GWPORT32.exe to extract the FID of the users in the Post Office:
- Download gwport32.exe from the following link:
https://download.novell.com/Download?buildid=Hnvcrv78rfs~ - Extract gwport32.exe using winrar or just switch to a Command Prompt and switch to the Directory where gwpo32.exe was downloaded and type gwport32.exe .
- Browse to the extracted folder and there would be an other GWPORT32.exe in the Extracted folder.
- Copy extracted GWPORT32.exe to c:\novell\ConsoleOne\1.2\ directory .
- Double click on GWPORT32.exe and it would ask to unzip to .\ directory. Click Unzip.
- Launch ConsoleOne from c:\novell\ConsoleOne\1.2\bin\ConsoleOne.exe .
- Connect to the GroupWise Domain.
- Highlight the Top Most Container in eDirectory and click Tools | GroupWise Utilities | Export.
- Select NDS/GroupWise Class.
- On the Right hand side, select the drop down list and select "User".
- In the Parent: GroupWise Post Office , select the Post Office.
- On the Right hand side, type in the Export File: name as c:\exp.txt .
- Select "NGW: File ID " from the Attributes and click the Right Arrow to push it under File Fields:
- Make sure the starting Context: is set to [Root.
- Select "Export from subordinate contexts" and click Run.
- Once the Export is complete, click OK.
- Open exp.txt using Excel.
- Sort the FID columns to remove blank lines.
- Move the sorted FID colum to the second column.
- In the first column first row, type "of" without quotes.
- Drag the word "of " without quotes the all the rows by clicking on the bottom edge of the cell using the mouse and drag it down.
- In the Third column first row, type "arc " without quotes.
- Drag the word "arc " to the all the rows by clicking on the bottom edge of the cell using the mouse and drag it down.
Finally it should look like this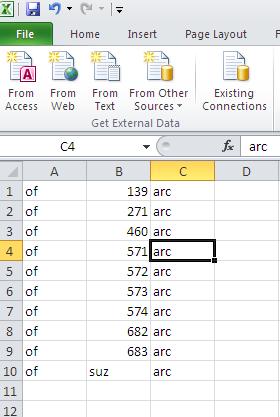
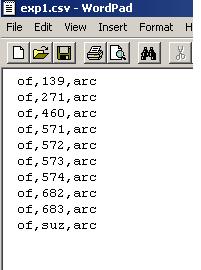
- Save the File in CSV format as c:\exp1.csv.
- Open c:\exp1.csv in wordpad and it should look like the following:
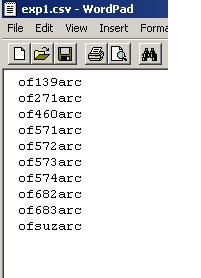
- Click Edit | Replace.
- In the Find what: field, type , (Type the symbol for comma).
- Leave the Replace with: field blank and click Replace All. The output should look like the following:
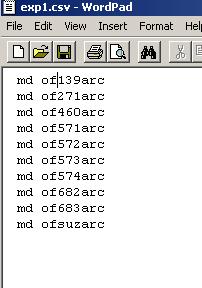
- Click Edit | Replace.
- In the Find what: field, type "of " without quotes and press Enter.
- In the Replace with: type "md of " without quotes and press Enter.
- Click Replace All. The output should look like the following.
- Save the file as c:\exp3.bat.
- Copy the file to the location where these directories need to be created and map a drive to that Location.
- Launch a Command Prompt and switch to the Mapped Drive.
- Type "exp3.bat " and it will execute the commands in the exp3.bat and create the directories in that location. If the folder already exists, it would just give a message saying that the folder already exists.