Environment
Products:
Novell Teaming 1.0
Novell Teaming 1.0 Support Pack 1
Novell Teaming 1.0 Support Pack 2
Novell Teaming 1.0 Support Pack 3
Novell Teaming + Conferencing
Novell SUSE Linux Enterprise Server 10
Novell SUSE Linux Enterprise Server 10 Support Pack 1
Configuration:
Novell Teaming is installed correctly.
Novell Teaming is working on both HTTP and HTTPS ports.
Situation
Purpose:
To modify the default home portal page that new users of Teaming receive.
Symptoms:
When new user logs into Teaming for the first time, they receive a default home portal page that includes four Novell Teaming portlets. The users have the ability to add additional portlets and change the layout of how those portlet are displayed.
Changes:
Teaming Administrators would like to customize this default home portal page to either include other portlets or change the page layout.
Resolution
Corrective Actions:
The definition for the default portal home page resides in the portal.properties file which is embedded within the portal-impl.jar file. A .jar file is very similar to a .tar or .zip file. You can use winzip or file roller to extract files or add files to .jar files. The only reason to extract the portal.properties file from the portal-impl.jar file is to get a the correct syntax for the default home page definition. This syntax can then be inserted into the portal-ext.properties file which will override the definition in the portal.properties file. To save time that sytax is posted here and it is not necessary to extract the portal.properties file.
<Begin Syntax>
##
## Default User
##
#
# Users who have the Power User role must have at least one private personal
# page. The settings for the initial private page are specified in the
# following properties. For more complex behavior, override the
# addDefaultLayouts method in com.liferay.portal.events.ServicePreAction.
#
#
# Set the layout name.
#
default.user.layout.name=Home
#
# Set the layout template id that matches an existing TPL.
#
#default.user.layout.template.id=1_2_1_columns
#default.user.layout.template.id=1_column
#default.user.layout.template.id=2_2_columns
#default.user.layout.template.id=2_columns_i
#default.user.layout.template.id=2_columns_ii
#default.user.layout.template.id=2_columns_iii
#default.user.layout.template.id=3_columns
#
# Set the layout ids for the column specified in the layout template.
#
default.user.layout.column-1=ss_welcome_WAR_ssf_INSTANCE_wXyZ,ss_presence_WAR_ssf_INSTANCE_wXyZ,
default.user.layout.column-2=ss_toolbar_WAR_ssf_INSTANCE_wXyZ,ss_forum_WAR_ssf_INSTANCE_wXyZ,
default.user.layout.column-3=
default.user.layout.column-4=
<End Syntax>
Workaround Steps:
Step One: Locate the portal-ext.properties file. This file should be located in the <teaming install directory>/webapps/ROOT/WEB-INF/ directory. The default âteaming install directoryâ on linux is /opt/icecore/liferay-portal-tomcat-5.5-jdk5-4.3.0. The default âteaming install directoryâ on Windows is c:\iceore\liferay-portal-tomcat-5.5-jdk5-4.3.0. Both of these may have been customized during the Teaming installation. If this file does not exist, it can be created with a text editor.
Step Two: Make a backup copy of the portal-ext.properties file.
Step Three: Insert the above syntax (without word wrap or the <begin/end syntax> markers) at the bottom of the portal-ext.properties file.
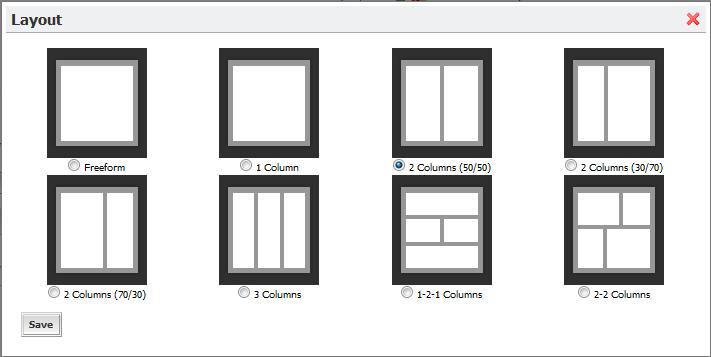
Step Four: Choose and un-remark the desired default layout.
#default.user.layout.template.id=1_2_1_columns
#default.user.layout.template.id=1_column
#default.user.layout.template.id=2_2_columns
#default.user.layout.template.id=2_columns_i
#default.user.layout.template.id=2_columns_ii
#default.user.layout.template.id=2_columns_iii
#default.user.layout.template.id=3_columns
Example Screen Shot of Layout options
Step Five: Choose which portlets will be displayed in which column and it what order.
Each portlet name must be in the exact syntax/case and separated by a comma.
The following is the default definition:
default.user.layout.column-1=ss_welcome_WAR_ssf_INSTANCE_wXyZ,ss_presence_WAR_ssf_INSTANCE_wXyZ,
default.user.layout.column-2=ss_toolbar_WAR_ssf_INSTANCE_wXyZ,ss_forum_WAR_ssf_INSTANCE_wXyZ,
default.user.layout.column-3=
default.user.layout.column-4=
The easiest way to determine the name of the portlets is to login to Teaming as a user and add the desired portlet from the add content option. Then hover the cursor over the minimize button for that portlet. In the bottom left corner of most browsers there is a status bar that displays the url for that portlet. The name for the portlet can be extracted from there.
Example Screen Shot
Another way to get names for the portlets is to look in the âliferay-portlet.xmlâ file.
This file is located in the <teaming install directory>/webapps/ROOT/WEB-INF/ directory and can be edited with a text editor.
Step Six: Save the portal-ext.properties file with the changes made.
Step Seven: Restart the Teaming server service.
Hint:
/etc/init.d/icecore stop
/etc/init.d/icecore start
Additional Information
Notes:
The changes made to the portal-ext.properties file will only effect new users. Existing users who have logged in will not have their home page reset. If users customize their home page, those settings will remain intact.


