Environment
Situation
This tid provides instructions for configuring the Novell GroupWise Messenger service to archive message conversations.
Resolution
Prerequisite: The GroupWise Messenger Archive Agent is installed and running on a supported server platform.
To configure archiving, do the following:
Start ConsoleOne; then login as a user with supervisor rights to the GroupWise system objects.
Browse the tree and find the MessengerService container object; then on the left of the object, select the plus sign ([+]) to display the contents of the MessengerService container.
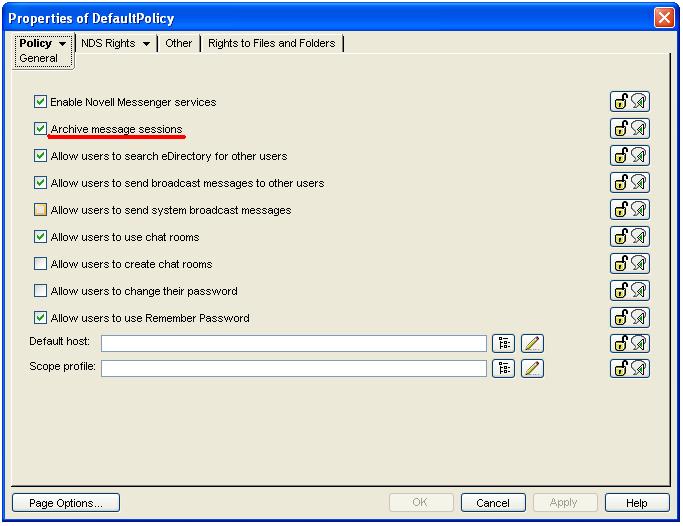
Select thePolicyContainerobject; then in the right panel, display the properties of the DefaultPolicy object.
Select the Archive message sessions check box; then select OK.
Stop then start the Novell Messenger Messaging Agent and the Novell Messenger ArchiveAgent.
All users' messages will now be archived.
Archived messages are read by granting archive access to authorized users. To grant authorization, do the following:
Display the properties of the MessengerService container object.
From the Novell Messenger tab, select Archive ACL.
From the right of the dialog, select the Add button.
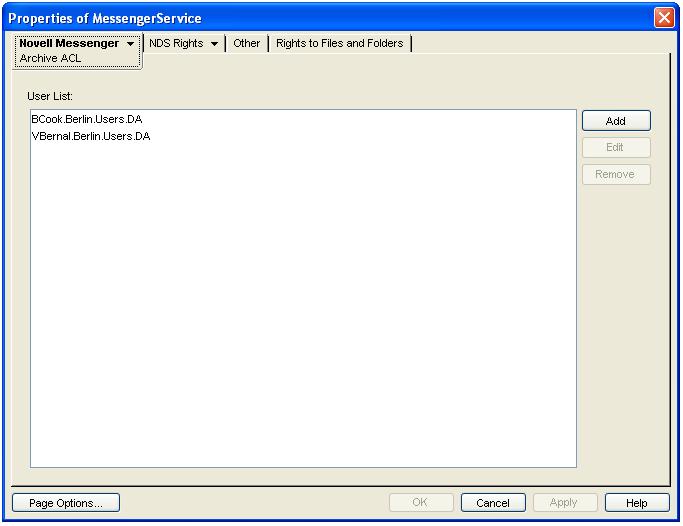
Browse the tree and select users that you want authorize.
Note: Shift or Ctrl clicking is supported for selecting multiple users.
Select OK; then selectOKagain.
Stop then start the Novell Messenger Messaging Agent and the Novell Messenger Archive Agent.
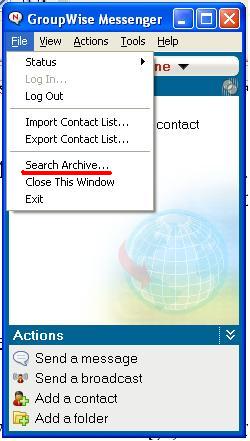
Authorized users should log out then log back in to the GroupWise Messenger client. Doing so will activate a Search Archive option on the Messenger client File menu.
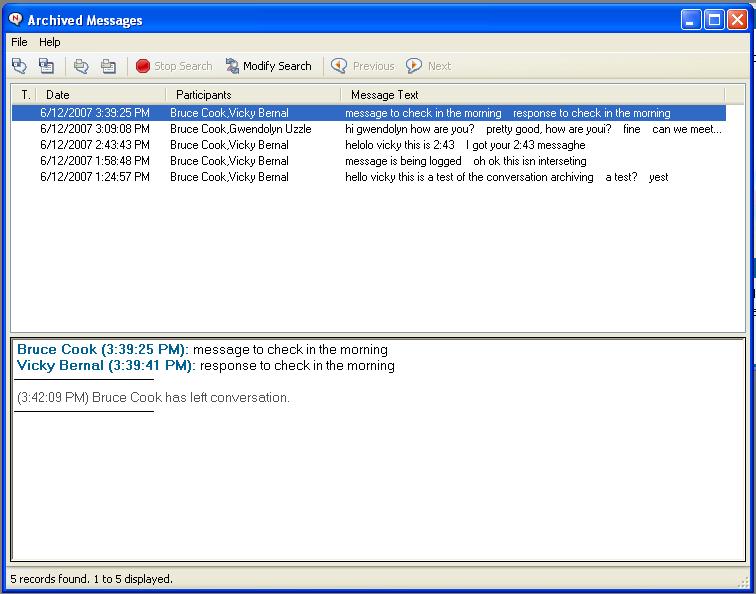
To read archived conversations, to the following:
Make sure you are logged in to the Messenger client as an authorized user.
From the File menu, select Search Archive.
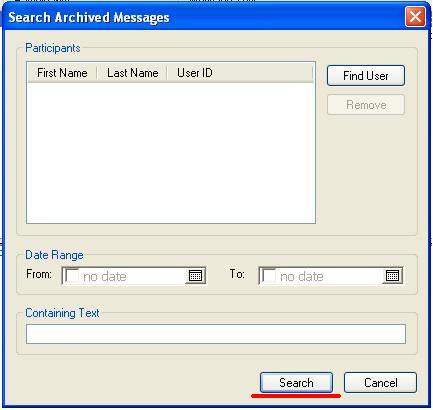
To read all archived conversations, select the Search button.
To read conversations of specific users, and/or to read conversations between a date range, and/or to read conversations that contain specific text, enter information into the appropriate fields; then select theSearchbutton.
You can now view, save, or print individual conversations.
Conversations are available to be read after the indexing process is completed. By default, the index process starts at 2:00 am and then runs every four hours. Every 24 hours, indexes are compressed. To change these default values, do the following:
Display the contents of the MessengerService container object; then display the contents of the (servername)SERVER object.
Select theArchiveAgentobject; then in the right panel, display the properties of the FileModule object.
From the Module tab you will see the Store Settings page. You change the indexing settings by adjusting the values in the QuickFinder Maintenance section of the Store Settings page.
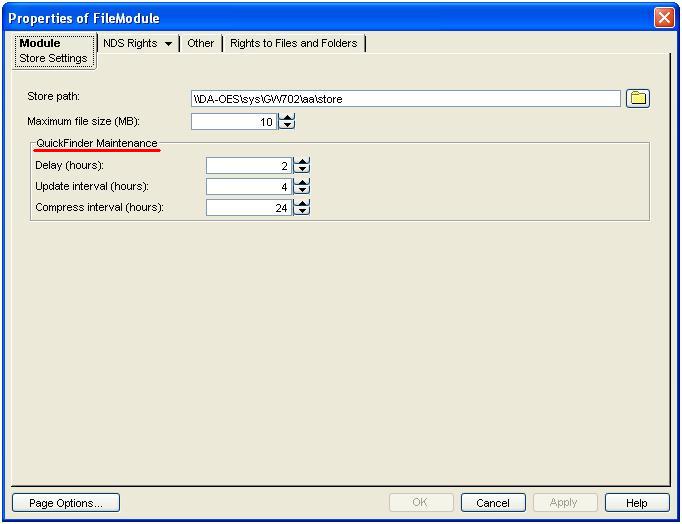
If you make any changes, make sure you apply the changes in ConsoleOne and stop then start the Novell Messenger Messaging Agent and the Novell Messenger Archive Agent.
You can manually invoke the index process at any time. To do so, follow the instructions for each platform that the agent runs on.
NetWare
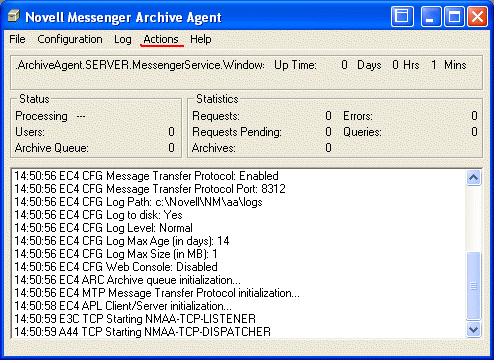
Display the server console for the Novell Messenger Archive Agent.
From the keyboard, select the F10 button; then selectActions.
Select Update Indexes.

Windows
Display the Novell Messenger Archive Agent from the Windows server console.
From the pull-down menu, Select Actions; then select Update Indexes.
Linux
Because the Linux platform does not include a server console for the Novell Messenger Archive Agent, you manage the agent from a web-based console.
Note: As an alternative to the above platform specific steps, a web console can also be configured for NetWare and Windows.
Do the following:
In ConsoleOne, display the contents of the MessengerService container object; then display the contents of the (servername)SERVER object.
In the right panel, display the properties of the ArchiveAgent object.
From the Agent tab, select Web Console.
Enter a numerical port value in the HTTP Port field.
Note: The default client/server port is 8310. Entering a port value of 8311 works well.
SelectOK.
Stop then start the Novell Messenger Messaging Agent and the Novell Messenger Archive Agent.
Start a browser and enter the following in the URL field:
http://ipaddressof server hosting the archive agent:port selected above
example:http://10.200.200.10:8311
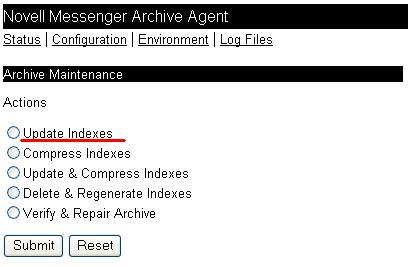
SelectConfiguration; then select Archive Maintenance.
Select the Update Indexes radio button; then select Submit.
You can now read all currently-archived conversations.