Environment
Situation
Resolution
Install the vpn Linux client from the beta NBM 3.9 download. Follow on line docs to install it properly
Open a system terminal, change to root using su and issue the follow command:
cat /var/log/vpnClientInstall.log
You should see at the end of the report:
Installation terminated successfully
Using KDE, click over the KnetworkManager on the right down panel and select vpn connections and configure vpn.
On the Manage Virtual Private Network Connections select + Add

Click on forward
On the Connect to field, chose NovellVpnClient. If you do not see this options and vpn client install finished with no errors, reboot the machine and try it again.
Click forward
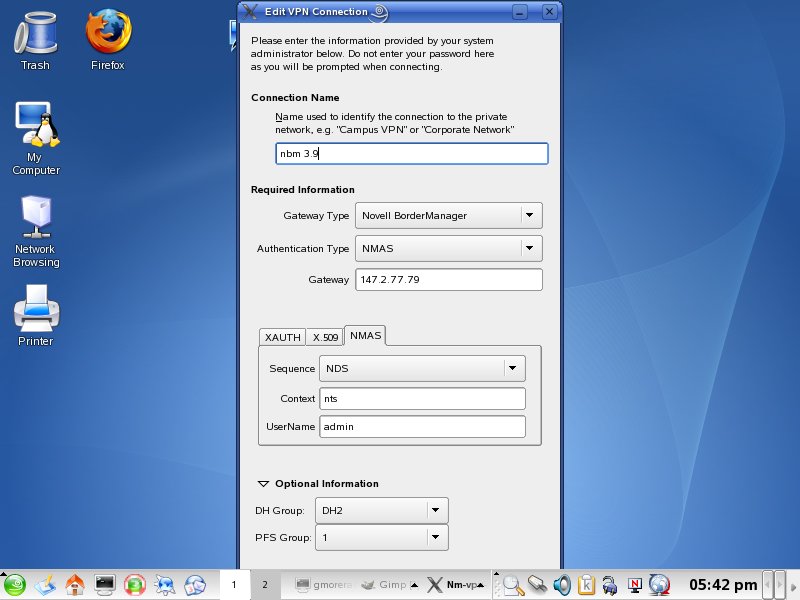
On the connection name field, give a name to identify this connection, e.i NBM 3.9
On the gateway type field select Novell Bordermanager
On the authentication type field select Nmas
On the Gateway field, enter the public ip address of the Novell BorderManager server
On the same screen, select the NMAS tab
On the NMAS sequence field select NDS
On the context field enter the context of the user, just the context, e.i novell
On the User name field, enter the user name, e.i admin.
( Assuming user is located in cn=admin.o=nts)
On the same screen, click on the arrow of the optional information
On the DH group field chose DH2
- On the PFS Group chose 1
Click on apply
Profile has been created and you can close the manage virtual private connections screen
Verify that racoon service is ready. As root on a system console type:
rcracoon restart
To use this profile and connect to your NBM server, click on the KnetworkManager on the right down panel and select vpn connections. You will see an entry "Connect to NBM 3.9”. Select the entry.
Yo will be prompted for the user eDir password. Enter it.
Connection will be made. you can verify it on a terminal server console, being root, type ifconfig
you will see an ethx:x interface with the ip address of the vpn client pool you configured in iManager.
Now you will be able to access your internal networks thru the Linux vpn client