Environment
Novell
NetWare 6.5
Situation
How to change the
IP address on NetWare 6.5
Resolution
- Login to the NetWare Remote Manager (NRM) by going to https://<IP_address_or_DNS_name>:8009
- Under the MANAGE SERVER section, click on CONFIGURE TCPIP | START TCPIP CONFIGURATION | TCP/IP TO INTERFACE BINDINGS.
- Select the appropriate interface (if there is more than one available in the list).
- Once in the interface, change the IP address and then click on SAVE.
- ** NOTE ** You may receive an error saying that the IP address is in
use for the Portal.
What this is saying is that you are currently using this IP address with Novell Remote Manager and if you reinitialize your system you will lose your connection.
Do NOT reinitialize the system yet.
- Click BACK and EXIT. You will then receive this message. Just click OK, we will reset the server in a minute.
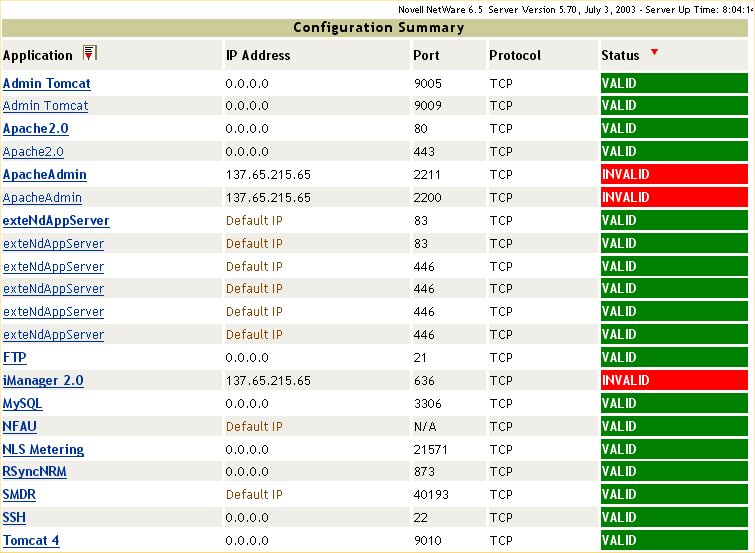
- Now go back to Novell Remote Manager and select IP ADDRESS MANAGEMENT under the MANAGE SERVER section.
You will notice that there are certain services listed which were specifically configured for the old IP address, and these now show an INVALID in red.
To resolve, select the application link on the left hand side and change it to the new IP address. An example is shown in the next step.
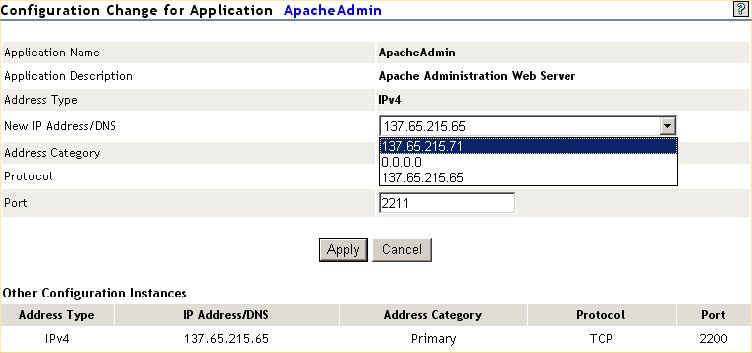
- In the example here,we will click on the ApacheAdmin section and select the new IP address from the drop down list.
Click APPLY to continue.
- Perform this same IP address change for any service in the list that still displays using the old IP address.
** NOTE **
After you change the first service, other services may not show invalid, however they will still show the old IP address. The reason for that is due to the fact we have not yet reinitialized the system.
Do not worry about this and just continue and change the IP address in the other sections where required. Once this is done, go to DOWN/RESTART section under MANAGE SERVER and click on the RESET button to perform a RESET SERVER.
Once these steps have successfully been completed, it would be wise to initiate a Limber process on
the server.
Do this by entering the following commands at the console prompt:
SET DSTRACE=ON
SET DSTRACE=NODEBUG
SET DSTRACE=+LIMBER
SET DSTRACE=*L
Once this has successfully finished, there should be a " End connectivity check, all OK " message displayed on the Directory Services screen.
Additional Information
Important information :
When changing IP addresses and/or IP subnets, please verify and make sure that where required, the server's default gateway is also simultaneously updated to reflect the new configuration.
TID is formerly known as TID# 10088753, and also known as KB 3548411.
When changing IP addresses and/or IP subnets, please verify and make sure that where required, the server's default gateway is also simultaneously updated to reflect the new configuration.
TID is formerly known as TID# 10088753, and also known as KB 3548411.
Change Log
03/23/2015 - Hans van den Heuvel - Updated TID readability and some details based on TID feedback.


