Environment
Novell eDirectory 8.8 SP1 for All Platforms
Novell iManager 2.6 SP3
Novell Certificate Server (PKIS) 3.1.1
Situation
eDirectory 8.8.1 has the full capability of being reconfigured
as a SubOrdinate CA.
One of the advantages of configuring this is to create a Trust
Anchor between disparate directories\Certificate Servers so
multiple self-signed certificates do not need to be maintained on
clients.
This document describes how to do this with a MicroSoft
Certificate Server running on a Windows 2003 server and creating
the subordinate on a Linux based eDirectory tree. This
process involves deleting the existing CA so ensure backups are
creating before proceeding. The backups should contain the
eDirectory database, the NICI files as well as PKCS#12 files of the
existing CA.
More information on these procedures can be found at the
following links:
Resolution
Summary of Steps
- Create a server CSR, get it signed and reimport it into eDir
- Export the new server cert
- Backup and delete the current RootCA
- Use signed certificate to create a new RootCA
- Regen the server's default certificates
Detailed Steps
1. Backup the Existing CA
2. Create a Trusted Root for the existing CA
3. Create CSR
4. Get the CSR signed. (PKCS#10 - cer)
5. Chain the signed certificate with the 2003 CA's key
(In your case I would suggest placing the remote RootCA's public key in a Trusted Roots container. It must be called “Default CA Certificates.Security”. This will create the chain for you.)
6. Import the signed certificate with the chain into eDirectory. (PKCS#7 - p7b)
7. Export the new server certificate to a PKCS#12 file
8. Delete the Organization CA in eDirectory
9. Create a new RootCA, importing the signed server certificate
10. Regen the server's default certificates
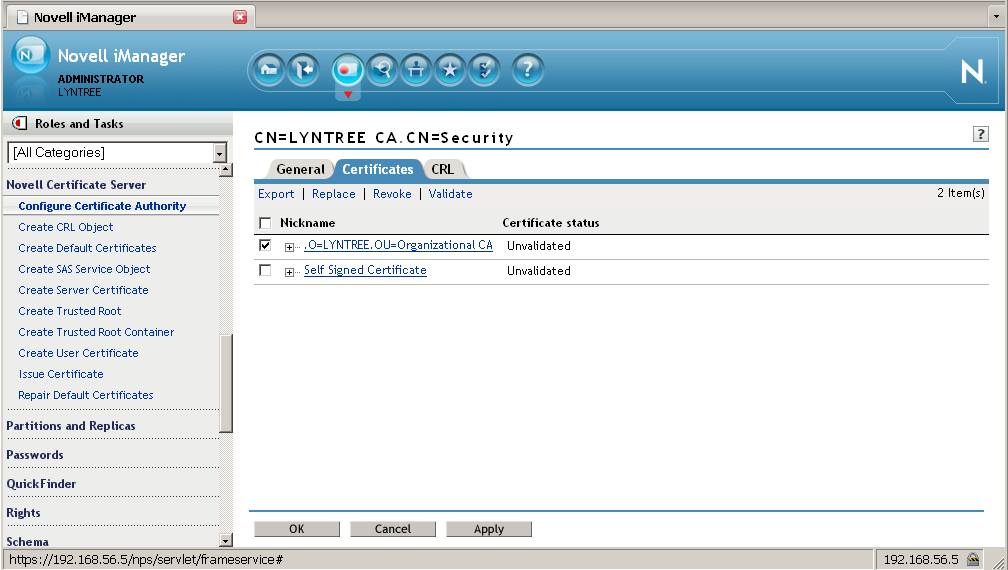
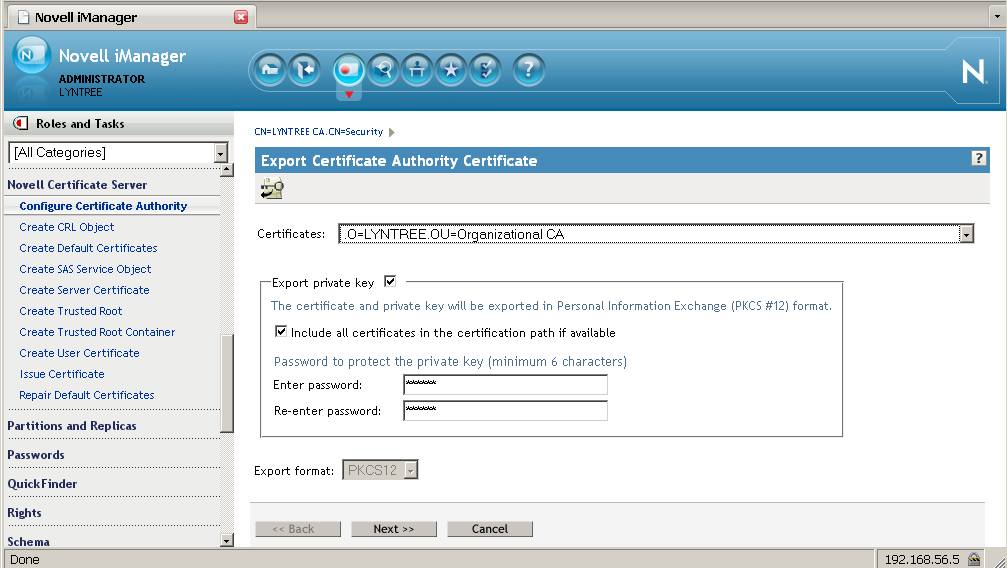
1. Backup the Existing
CA
From the Roles and Tasks menu in iManager , click Novell
Certificate Server > Configure Certificate Authority.
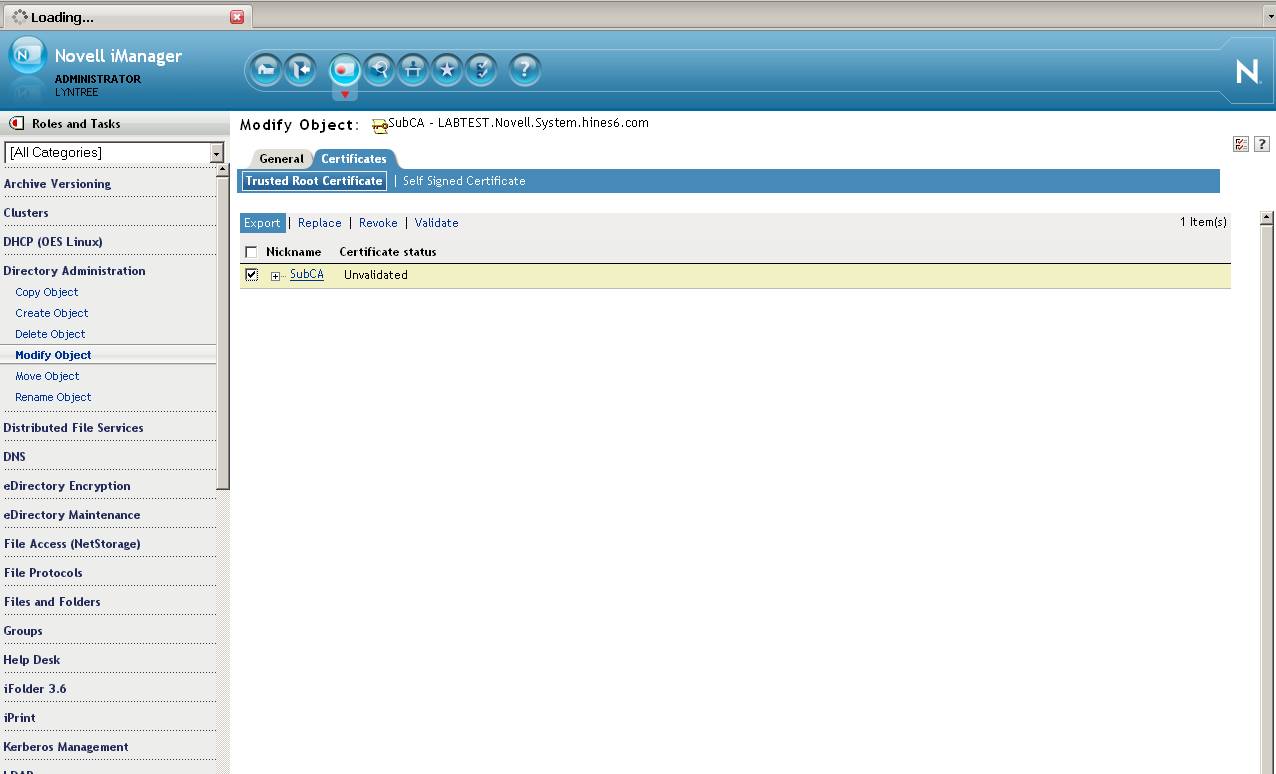
Click Certificates, then select either the Self Signed Certificate
or the Public Key Certificate. Both certificates are written to the
file during the backup operation. Click Export. This opens a
wizard that helps you export the certificates to a file.
Choose to export the private key, specify a password with 6 or more
alphanumeric characters to use in encrypting the PFX file, then
click Next.

2. Create a Trusted Root
for the existing CA
In order to create a new
Subordinate CA the existing one will first need to be
deleted. It will also be based on a server certificate whose
certifcate chain will contain the existing CA. Therefore we
must, before deleting the CA, create a Trusted Roots container and
object.
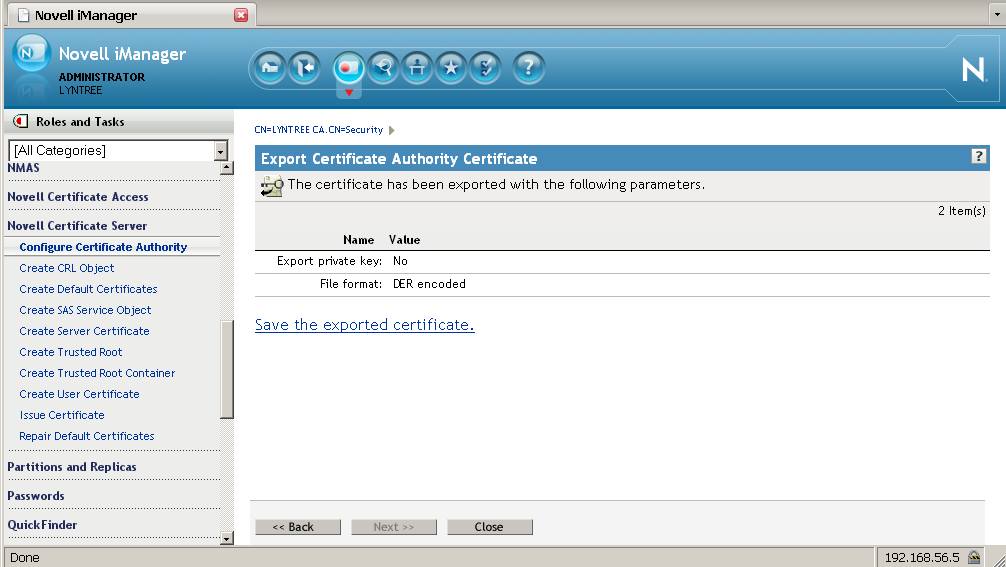
From the Roles and Tasks menu in iManager , click Novell Certificate Server > Configure Certificate Authority. Click Certificates, then select the Self Signed Certificate and export it without the private key. This will be used to import into the Trusted Roots object.
From the Roles and Tasks menu in iManager , click Novell Certificate Server > Configure Certificate Authority. Click Certificates, then select the Self Signed Certificate and export it without the private key. This will be used to import into the Trusted Roots object.


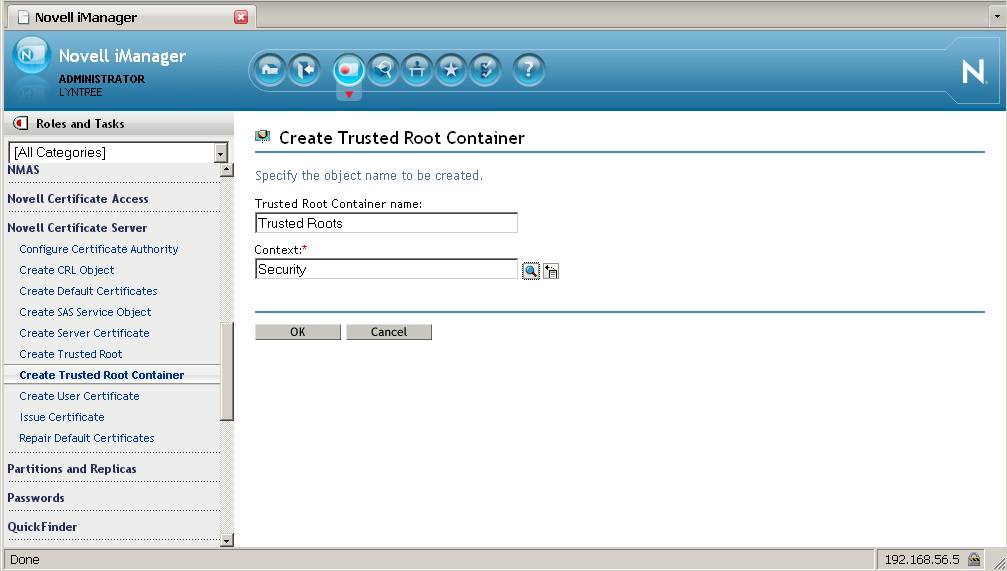
Now the Trusted Roots container can be created. From the Roles and Tasks menu in iManager , click Novell Certificate Server > Create Trusted Root container. This must be called " Trusted Roots " and must reside in the Security container.
The next step is to create the Trusted Root object
within the Trusted Roots container. This is done by importing
the self-signed certificate without the private key previously
created. From the Roles and Tasks menu in iManager , click
Novell Certificate Server > Create Trusted Root.

3. Create a server
Certificate Signing Request (CSR) and have it signed by the 2003
server.
The Subordinate CA is based on a keypair created by the
existing CA which will be signed by the 2003 server. Then the
certificate will be imported into eDirectory. The last step
here is to export the entire certificate as a PKCS12 file
(*.pfx).
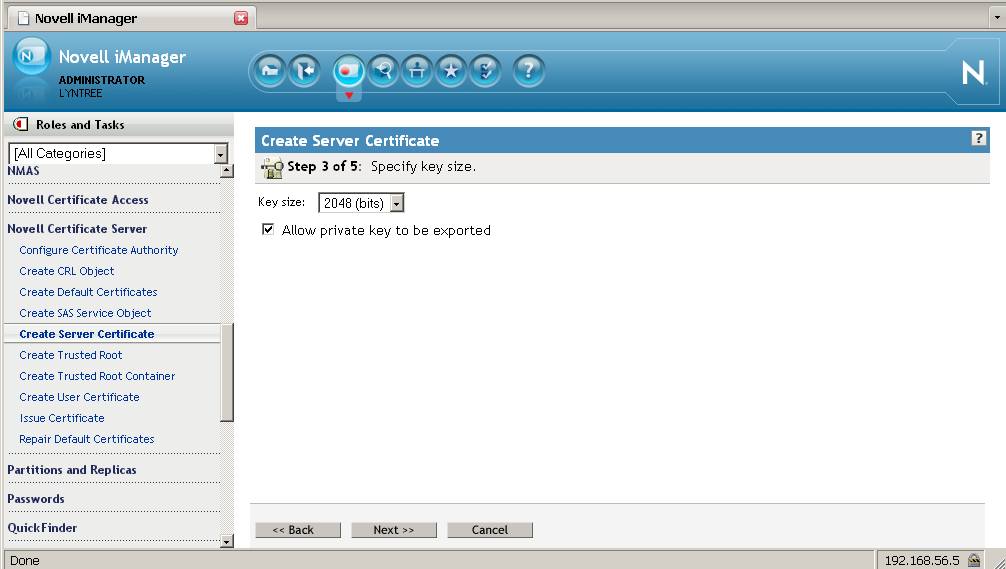
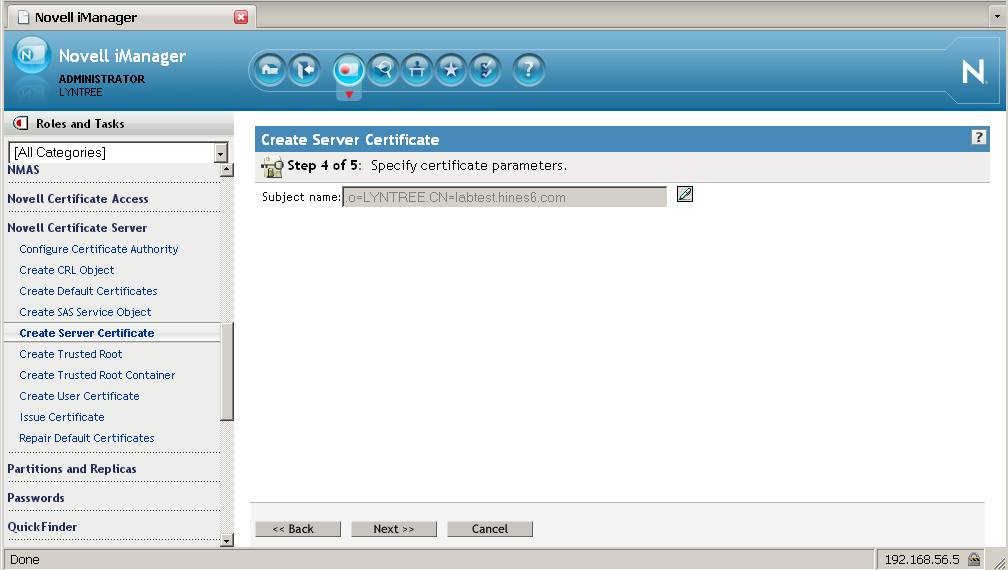
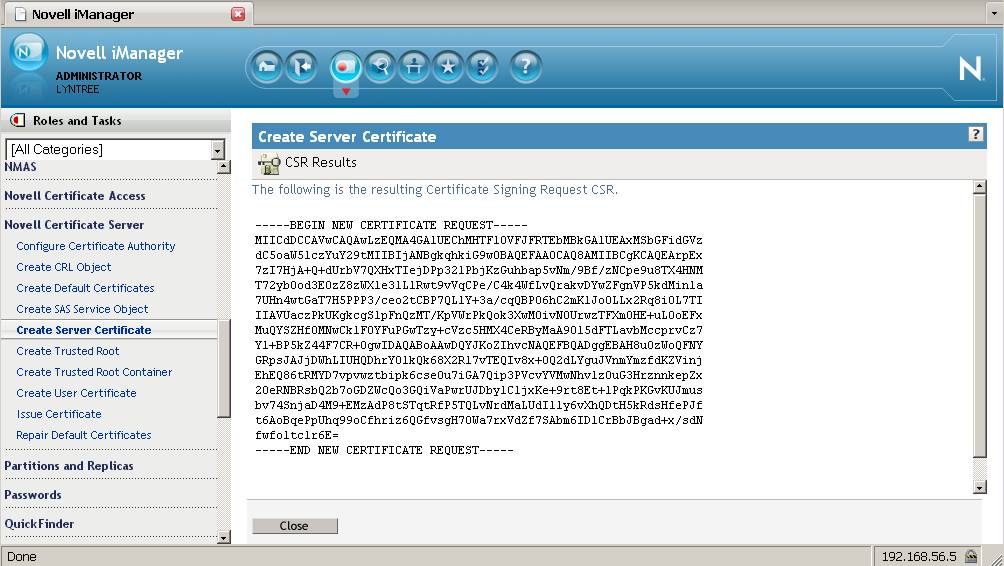
From the Roles and Tasks menu in iManager , click Novell Certificate Server > Create Server Certificate > Custom > External certificate authority. Select the current CA as the server for whom the certificate will be created. The nickname will be the object's name. Leave the defaults at a 2048 keysize and allow the private key to be exported. Then save the csr file.
From the Roles and Tasks menu in iManager , click Novell Certificate Server > Create Server Certificate > Custom > External certificate authority. Select the current CA as the server for whom the certificate will be created. The nickname will be the object's name. Leave the defaults at a 2048 keysize and allow the private key to be exported. Then save the csr file.


4. Sign the CSR by the
2003 server's CA
Open an Internet Explorer browser and go to the 2003
server's certificate administration page:
http://ipaddress/certsrv. Login as the Administrator. Select Request a certificate > advanced certificate request > Submit a certificate request by using a PKCS#10 file. Browse to the csr file previously created then click on Read. For Certificate Template select Subordinate Certification Authority then select Submit.
http://ipaddress/certsrv. Login as the Administrator. Select Request a certificate > advanced certificate request > Submit a certificate request by using a PKCS#10 file. Browse to the csr file previously created then click on Read. For Certificate Template select Subordinate Certification Authority then select Submit.

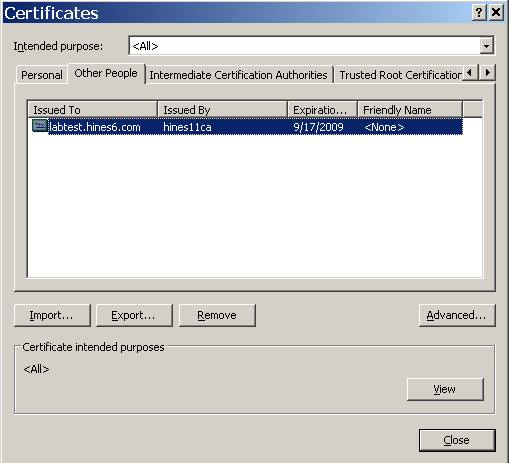
Then download both the certificate as well as the certificate
chain. You should now have a cer file and a p7b
file.
5. Chain the signed
certificate with the 2003 CA's key
Open an Internet Explorer browser and go to the 2003 server's
certificate administration page:
These need to be chained before importing the signed
certificate back into eDirectory. To do this we will use CAPI
(Internet Explorer tools). Open an Internet Explorer browser
and select Tools > Internet Options > Content >
Certificates > Import > Select the cer file and accept the
defaults making note of where it is being saved. Do the same for
the p7b file which contains the certificate chain but select the
Trusted Root Certificate Authorities location.
While still within IE locate the imported certificate (IE.,
Personal or Other People location) and doubleclick on it.
Select Certification Path. You should see that there are no
red errors on either the certificate or the CA certificate chained
to it.
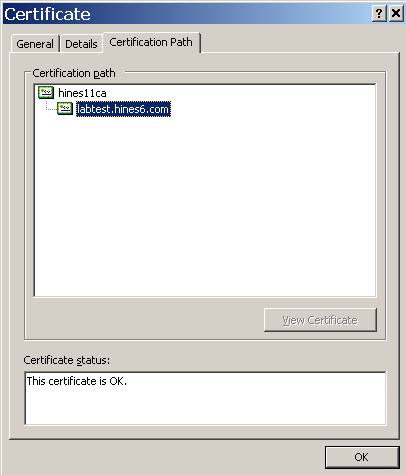
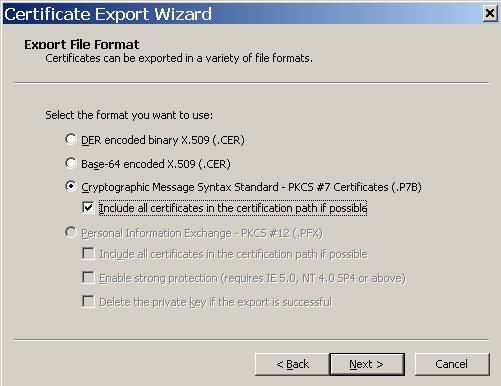
From here select Details > Copy to File > PKCS #7 and be
sure to check the box indicating to include all certificates in the
certification path.

NOTE: Alternatively, one can place the remote RootCA's public key in a Trusted Root object within a Trusted Roots container. It must be called “Default CA Certificates.Security”. This will create the chain for you.
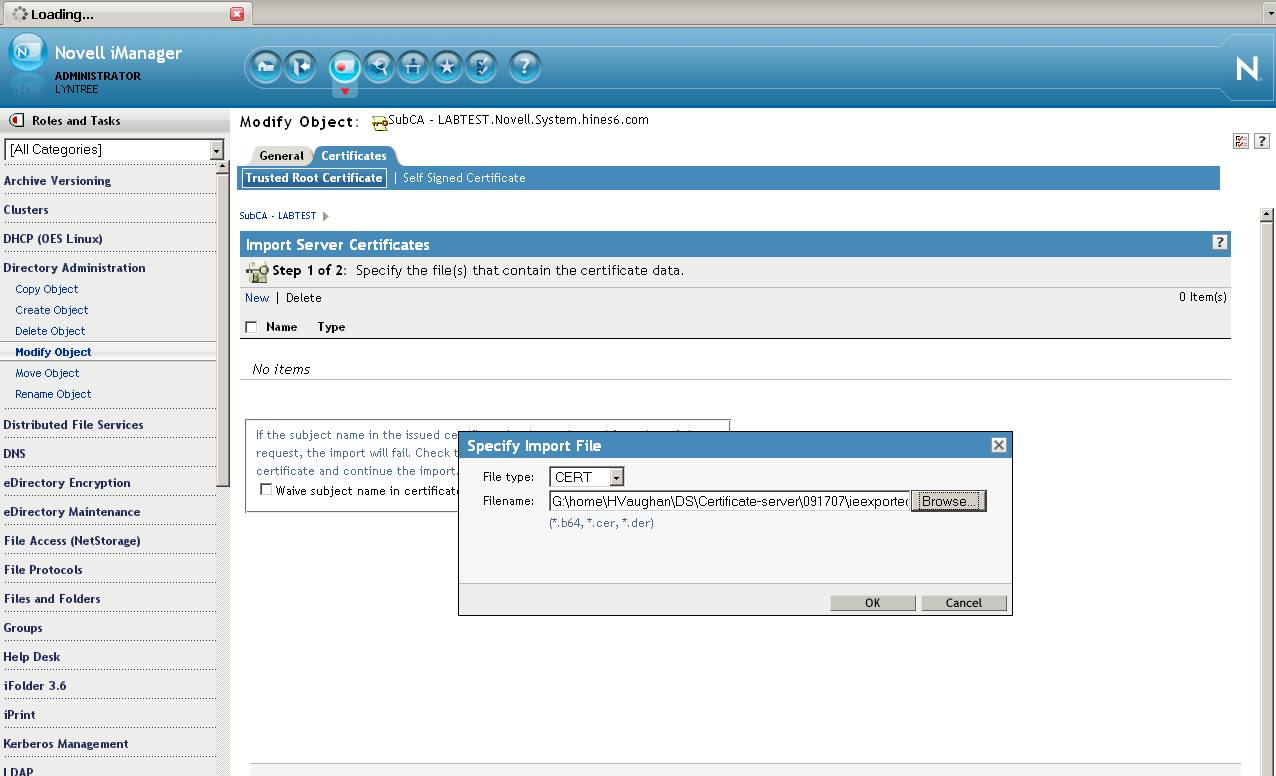
6. Import the signed
certificate with the chain into eDirectory.
In iManager from the Roles and Tasks menu in iManager , click
on Directory Administration > Modify Object > Browse to
the
object created in Step 3 which will be named after the
nickname and reside in the container that holds the CA server's NCP
server object.
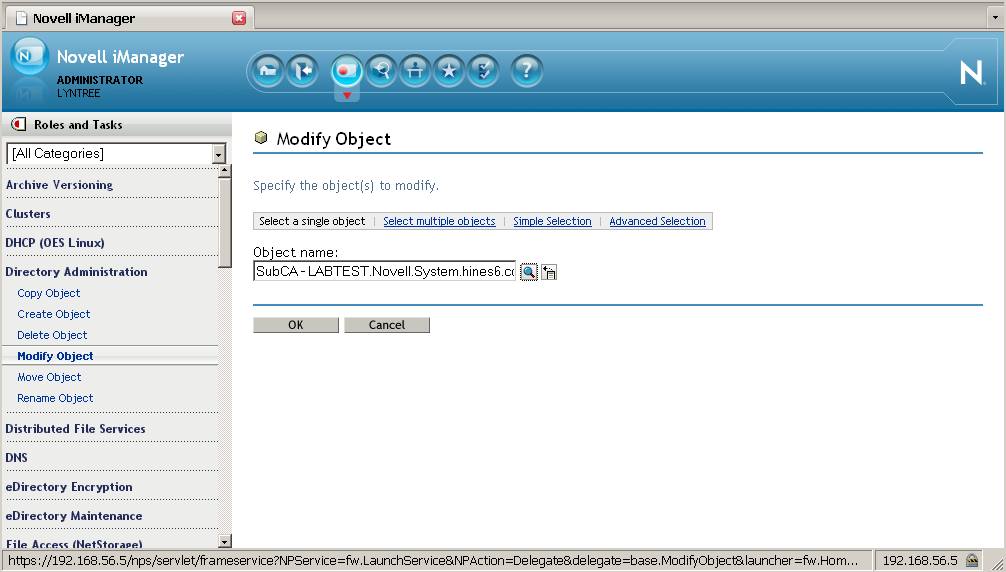
Once into the object's properties, click on the Certificates
tab > Import > Browse to the signed chained certificate p7b
file and Click on OK > Next > Finish.
7. Export the new server
certificate to a PKCS#12 file
This file will be used to create the Subordinate
Authority.
In iManager from the Roles and Tasks menu in iManager , click
on Directory Administration > Modify Object > Browse to
the
object created in Step 3 which will be named after the
nickname and reside in the container that holds the CA server's NCP
server object. Select the Certificates tab > Select the
certificate then click on export. Export the certificate
ensuring the Export Private Key and Include all certificates
checkboxes are checked. As in step one give the file a
password in order to protect the private key.
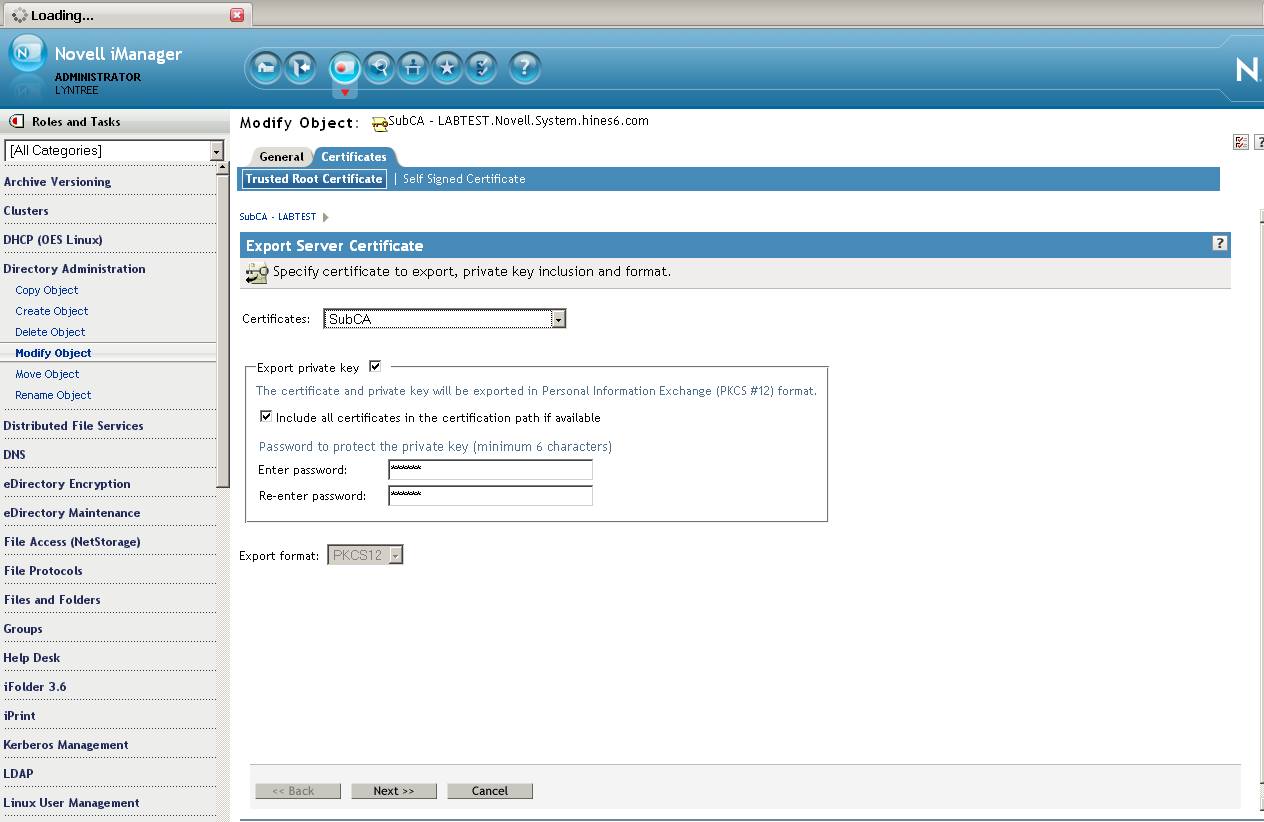
Click next and save the certificate as a pfx file.
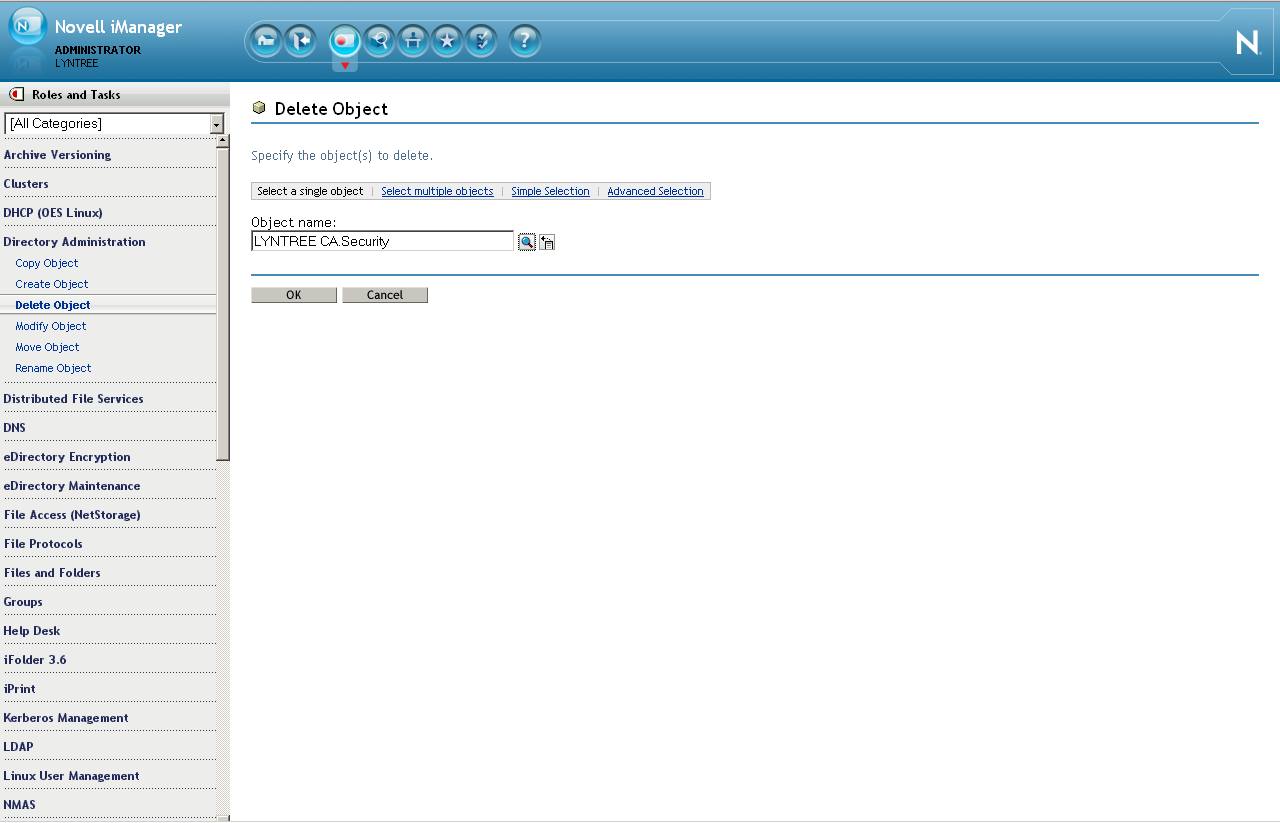
8. Delete the
Organization CA in eDirectory
Make sure all backups have taken place. The Org CA for
eDirectory will now be deleted.
In iManager from the Roles and Tasks menu in iManager , click
on Directory Administration > Delete Object > Browse to
the
Organizational CA object in the Security container. This
will be named " YOURTREENAME CA ". Click on OK.
9. Create the
Subordinate CA in eDirectory
From the Roles and Tasks menu in iManager , click Novell
Certificate Server > Configure Certificate Authority. The
plugin will detect that the CA is missing and kick off the CA
creation wizard. Browse to the CA server and make its object
name the same as the one just deleted: " YOURTREENAME CA " then for
the Creation method select Import.
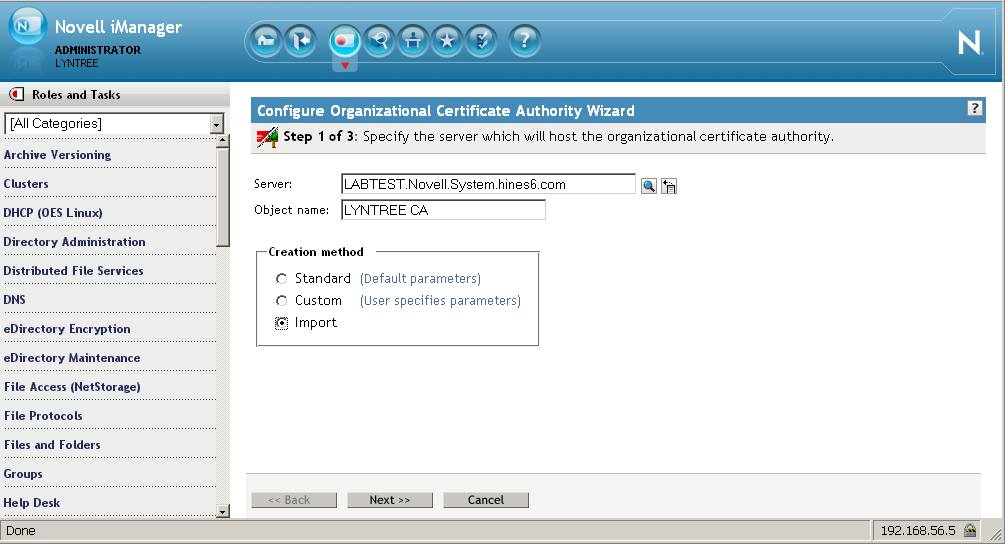
On the next screen browse to the PKCS12 file created in step 7
and input the password with which it was created.
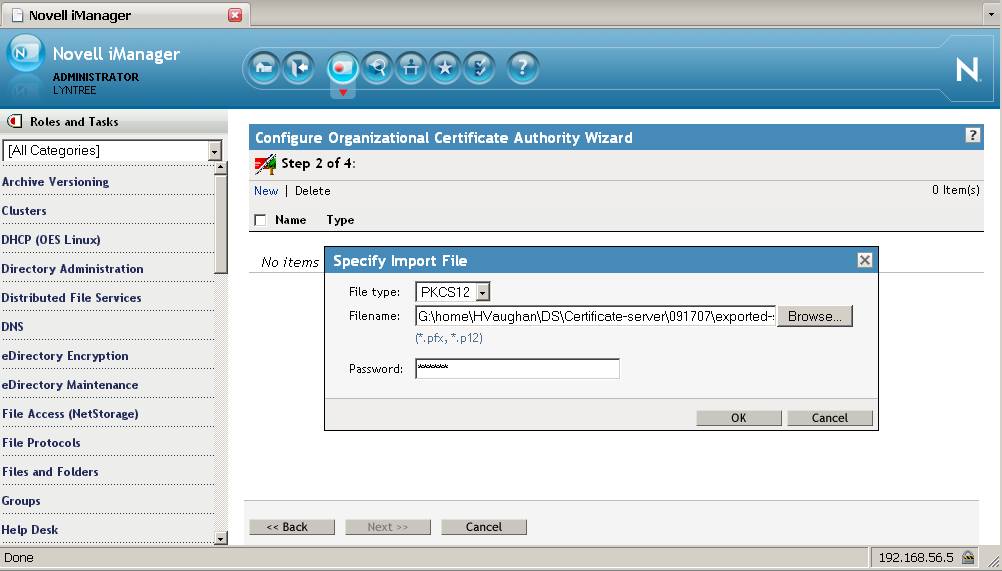
Select OK > Next > Next > Finish.
10. Create the new Server
Certificates
The eDirectory tree once again has a working CA.
However, this one is now subordinate to the 2003's CA.
Though the eDirectory server's certificates will continue to
work since they hold the entire certificate chain they should now
be replaced by certificates from the new Subordinate Authority
CA.
From the Roles and Tasks menu in iManager , click Novell
Certificate Server > Create Default Certificates > browse to
the server for whom new certificates will be created > Next >
Overwrite > Finish.

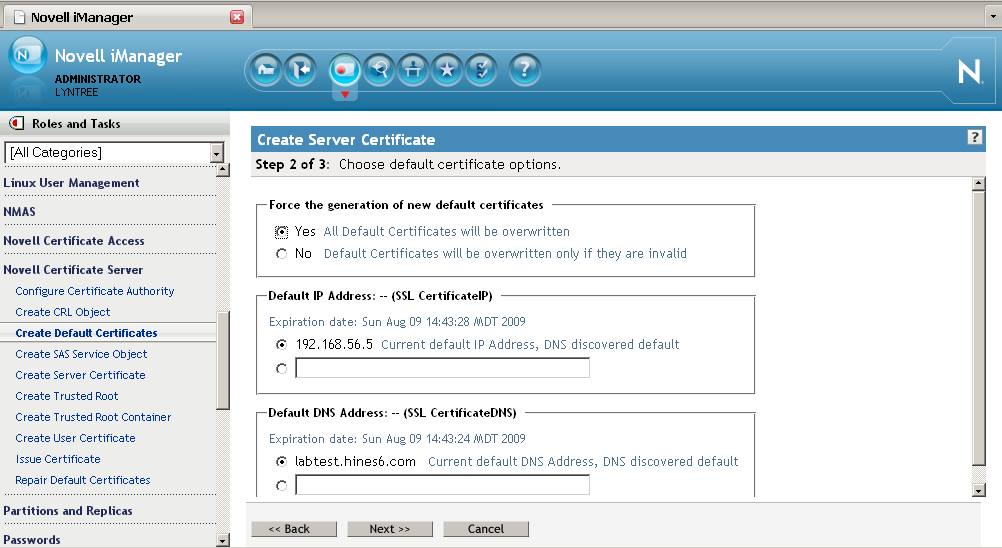
The public and private keys for the server's SSL
CertificateDNS and SSL CertificateIP kmo's will now be generated
from the New CA. These certificates can now be used by the
server's applications such as LDAP, Apache, Tomcat, etc.